
I'm confident that Photoshop can easily handle the tiny lettering and details required, but my biggest concern is whether or not my printer is capable of printing such tiny details with any sort of clarity. But first thing is first. Lets make the artwork.
This blog seems to have a few regular readers. But honestly, I maintain this blog mainly so I can remember how the heck I did things! So, in the future when I'm making decals again, here are a few things I'll want to remember: I'm using the Cannon MultiPASS F30 to scan and print. It has a resolution of 2400 x 1200 dpi. So the artwork is being made at 1000 dpi to be within that parameter. And now back to the show...
 First, I scan my reference photo of ol' #301 and import it into Photoshop. I also imported a mugshot of my model. The lettering will be extracted from the ref photo and applied onto the photo of the model. Using the "lasso" tool, I select the side of the car in the ref photo.
 I then apply the selection to the model photo. Using the "perspective" tool, I'm able to "flatten" the photo and conform it to the dimensions of the model. Now its just a matter of tracing the lettering and pin striping.
 "INBOUND PAY AS YOU ENTER. OUTBOUND PAY AS YOU LEAVE. Transfers Issued Only At Time Fare Is Paid" Fortunatly, my 8x10 glossy reference photo is detailed enough where I can make out the fine print. But we'll see if this actually makes it onto the model without being a complete blur.
 After much fussing and tinkering, I eventually get things to look about right. Everything is on different layers. So now all I have to do is turn off the layers with elements I don't need anymore and rearrange the artwork so it makes efficient use of the decal paper.
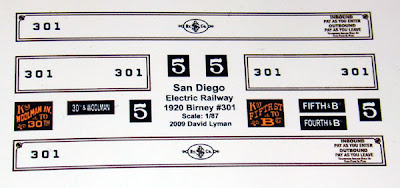
I had to make some educated guesses on some of the signs here. The ref photo only shows one end of the car, so I had to research the routes that this car took to help determine what the signs on the other end read.
 Ta-da! Wow! I am just pleased as bees at how well these turned out! And because I'm such a generous guy, clicking on the decal image above will open a big juicy copy of it so that you (yes YOU my loyal followers) can print your own decals!!! Because I know that tons of folks out there are wanting to build their own model of SDERy #301!
Except for the fancy, long out of production, and expensive ALPS printer, printers don't print white or light (as in light magenta, light cyan, light yellow or any of the variants between). Fortunately for me, my decals are black (actually dark brown) so I'm able to print right onto clear decal paper. Since my printer is an Ink Jet I used paper for an Ink Jet, which is important, Laser paper wont work in an Ink Jet printer and vice versa.
But! The route board is brown and yellow, so I have to print that onto white decal paper (or if using the clear decal paper, prepare the surface first with white before applying the decal).
After futzing with the settings on the printer...
 You know... It's funny the things that make me happy. This makes me really happy. I'm walking around with the biggest grin on my face... Success!!! These printed out beautifully!
 Look! You can even read the fine print!!! Wow. This is a big load off of my mind, I am so pleased with the results. I am just pleased as bees. Yessir! Pleased as bees!
Dandy


