Modeling Electrically Ignited Gas Lamps
When electricity came into use it wasn't used for illumination right away. Instead, electricity was used to ignite the gas lamps.
This made sense since the infrastructure for gas was already there and worked perfectly fine. Electric ignitors was a logical upgrade to this system.
Here are my 1890's street simulated gas lamps being ignited and then warming up to their operating temperature. Pretty Neat-O! That would have been a site to see for real back in the day, yes?
Here is a Gas Lamp as they appeared in San Diego in 1905.
The closest models that match the prototype I can find are these identical models by both Miniatronics and Viessmann. Not quite right, but they do capture the flavor. But they are awfully pricey. Occasionally I'll find one at a bargain price, so I'll pick it up. Eventually I had the 6 that I needed but four of them have incandescent bulbs. I'm a fan of the long lasting LED's. So my plan was to replace the incandescents with LEDs. But I made an interesting discovery about that...
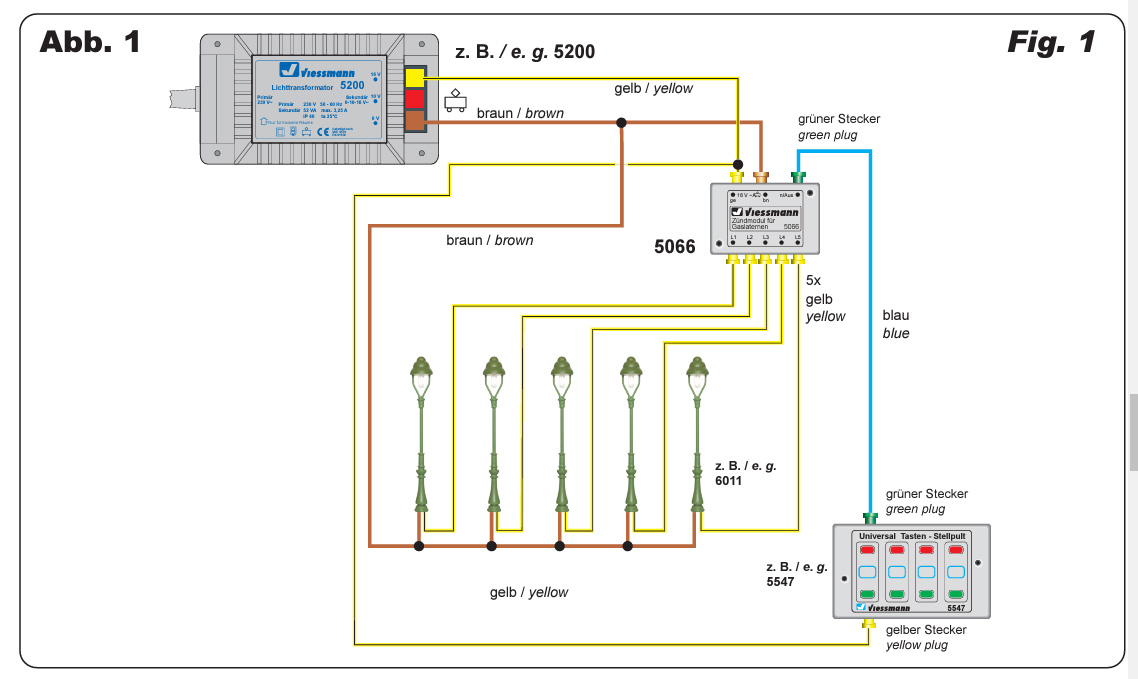
While looking around at Gas Lamp models I stumbled across this Gas Lamp Ignition simulator module (Viessmann 5066). And it will power both the incandescent and LED lamps. Well this sounds fun! So I purchased it.
And installed it under the layout. It only has 5 ports so two of my 6 lamps with have to double up. I chose the two on the extreme ends so that it will be less noticeable that they are in sync.
Nothing like wiring everything up properly just to have it fail. After going through all the trouble of trouble shooting I discovered that the wiring schematic that came with the 5066 Ignition module was incorrect. Where it showed the brown wires going to each of the 5 ports it should have been the yellow wires (as seen in the correct schematic above). Nothing going smoothly is par for course for this hobby I guess.
I decided against the Viessmann power supply (5200). It's overkill for my needs. So instead I ordered this basic 15 volt power supply.
The power connector was installed with double sided mounting tape with a cable clip to secure the wires.
Plug it in and voila! Now this is where the difference between incandescent and LEDs can be seen. Incandescent on the left and LED on the right. I'm a big proponent of LEDs but the incandescents are performing much better here. The LED is way too bright and doesn't have the range of brightness that the incandescent has. The incandescent does a great job of igniting and then glowing dim before slowly brightening as it warms up. Its final operating brightness is more realistic as well. Plus the pool of light cast by the incandescent on the building and streets is much more pleasant than that cast by the LEDs. Instructions come with the lamps on how to change the lightbulbs, so I might do that at some point.
But for now I am quite satisfied.
Yes sir!
Quite satisfied!
Dandy