Showing posts with label Display Case. Show all posts

Monday, January 05, 2015

A Brighter Year Ahead

Layout Illumination!

Getting enough light on the layout has been somewhat of a problem (shuffling a clamp-on lamp between the workbench and the layout). So this should help.

You know... I try. Despite my best efforts, I don't think this is up to code. I'm not a certified electrician, so in effort to illuminate this layout safely I simply copied how the vanity lighting in my bathroom was wired. Same wire gauge, same bulb wattage. Same splicing. Same everything, except, my valances are wooden as opposed to the metal vanity lighting housing. So apparently I have violated the "Splices outside of a Junction Box" rule. As well as others I'm sure. I have some exposed wires that need to be tucked into a conduit as well as install some cable clamps.

So, some more work remains to be done.

Other than that though, I'm feeling quite accomplished. I make light where there were none before! And its all looking like a rather authentic streetcar interior.


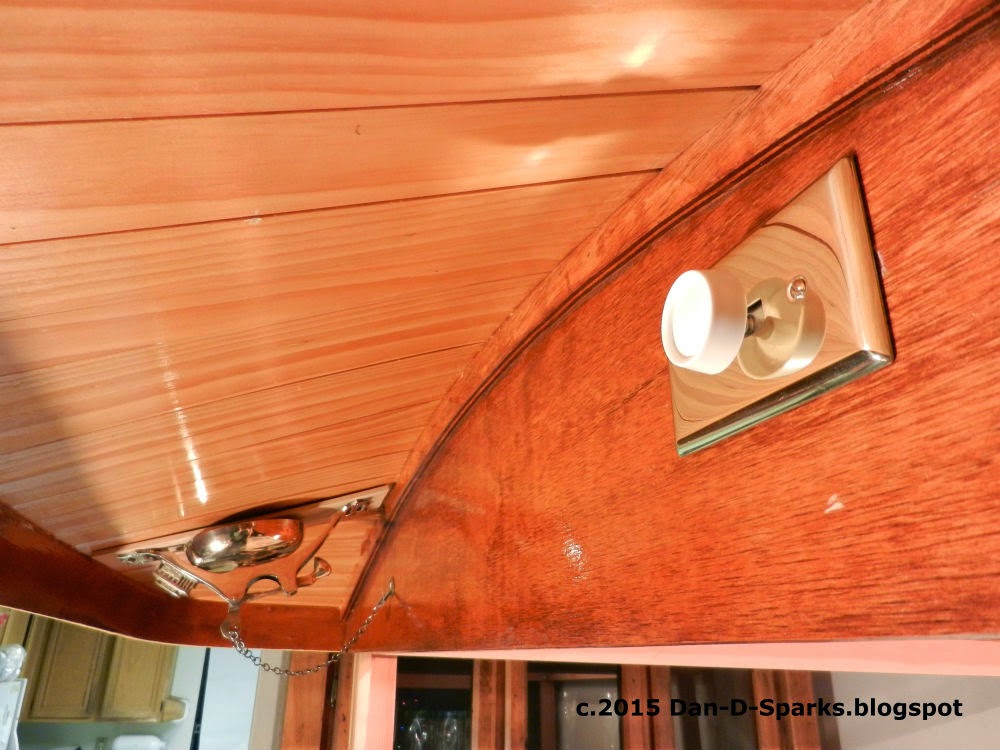
The lights are controlled with this dimmer switch in the same shiny brass as the conductors bell. The control panel will eventually be build below here, so everything will be within reach.

This scene is shot with just the canopy lights illuminating the scene. Looks like an overcast day. San Diego spends half its time in overcast days anyway so, we're good.

Yes sir! We're good!

Dandy

Monday, December 29, 2014

Ringing In The New Year!

Because A Good Traction Layout Should Have A Conductors Bell.


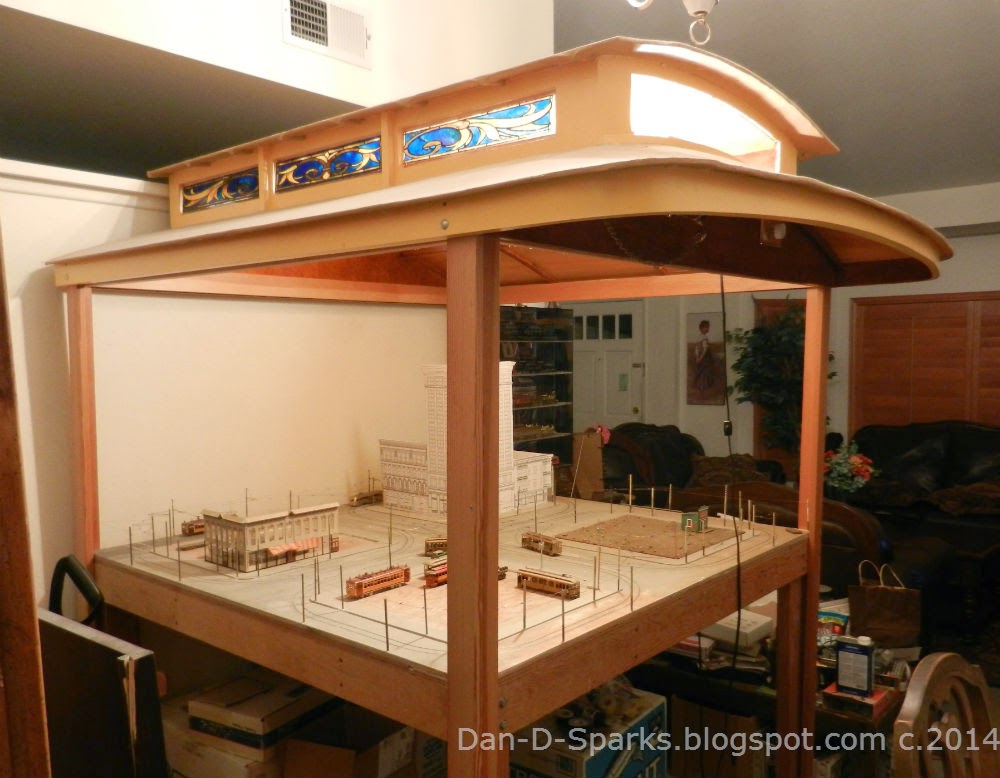
As you may or may not remember, the layout is housed in a protective canopy to keep off dust and household critters and provide layout specific lighting. It's been a lot of work to build when it occurred to me that the layout was unproven and if the intersection didn't work right then I'm wasting time and money building a useless canopy for it. Well, the layout has since proven itself and so I have decided to resume work on it.


Since the canopy has a remarkable resemblance to a trolley car, I thought it would be rather nifty to add a conductors bell to it. And it just so happens that many, many years ago, my wife and I took a trip to San Francisco where I managed to pick up a full sized souvenir brass cable car conductors bell. And wouldn't you know, its a perfect fit!

A length of leather cord was procured from the local fabric store to use as the pull cord. Brass eye-bolts installed to support it and its tied off at the end with an authentic bowline knot (Boy Scouting paying off there).

The fabric store also had these grommets that I thought would be a good way to thread the cord from the "main compartment" to the "motorman's compartment".


So there we go! We've established a means of communication between the conductor and motorman on this layout. Because you know, communication is important on a small home layout. 

And now for some real bell ringing, here is the 2013 San Francisco Cable Car Bell Ringing Champ:


Ding Ding! Yes sir! Ding Ding!

Dandy

Sunday, January 01, 2012

2012 State of the Layout Address

Happy New Year Folks! 2012 is going to be a gang busters year I just know it! Yes sir! A gang busters year! I have some new projects ready to start as well as finishing up old projects, as I resolve this year to be my most productive year yet! So bring it on!

State of the Layout:
This is how things stand at this moment, January 1st 2012:

SD&SE Ry #107 Niles Car. During this holiday season I added the finishing details. This car is 98% DONE!  I'll post more about that in the coming weeks.

SDERy Birney #103 has been making regular runs on the Southern California Traction Clubs layout. The car with its BullAnt mechanism performs beautifully even through rough, intricate trackage. The car was declared 100% finished until Fred Gurzeler presented me with some beautiful, delicately built fenders for the underbody that I have yet to install. This car will be an important representative of 4 wheeled equipment when I start fine tuning the track and stringing overhead on my layout, hopefully soon this year. Yes sir! Hopefully soon this year!

SD&SE Ry #105 Niles Car is listing to one side! That's not good. Leaning like that causes the trolley pole to be off center and so has to reach over to the overhead. Which means the shoe is contacting the overhead at an angle. Which means dewirements are frequent.  I can't figure out why its listing but I do know how to fix it thanks again the invaluable Fred Gurzeler. He gave me some hardware that replaces the tiny Hollywood foundry screws that attach the trucks to the body. The listing isn't the fault of the Hollywood Foundry equipment but this swapping of hardware will probably fix the problem. When that's done, the car is ready for super-detailing.

 
Point Loma RR #109 / #402: I've been referring to this car as #109, but the prototype was later repainted and renumbered to #402. The paint scheme of #402 is the one I'm modeling so this car will be referred to as #402 from here on out. Progress has stalled on this car because this car requires some custom printed decals since the lettering and striping include silver. I don't have the funds for that right now and so concentrated funds on getting #105 and #107 done. They will represent big interurbans when I'm fine tuning the track and stringing overhead on my layout.

The Layout is in a state all right. A state of chaos!  The layout has suffered. From the destruction of its overhead by rambunctious kittens, to dust, to over a decade of storage, and the trial and errors of learning how to build a traction layout. So it was stripped down to just the track and streets and is ready to be rebuilt stronger, better. A canopy (what I was originally been referring to in this blog as a valence) designed to look like a streetcar deck roof, has been built to keep dust off the layout and to house the layouts lighting. It features faux stained glass clerestory windows and a brass conductors bell. I recently covered the wooden roof with a waterproof paper mache to simulate canvas covering. Sides will be installed to insulate the layout from the inhospitable world of dirt and varmints and anything else that could cause damage and grief! 

Then and only then can I start stringing the overhead again. This time tailored to a sample of each type of rolling stock that's going to be running on this layout. Which brings me to my next project...

San Diego Electric Railway Class 5, 400 series car. This project will be built from a 1970s brass import by Pacific Traction and feature the new Diablo mechanism from Hollywood Foundry.

Dandy Blog. As you can see, this blog is sporting a new 1920s look to it and features an art deco portrait of the man himself, ol' Sparky along with one of the 400 series cars. The new "Module Spotlight" feature has been met with happy comments and so will continue. Bloggin' along. Yes sir! Bloggin' along.

So that's where it all stands. As you can see I got my work cut out for me. One more car to go and then I can concentrate on getting the layout running. Yes sir! Concentrate on getting the layout running!

Dandy


Wednesday, May 12, 2010

Valence Project ~ Light Fixtures

Hey! You know what this lighting valence needs? How about some lights!

I have been puzzling for some time now with how exactly I was going to install lights into this thing. I mean, lights are one of the major reasons for building this lighting valence in the first place after all.
One major stumbling block is that I'm not a certified electrician. The highest voltages I have ever dealt with is about 15VDC, you know, model railroad motors and whatnot. So its with some intrepidation that I design and build a 110V layout lighting system.

I'm interested in using the round bulbs that were popular with the old wooden streetcars and carousels during the early 20th century. But my walls and ceiling don't have space for wiring inside because, well, there isn't any inside. Just 1/2" plywood at best. I looked into using white, round bulbed Christmas lights. Just attach them to the ceiling and plug them in. Easy enough. But it just lacks that elegance I'm looking for. So I looked at how they were constructed and then headed off to the store to see what I could find.

 After MacGyvering my way through various home improvement stores, this is what I have come up with.

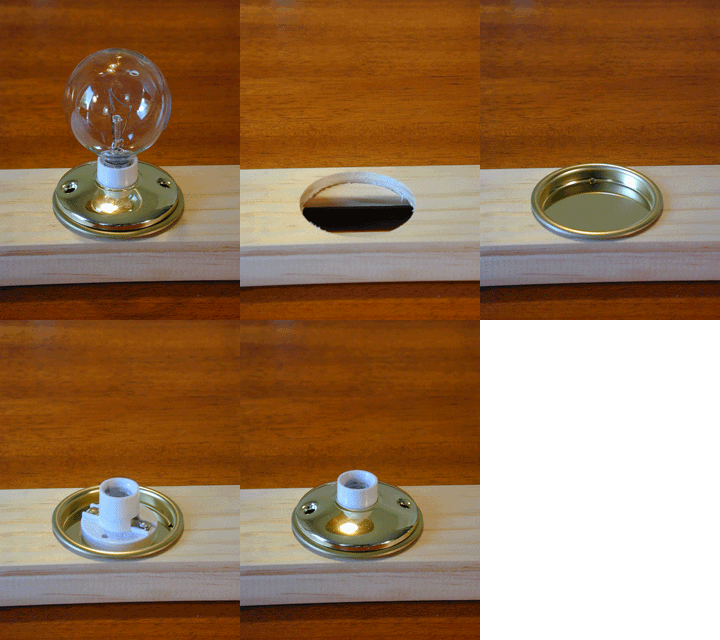
 I found a plastic candelabra cleat and the round bulbs that come in the candelabra size which is about the right size for this project. But the wiring is exposed, which doesn't seem like a good idea to me. So mounting the cleat directly to the valence out. I need some sort of housing for the cleat.

 A brass doorknob back plate! Looks like the stem of the cleat will slip right through the hole. But it didn't. I had to grind off about 1/16" with the Dremel tool. Then to close off the bottom... a sliding wardrobe door  brass pull! And here is how it all went together all nice and neat:

1. Wardrobe door pull. 2. Candelabra cleat. 3. Doorknob Back Plate. 4. Bulb.

The base is constructed of 2.5"x.25" trim wood and .75"x.75" angle trim from the moulding dept.

Then a hole was drilled to accommodate the light fixture.
Here is the completed lighting assemblies. The spacing of the bulbs coincide with the clerestory windows. Now all that's needed is wood treatment, staining and varnishing. And...


Wow! You would think I knew what I was doing or something. Now all that"s left is somehow wiring all this up in a safe and appealing way. But so far its looking just fine. Sure beats Christmas lights. Yes sir! Sure beats Christmas lights!

Dandy

Monday, April 19, 2010

Valence Project ~ Staining and Varnishing

You know, its funny. I started the Birney Project as a diversion from the ongoing lighting and anti-dust (and anti-cat) valence project. But that was so long ago now, and the Birney project has been so ongoing that working on the valence is now a divergence from working on the Birney!

So this is where I left off. With the major woodworking done, its now time to stain and varnish the inside.

Remember that this blog is not a "how-to" but rather a "how-I-did-it". Which isn't necessarily the best way. As it turns out, since I'm using a two-tone color scheme, the wood should have been stained ahead of construction. Masking doesn't work when it comes to staining. The masking tape will actually draw in the stain underneath it. And as you can see, I have quite a few spots where that happened. But overall it looks all right, doesn't it?

For the stain I used an oil based. Oils are harder to work with, but the results are so much nicer. For the main color I used "Natural", a stain that brings out the natural color of the wood. And for the trim I used "Golden Mahogany". Mainly because Mahogany was used as the trim for the old San Diego streetcars. Over all I'm pleased with the results. This valence is getting that elegant look I'm looking for. Yes sir! Quite elegant indeed!

Dandy

Friday, May 09, 2008

Glass Beading

Man! All the little details that need to be taken care of! Now I’m installing beading for the clerestory window glass. Though I’ll probably use Plexiglas, since this thing is designed to be portable, I don’t want to risk shattering glass from all the handling. I never gave the mechanics of window beading a thought until now. It fun, but time consuming, yes-sir! Time consuming!


While I’m building that, take a look at a trip I did with my family on a Mud Wagon. You can read all about it on my A California Adventure blog.


Monday, April 21, 2008

Yet More Fun With Engineering!

With principal construction done with the valence it’s now time to trim it out, hide a multitude of sins with wood filler, trim the roof slats in the front to a nice arc, and a bunch more sanding.
While taking these photos I noticed that the curved roof slats are pulling up the front of the frame! Compare this photo with this earlier one of just the frame and you’ll see what I mean.

Luckily, it’s not so noticeable when it’s in place on the display case. It’s actually a nice arch. In fact, it almost looks intentional. Yes-sir! Looks intentional!

Dandy

Monday, April 07, 2008

More Fun with Engineering!

It's too late for me, but you can still save yourself! That is if your reading this to learn how to bend wood. See, the problem I was having was, even though I was steaming the wood, it would rather just angle towards where I was trying to get it to go instead of bend in a nice arc to where I wanted it to go. As you can see in the photo below, the roof slat is almost straight. Not the curving arc as seen in the blueprints.


In this close up shot below, you can see where the roof slat would rather break its bonds and bite into the support its attached to.


I figured out a solution, but unfortunately, it wasn't until the last slat. Turns out that cutting the slats to length before installing them was the problem. The secret is to keep them long and cut them to size after installation! First, The slat is nailed and glued to its support beam. This is allowed to dry over night.


Then, using the natural springiness of the wood, grab the end of the slat and bend it down. The longer the wood slat, the more it arcs when its end is pulled down(the shorter the wood, the less it arcs)! All this without steaming it! I couldn't pull it down too much because it would arch way more than its neighbors and be out of line.


Too bad I didn't figure this out sooner. Oh well... live and learn. Yes sir. Live and learn.

Sunday, March 30, 2008

Fun with engineering!

Here is a quick update on the continuing saga of building this lighting valance. I ran into an interesting, unforeseen engineering problem (due entirely to my inexperience). Let’s see if I can explain this...

While installing the front roof slats (starting from the center and working towards the sides), that extend from the front of the clearstory and curve down to the very front of the valence, I discovered that they were fanning out in the front.

I think I know why this is happening. The big arch of the roof requires the roof slats to cover more “ground”. You can see what I mean in the front view photo. The front edge of the roof slats are only required to cover the horizontal distance from side to side. But the back ends of the roof slats are required to not only cover that side to side distance, but also the vertical distance of the arch which, at its peak, is 6” higher than the sides.

So what that boils down to is; the fronts of the roof slats have to cover the 57” from one side to the other side. The back end of the slats that are butted up against the clearstory have to cover 59 ½”, another 2 1/2” further.

Fortunately I was using a square the whole time. So I thought the slats were moving slightly while I was nailing, so I would compensate with a slight gap at the top to keep things square. But the problem persisted until I finally figured out what was going on.

I guess what I should have been doing all along is sanding a slight taper to the roof slats to compensate for this. And that’s exactly what I started doing with the slats that extend clear across the roof. In the last photo you can see that the first full length slat took the brunt of the tapering. After that each full length slat was sanded with a more reasonable taper.

So all I’m saying is, things are turning out a little less than perfect. But really, who the heck is going to notice? Not many. Everybody’s attention should be focused on the layout anyway. After all, the layout is the real attraction. yessir! The real attraction!

Tuesday, January 15, 2008

Clearstory Frame Assembly

Furniture grade plywood is nice stuff. Costing about twice as much as regular plywood, it has a nice smooth sanded finish to it. Since the layout is residing in our dining room at the moment, it should look really nice. So I sprung for the furniture grade plywood.

After sifting through their entire stack of 4’ x 8’ plywood, selecting their finest piece, I dragged it over to their saw for cutting. Before I even showed up to the lumberyard, I carefully planned out how to cut the 4’ x 8’ sheet most efficiently so that I ended up with two profile boards for the ends and two strips for the clearstory windows. The lumberyard only does rough cuts, the contouring I’ll do at home with my jigsaw.

If you look closely at the top piece of wood (as Thunder dog is doing) you can see how I drew out the final shape of the contour boards. Below it is the contour board cut out.

The kid at the lumberyard did a lousy job cutting the clearstory strips, they went from 3 ½” wide at one end to 4” wide at the other end, a mistake I didn’t catch until I got home. An unfixable mistake. But I can’t return the whole thing ‘cuz I already have the contour boards cut out. But, the plywood does seem a little too flimsy to me for this framing, so I decided instead to construct the clearstory windows from 1 ½” x ¾” “sustainably managed tree-farmed select pine”! This is some strong, beautiful wood. And it’s available at your local do-it-yourself lumberyard.

Hey! Things are shaping up. Look at that, its looking like it’s supposed to. The clearstory widows were attached to the profile boards, and then the profile boards were attached to the outside frame. All that’s left to do is to start nailing on the roof.

But first, I have bevel the outside frame so that the curved roof will conform to it. And then the whole thing needs to be sanded smooth. So... I better get to sanding. Yessir... better get to sanding.

Sunday, January 06, 2008

The Adventure of Bending Wood

Well this is a first. My blog is falling behind my progress. You would think I was being productive or something! So in an attempt to get caught up...


I bent wood! I am man! Me bend wood. How many guys do you know that have bent wood? I am wood bender.


Okay, I actually found bending wood to be quite stressful. But I'm getting ahead of myself.


First of all, I had to build a jig to bend the wood on. I started by drawing the shape of the rounded roof end onto a piece of plywood.


Then I pounded in big 'ol nails (I forget what size) following that line so that most of the nail was sticking out of the plywood. The plywood is about 3/8ths inches thick, so thats how far I pounded in the nails. A good 2” or so of nail was left sticking out. These are whats going to take the brunt of the force needed to bend the wood.

The nails are going to leave dents in the wood so what I did was, take a length of scrap 1/8th luan and bent that first. This will give the good lumber a smooth surface to be bent on. The luan will take the brunt of the nails. So actually, the very first wood I ever bent was used as a tool and will be scrap after I'm done.


I let the first 1/4” pine steam for about an hour. I sent a whole kettle of water through that steaming rig!


My idea is instead of trying to bend a 3/4” piece, I'm going to laminate 3 pieces of 1/4” together to make a 3/4” end, bending one over the other. And to help make it strong, I'm offsetting the joints so they all don't line up.


The first piece is a tough one since it curves over the left and right corners. So in other words, it requires two bends! The curve on the left side went perfectly, I was stoked! But I don't know if the wood cooled or what because the curve around the right side didn't go as well. It curved all right but the stress caused the wood to begin to splinter as you can see in the last photo.


Sequent bends had degrees of success, from bending just fine to an all out snap! in half. Thats disheartening to steam the wood for an hour just to have it snap. And then its off the lumber yard for a replacement and start all over again.


I think the trick is, take your time and bend the wood slowly, don't muscle it. Become one with the wood. Let the fibers stretch naturally around the curve at its own pace. Yes, thats the ticket. Feel the sensation of the wood giving way, it will let you know if its going too fast. Yes. Ahhh.


To tell you the truth, I'm glad thats over. Yes the wood bent, but it's less than perfect. The laminated pieces don't line up perfectly, but with a little filler in the spaces, I don't think anyone will notice. The front edge visible to everyone is a beautiful curve, and thats what matters, right?


Next, it's off to the lumber yard for some furniture grade plywood. Yessir! Furniture grade plywood!


Thursday, November 15, 2007

Steaming Rig

The success of building a lighting valence in the configuration of a clerestory roof seems to be hinging on a big “if”. The roof curves from the front to the sides. And building this will require bending wood! The success of the valance hinges on if I can bend wood. Bend wood! Geez, that like goes against nature, bending wood.


I looked around the net and found some cool how-to videos on bending wood using steam. They're amazing. Oh I gotta bend wood. How cool would that be!


Roaming around a home improvement warehouse, I was able to MacGyver together an inexpensive steaming rig. I found some 3” flexible tubing that has a wide enough diameter to accept the 2” lumber that I'm going to need to bend.


Somehow, I need to attach that tubing to a big 'ol kettle that I will be using to boil water with on my stove. What I found was a roof jack. Roof jacks are used for rooftop vents. They have a flat base with a pipe coming off it. Because they are made for the pitched roof of a house, the pipe comes off the base at an angle. So when I lay the base over the kettle the pipe will angle away from the stove. That pipe has a 3”diameter, same as the tubing!


The tubing section had all sorts of attachments for these tubes, one of them being an insert to attach these tubes together. It fits perfectly in the roof jack pipe and the tubing, connecting them together.


Then I duct taped the heck out of the whole thing the keep it together and help keep the steam from leaking out.


Here you can see the kettle on the stove with the roof jack covering it. The black flexible tubing is attached to the roof jack with duct tape.


From the stove the tubing lays on a plank supported with a ladder.


Ah, look at it steam!

I went back to the store and got this cap that has a couple of holes drilled in it to try to keep more steam in the tube


In this shot you can see the 1/4” x 2” lumber inside getting steamed. The rule of thumb is about 20 minutes steaming per 1” thickness, but I ended up steaming them for a lot longer.


Next comes time to actually bend the wood, keep your fingers crossed! Yessir! Keep your fingers crossed!