Read the Free Trolleyville Times Monthly for the Latest News on Prototype and Model Traction!

Monday, November 21, 2011

Niles Project ~ The Cheap Seats. And the Expensive Ones Too.

Here come the paying passengers! Filling #107 with folks.

Funny that Preiser folks are pricey. Pricey Preiser. But truth is, Preiser offers some outstanding figures. Best on the market if you ask me. So I really like using them in my modeling. But averaging over $3 per folk and rising, and each Niles car requiring around 25 figures each, well I'm going to place them strategically.

The Preiser site has cool photos of models modeling for the figure modeler modeling figures. (as an interresting side note, Germans make a distinction between human "models" and miniature "modelles"). Check it out.


Not only are Preiser figures well done, they are also available in era specific costume. So I picked up their 1900 era figures for the 1908 vintage Niles trolleys. Here is #12136 Seated Persons (above, with parasols removed),


#12137 Seated Persons, (I don't know what I'm going to do with that cat.).

#12190 Seated Passengers, (my favorite. I think these are very nicely done).


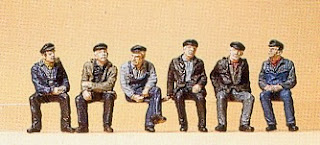
#10351 Seated Industrial Workers. (The working class ride the trolley too).


#12191 Railway Personnel.(remove the shovels and we got our trolley crew).


Woodland Scenics (#A1908 Sixteen Passengers) on the other hand, aren't quite as sophisticated as Preisers, but they are full of character and somewhat "generic" enough that they can fit many eras. Considering that the closest we ever get to HO models is about a scale block away,  Woodland Scenic folks will work just fine. Especially at a third of the cost of Preisers, Woodland Scenics figures average about $1.25 per folk.

So here is the plan. The Niles cars are "California Cars" which means they have a glassed in center section and open air sections on the ends. So...

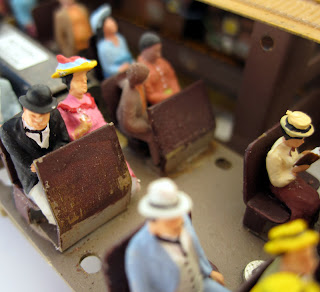
 The pricey Preicer figures will adorn the open end sections where they are more easily seen and appreciated, and the Woodland Scenic characters will ride in the enclosed center section behind the glass windows. The figures are glued in with good ol' Micro Kristal Kleer because of its rubbery characteristics. If a figure is accidentally bumped, its less likely to snap off.

Some of the seats couldn't be filled because of mountings for the motor and shell. But I did manage to fit 24 figures in there! 25 if you count the double figure of a man with a child on his lap.

This is where the bulkhead of the shell attaches to the floor. So only the seat backs are present.

Figures add so much to model. Look how much life is in that populated car! You'd think the line was turning a profit. Yes sir! Turning a profit!

Have a Happy Thanksgiving Folks!
Dandy

Monday, November 07, 2011

Module Spotlight ~ New Series!

A new series that will feature an in depth look at each module of the Southern California Traction Clubs (SCTC) HO scale modular layout.

My reasons for this are twofold. First, the SCTC modular layout is always a favorite at the train shows. So I thought I would share it with yous guys who don't live in our displaying area. Secondly, I'm an itchin' to build some modules for the SCTC layout. So I'm studying the intricacies of the clubs modules that mine would fit in with. So I might as well share that information with you guys.


The Southern California Traction Club
One of the outstanding features of the SCTC modular layout is that all the modules are designed to blend seamlessly from one module to the next. Some modular clubs claim that they never set up their layout the same way twice. Which is fine for variety. But what happens is that they end up with a mix and match look. Such as an authentic SoCal citrus packing scene situated next to a module featuring Dracula's castle with dragons. The SCTC on the other hand sets up their modules the same way every time. It is in essence a portable permanent layout. The modules are set up in a rectangle shape. Each side of the rectangle is "zoned". That is, we basically have the City side, Suburban side, Industrial side, and Country side of the layout. The individual modules are detailed according to what side they are situated in. And it is these modules that I thought I would showcase here.

The SCTC layout is themed as Anytown USA set about mid 20th century. And despite the layouts custom look, practically all of the models are built from kits with occasional kitbashing where needed. Very little in the way of scratch building. I don't know if its a club policy to use only commercially available kits (I'm sure its not, its more about practicality), but it goes a long way with promoting the hobby. When visitors see the level of authenticity achieved with just store bought models, well the hobby feels more accessible to them and they leave fired up about building their own layouts at home.


The track and overhead on the other hand are a different matter. They are very custom built. The track less so than the overhead. But the truth is, Traction Modeling is not for the entry level modeler. The beginner needs to cut his teeth and be comfortable with two rail railroading before adding the additional pain-in-the-aspirations of building and maintaining overhead. Fortunately, with the rise of the internet we have many resources available to aid us in building traction layouts. Websites such as Trolleyville, web groups such as HO Traction Modeling, HO Electric Traction Modeling, and Interurbans. Various blogs such as this one and organizations such as East Penn Traction Club, and of course, The Southern California Traction Club are each doing their part to advance this fascinating facet of the hobby.


So if you ever wondered what goes into building traction modules then stay tuned as I examine, analyze, and discuss each module and then hopefully build some of my own modules. Yes sir! Build some of my own traction modules!

Dandy