Read the Free Trolleyville Times Monthly for the Latest News on Prototype and Model Traction!

Wednesday, December 22, 2010

Inaugural Run of Birney #301.

SDERy Birney #301 makes it first public run!

The Southern California Traction Club set up its modules at the Great Train Expo this last weekend at the Fairplex in Pomona. I took the opportunity to fine tune #301 and was able to get it to run perfectly on the modules. It ran trouble free for hours. And of course I took plenty of video to share with you!:


The BullAnt motor is kind of noisy in this video but really its not that bad. To be fair, Hollywood Foundry who manufactures the BullAnt offered to replace it with their new and improved belt driven extra quiet BullAnt drive, an offer I hope that isn't too late for me to take them up on!

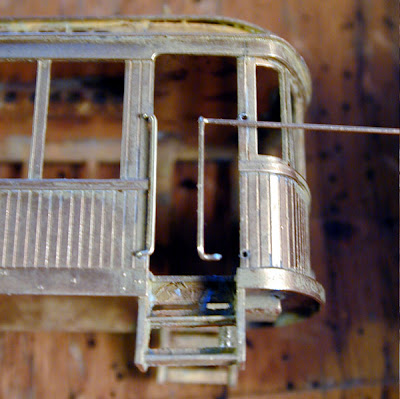
Because Birneys are a rather diminutive car, the Miniature By Eric trolley poles proved to be not quite long enough to reach the overhead. So one was swapped out with a rebuilt Bowser pole. In the video you can see how the new pole really presses against the overhead for good electrical contact. I'll post in the near future how to rebuild trolley poles.

So after all this time, it was quite satisfying to finally see this little guy make laps around the layout. Yes sir! Quite satisfying indeed!

Dandy

Monday, December 06, 2010

Niles Project ~ Applying Decals to #107

Now that the decals are made, I'm going to try a different technique of applying the decals so as to help them settle more easily into the wood slats.


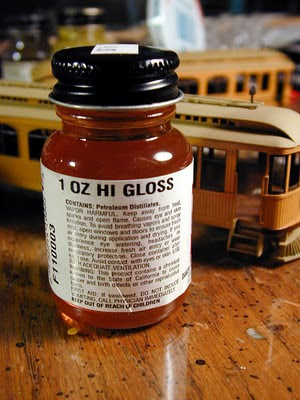
Remember, decals have to be applied onto glossy surfaces. Since I painted #107 with Floquil paints, which dry dead flat, a coat of gloss has to be sprayed on to where the decals are going to go. AND the decals need to be sealed as well. So while I have the gloss in the airbrush, I'll coat the decals with it as well.


Okay, Floquil Hi Gloss has been applied to the decals and #107. While they dry let me recap the decaling of #105...

With #105 the decals didn't want to settle into the deep wood slats. Eventually, the parts of the decal with air under it will dry out and flake off. So I'll probably loose that part of the "5", and the 3D drop shadow of the "0", and the rose buds on the corner flourish of the pin stripping, etc.  So after discussing the matter with Don Ball, it was concluded that it was difficult for the air to escape from under the vast expanse of the decal paper. So he suggested cutting the decals closer to the printing:


With a new, sharp eXacto blade, I cut out the negative areas of the decals that didn't contain any printing. But while applying the decals, I had a horrible problems with the decals curling! I wasn't able to get any photos since I was frantically trying to get the decals to lay down flat and straight before they set. Some decals got so distorted that I had to scrape them off and print new ones. Now its quite possible that this happened because the decal paper I used is over a year old. Fresh paper might behave better, but I don't know for sure. But I'll be sure to start with fresh decal paper next time since decal paper doesn't cost and arm or a leg.


Decaled and sealed with Dull Cote. Over all it looks good! But under closer inspection, the pinstripes are a bit wiggly, air bubbles can be seen here and there, and the edges of the decals are visible. Hopefully, some of these imperfections will be hidden by a bit of weathering. But over all, its looking good. Yes sir! Looking good!

Dandy

Monday, November 08, 2010

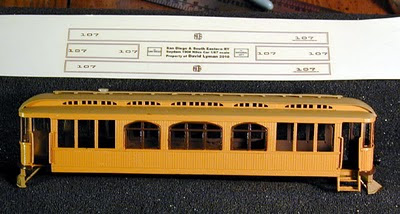
Niles Project ~ Decals for #107

As typical of railroad companies in the early 20th century, the San Diego & South Eastern Railway lettering and striping scheme became more simplified.

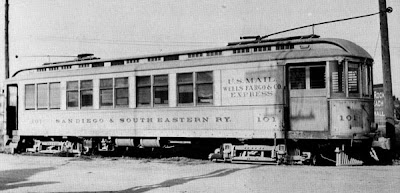
This photo of #105 was used to determine the lettering scheme for my model of #107, since the number #105 i'm using for the combine.

Gone are the embellishment in the corners of the pin striping, and gone are the 3D lettering with drop shadows as found with the earlier Niles cars lettering scheme. The result is a rather smart looking interurban. The spelling out of "San Diego & South Eastern" has been replaced by an interlocking monogram which I tried to magnify as greatly as possible (so great that the printing dot matrix is the limiting factor) :

Here is the monogram as seen in the center of the car greatly magnified. Spending quite a bit of time studying this monogram I have determined that it has to be the initials of the San Diego & South Eastern Ry (the photo is identified as San Diego Southern Ry). The two "S"'s are clearly visible. The "E" is readily discernible as well, though I'm not sure how it interrelates with the second "S". But the "D", is it backwards? The blob at the top center between the "D" and the "E" does have the general shape of an ampersand. And the blob at the bottom center is the right size for a "RY". So here is my interpretation of this monogram:
What do you think? Looks about right? I hope so, it was a lot of work. I'm not too concerned about it though, its so tiny in HO scale that it'll just end up looking like the fuzzy prototype picture anyway.

It also appears that the spelling out of the railways name occurs underneath the cars number. The overall shape of the fuzzy streak in the photo is about the right proportion for it. I can't imagine what else it would say otherwise.

And here is my interpretation of that as well. Looks about right? I settled on mahogany brown for the lettering and striping. Seems like the logical choice.

The finished decals. I did a test print and found that despite careful measuring, the proportions are off a bit (I ran into that with #105 as well), so adjustments will have to be made when I actually print onto decal paper. Otherwise, were good to go, yes sir! We're good to go!

Dandy

Monday, October 25, 2010

Birney Project ~ Test Run

Birney #301 takes a test spin around the Southern California Traction Clubs test track.

Wow! I'm really late with posting this! I apologize. Took the Birney for a spin around the test track and it performed as expected. A little noisy though, club members ( having the bull session in the background) thought I was making margaritas or something.


Hollywood Foundry is now making the BullAnt with a belt drive, so the mechanism is really quiet now.

I can't wait for the next set-up of the clubs layout so this little guy can ply its trade on the streets of the big city. Yes Sir! Ply its trade!

Dandy

Monday, October 18, 2010

HO Scale Vacuum Track Cleaning Car

This Russian traction modeler built a car for vacuuming his track!


I'm not to the point of needing one for my layout yet, so I'm posting this video here so when the time comes I'll have this as reference. Because this car is just so darn nifty! Yes sir! Darn nifty!

Dandy

Sunday, October 10, 2010

Niles Project ~ Doing the Dirty Work

Weathering #105 to give it the appearance of a hard working interurban.

San Diego cars were a grimy lot. Look at this photo of #101. Its a dirty dirty trolley! The Wells Fargo panel looks to be recently painted (new express contract?), so its clean. but the sides and window posts are down right grungy. I suppose it would be difficult to keep a wooden car that makes its home working the hot, dusty dirt streets and in the moist salt air of a desert by the sea city clean. And judging by the automobiles, we're well into the teens if not the 20's by this time, so this car has many years of service under its belt rail.

Since my model of #105 has taken some modelers license to it, I intend to"go wild" with the weathering. This car will be the dirtiest of all my revenue cars, it will represent the dirty end of the weathering spectrum. The rest of the fleet will be a bit more classy in appearance. But for now, I'm going to have some fun with this.


There are some weathering techniques I want to try out. I'm a big fan of the Bragdon weathering powders, they are fantastic for, rusting, dusting, dirtying and "scale effect". I'll elaborate how to use the Bragdon Weathering System in a future post, but real quick, the powders contain a friction activated adhesive that affixes the powders when they are scrubbed on. But I want the powders to settle into the groves to accentuate the wood slats. So I'm trying the powders as a wash by mixing the powders with alcohol. The photo above is the result of this. I took a "0" brush load of the dark brown powder and mixed it with 4 drops of alcohol. The effect is stunning. Not only did the pigment settle into the groves, but it also stained the paint really nicely. It really desaturated to colors.

I thought I had overdone it. But comparing this photo with the prototype photo at the top of this post, it  actually looks about right. This car looks like a work-a-day interurban that has been making its rounds, keeping its schedule, and moving the merchandise. It has been a useful trolley, yes sir, a very useful trolley.

Dandy

Monday, October 04, 2010

The Small Layout Scrapbook

A website called the "Small Layout Scrapbook" featured traction layouts last month.

Layout Scrapbook publishes an article twice a month and is part of the Micro/Small Layouts for Model Railroaders site. The site is dedicated to layouts that are roughly 4x6 feet (1200mm x 1800mm) and under. It also features a design gallery of small layouts.

Here is an older post they did on traction layouts. It features some very fun and very tiny layouts! Yes sir! Very fun and very tiny!

Dandy

Monday, September 27, 2010

Niles Project ~ Slappin' Some Decals onto #105

Applying Decals to Niles Combination Car# 105


The last we left off, #105 has been painted and then a layer of Floquil Hi-Gloss applied to where the decals are going to be applied.


Fortunately there isn't any white or silver lettering involved, so I was able to print the decals with my home printer. My printer is an ink jet, so I purchased some decal paper specifically for ink jet printers.

These Niles cars are a little different from the Birney car in that these cars have "wood" slats. The decal doesn't want to settle down into all the grooves. It did in the groove to the left of the "0" (above photo) but that's about it. Eventually (as I understand it) the decal over those grooves will dry up and flake off. The only solution I could think of is to coat the decal with Micro Sol and used a tiny screwdriver to stretch the decal into the grooves. but I could only work the decal for a short time before it gets damaged. 

 This method proved to be somewhat successful, but only to a degree.The decal is conforming to the groves a little better, but a lot of air is still trapped in there. So I contacted my friend Don Ball for his advise...

Don Ball would know what to do, he is modeling the 1895 Stockton & Copperopolis Railroad which is stocked full of finely pinstriped and scroll lettered locomotives and wooden passenger cars. He recommended that instead of cutting the decal as one large piece, rather, cut the decals closer to the pinstripes and lettering and add them separately so that the air is better able to escape out from underneath the decals.  So its too late for #105, but not for #107 which is next in line for decals.


Not bad overall though. A downright fancy looking 1908 streetcar. After the decals are good and dry, I'll spray the car with a good coat of Testors Dullcote. Not only does this seal the decals, but it readies the car for weathering. So tune in in two weeks and we'll get this car good and dirty. Yes sir! Good and dirty!

Dandy

Wednesday, September 22, 2010

4th Dandiversary ~ 101 Posts!

The Dan D. Sparks Land Development and Transportation Co.
Board of Directors Meeting 22nd September 2010
8:00 AM San Dollar, California.

 Board Members:
 Present:
President: Dan D. Sparks
Chairman: Lettuceleaf M. Malone
Traffic Manager: Robin DeRail
Finance Manager: Pastor Buck
Director of Development: Arnie Clever
General Manager: David Lyman
Quorum present? Probably not.
Others Present:
Various Company Minions

Absent:
Slacker Sam

Proceedings:
· Meeting called to order at 8:01 a.m. by Chair, Lettuceleaf M. Malone
· Last year's meeting minutes were marveled at and approved.

· Traffic Managers Report:
- Last weeks post "Niles Project ~ I Cal, You Cal, We All Cal For Decals" brings this blogs total posts to 100! The board broke out the champagne and proceeded to congratulate themselves.
- An Australian reader of this blog, Bill Bolton, forwarded a rare document to the company containing invaluable information about the San Diego Niles cars not seen before by this committee. The committee broke out in a chorus of "For He's A Jolly Good Fellow!" and drank a toast honoring Mr. Bolton.
- Average daily readership of this blog is 5.57 readers. Up from 4.12 daily readers last year. The board commenced to congratulate themselves again and drank more champagne.
- Most hits received in one day was during the U.S. Senate hearings with Daniel Sparks of Goldman Sachs. The board once again congratulated themselves, this time because there was no relation to Dan D. Sparks, so this company isn't being investigated. I'll drink to that!
- Blog post most read: Birney Project~Fresh Homemade Decals with 305 pageviews. No congratulations since the post is over a year old but the sipping of champagne continued.
- In fact, no posts from this year even made the top ten posts read according to Google Analytics. Board members giggled over the offhand joke "well, you wouldn't have analytics without there being anal".


· Finance Committee report provided by Chair, Pastor Buck:
- Revenue from this blog is now averaging $0.01 a day, up from $0.005 last year. That means a whopping $3.65 a year earnings! At this rate we should make our first million in 273972.6 years! The committee proceeded to hide the expensive champagne.
- That brings this blogs all time estimated total earning from the last 4 years to: $19.11. Committee members sent out for coffee.

· Board Development Committee's report provided by Chair, Arnie Clever:
-Despite this blog being rather insignificant and having a tiny readership, Clever recommended continuing the blog for another year since the numbers are continuously improving. MOTION to continue this blog for another year; seconded and passed with a "...ah, what the hell, why not."
- Clever suggested to the Board that actions can be taken to improve this blog such as adding some how-to videos. MOTION to add how-to videos; seconded and passed.
-And Clever strongly suggested we finish building these damn Niles cars soon and get to building the layout and run some trolleys! MOTION seconded and passed with a resounding "Huzzah!".

· Assessment of the Meeting:
- General Manager David Lyman noted that this meeting was pretty much a huge waste of time, time that could have better been spent actually building models. He reminded members that the focus of this blog is to chronicle the construction of the layout and was never intended to make anyone rich. Unfortunately, the board was too hung over to pay any attention and the meeting was adjourned.

· Meeting adjourned at 10:30 p.m.
· Minutes submitted by Secretary, Mrs. Roundbottom.


Monday, September 13, 2010

Niles Project ~ I Cal. You Cal. We All Cal for Decals!

Creating decals for #105.
Voilà! Pretty much used the same technique that I used for the Birney car to make these decals for the Niles car. See my post: Birney Project~ Fresh Homemade Decals.

My model of #105 is based on the history of #101. So I used this photo as reference for the font style and the locations of the lettering and pin-striping.

The earliest surviving SDERy streetcar is car #54 of 1895 (rebuilt 1901) vintage. It ran until it was retired in 1913. So it was around at the same time as the Niles cars. #54 sports red 3D lettering with drop shadows. Looking at the b&w photo of #101, this seems to be of the same color scheme. So I went with that. SDERy seemed to have used either red, silver, or brown for lettering, so I'm pretty confident this is the correct color scheme.

Here is a nice clear closeup of #101 that I used for the destination sign. ( I deduced that the sign on the other end of the car read "To San Diego"). Its' also the only photo that I have come across that clearly shows the "garnish" in the corners of the pin-striping. Is that supposed to be a rose? My simplified version looks like an ant! Either way, it doesn't matter. It's really minuscule on the model.

#105 has been sprayed with a layer of Floquil Hi Gloss necessary for applying decals to surfaces painted with Floquil paints. Once its dry we can apply the decals. Decals really make a model, I can't wait to see what 'ol #105 is going to look like with decals. Exciting isn't it? Yes sir! Very exciting indeed!

Dandy


Tuesday, August 31, 2010

Niles Project ~ Yellow and Brown Paint for #109

After its last paint job was deemed unacceptable, the Point Loma car was stripped of its paint and is now ready for a new paint job.


While the Pine-Sol did a splendid job removing the paint, it left gooey, sticky boogerballs behind that where a real pain to remove. Scrubbing the model with Dawn dish soap on an old toothbrush helped a lot, but in the process I managed to loose a hand rail. So a new one had to be fashioned with brass wire.


Repaired, Cleaned, Sterilized, and Ready for painting.


Primed (Floquil Primer)


Interior painted with my Mahogany mix. (50/50 mix of Floquil Roof Brown with So. Freight Car Brown)


Masked


Exterior Paint (10 parts Floquil Railbox Yellow with 1 part So. Freight Car Brown)


Masked for Roof paint (Floquil Mud).


Detail painting (window sashes and bumpers(?)) with my Mahogany mix.


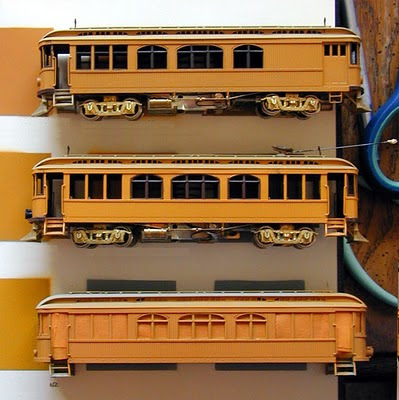
The Point Loma car is on the bottom. Compare this photo with the above photo and you can see that the new color is much more reasonable. Now it is the SD&SE car (center) that looks too yellow! Also compare with the photo of the original paint and I think I've pretty much nailed SDERy Yellow. Yes sir! Pretty much nailed it!

Dandy

Monday, August 16, 2010

Niles Project ~ Continuing Quest for Golden Yellow

Knowing the color is one thing. Replicating the color, that's another thing!


Splitting hairs at this point. The color slide of the SDERy work truck reveals a more brownish yellow. So I'm experimenting with mixing Floquils Southern Freight Car Brown with Railbox Yellow and CNW Yellow. The mix on the lower left (above) really caught my eye. Lets try that.

Hmm! Might be too yellow. At top is the Birney painted with Scalecoat colors. Next is #105 combine in Floquils CSX New Image Gold. Third is #107 sporting a 50/50 mix of New Image Gold and Railbox Yellow. But the Point Loma car on the bottom... It might be too yellow. Its a gorgeous shade of yellow though. But its more yellow than the Birney which is too yellow. But I tell ya... Its a very pleasing mustard yellow. But it needs to be a more of a golden yellow. You know... No matter how much I like it... its just the wrong color. Yeah, I don't think its quite right. Well... I really hate to do this, but...

... into the Pine Sol it goes. Its heart breaking. Such a beautiful paint job. But its just the wrong color, no doubt about it. Its gotta go. Damn. A lot of work down the drain. No wonder it takes me forever to accomplish something. Yes sir, It's no wonder.

Dandy

Monday, August 02, 2010

SDERy Yellow Caught on Color Film!

For the first time ever, I have come across the infamous yellow in a color photograph.


The San Diego Electric Railway streetcars wore their golden yellow and mahogany paint scheme from the companies inception (1892) to about 1931. Kodachrome wouldn't come out on the market until 1936. So as a result, nothing exists in the way of color photographs of the old paint scheme.

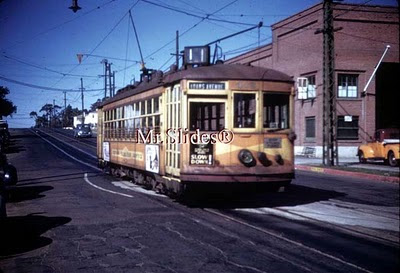
While looking around on eBay I came across this photo of SDERy 408 in the experimental orange paint scheme SDERy was trying out in the 1940s. I almost dismissed the photograph until I noticed that curved white line in the street. It warns of the overhang of the cars while making a turn. Ah, there is a turnout there. Going where? Oh hey, that's the car barn on the right. And whats that parked out front? The company truck!...

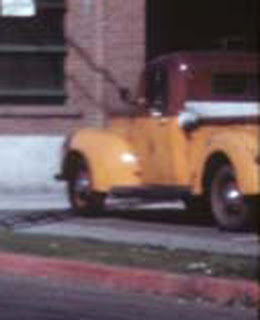
...still painted in the original company colors! There it is folks! Photographic evidence of SDERy "Mission Yellow" and "Mahogany Brown". Oh I'm so going to nail this color. Yes sir! Nail it!

Dandy

Monday, July 19, 2010

Niles Project ~ Yellow and Brown Paint for #107

Trying a 3rd mix of paints to replicate SDERy Yellow.
Floquils "CSX New Image Gold" looks pretty good on #105, but I want to saturated it a little more and push it more towards yellow. The "Roof Brown" used for the trim is just too dark.

After experimenting a bit (above), I settled on a 50-50 mix of "Railbox Yellow" and "CSX New Image Gold" for the yellow, and a 50-50 mix of "Southern Freight Car Brown" and "Roof Brown" for the Mahogany trim color (outlined above).

Ooh! Not bad. Not bad at all. Compare to this poorly lit photo of old actual SDERy yellow. After letting this dry for a day, I'll hand paint the trim with the Mahogany brown mix.

After letting the trim paint dry for a day, its time to paint the roof. Some precision masking is required for the clerestory windows. I laid out a length of masking tape onto a piece of glass a tad longer than the length of the windows. After carefully measuring the width and length as well as where the curves start, I cut the mask to size with a sharp Xacto knife.

The mask is carefully worked into place. Then the rest of the car is masked off. This time I'll paint the roof Floquil "Mud". Its a little warmer than "Earth".

Well... my digital camera seems to be "rounding off". The yellows almost look to be the same here. But the differences are more discernible in person. But not that much more. On the other hand, the difference between "Earth" on #105 (right) and "Mud" on #107 (center) is more discernible in the photo than they are in person! As for the yellows, I'm so close. I'm probably splitting hairs at this point. Yes sir. Splitting hairs!

Dandy