Read the Free Trolleyville Times Monthly for the Latest News on Prototype and Model Traction!

Monday, March 25, 2013

#426 Project~ Making the Circuit

#426 Makes her shakedown run around the Southern California Traction Club modular layout setup:

And she ran beautifully all weekend.

She's come a long way from her years as a tarnished display piece. Yes sir! She's come a long way!

Dandy

Monday, March 18, 2013

#426 Project~ Energizing the Diablo

With the Diablo Mechanism firmly installed, its time to wire it all together.


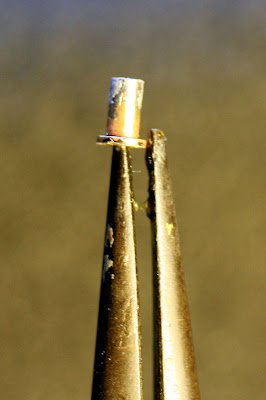
I find soldering the wire to the trolley pole base a little tricky. The wire attaches to the brass bushing which inserts into a plastic insulator. The wire can't be soldered on ahead of time because then the bushing would be too fat to fit through the plastic insulator. The only solution I've come up with so far is soldering it in place fast before the plastic has time to melt.

The bushing is prepared ahead of time. First by roughing it up with a Bright Boy so that its clean and etched, ready to accept solder.

Then the bushing is tinned (hot solder flowed on). I had to keep it thin so it could still be slid through the plastic insulator. 

Then the wire is shaped and tinned as well.

Then I line everything up, add some flux and then hit it with the hot iron. Hopefully the wire and bushing will melt together before the plastic gets too hot. Remember to clean off the flux residue with some alcohol. Give the wire a tug to make sure a good connection has been made.

Each wire from the two bushings (double pole car) connect to one end of a Micro-Mini Connector plug from Miniatronics (50-001). The other plug of the connector connects to each pole of the motor. To help keep wires organized and out of the way of moving parts, one of the plugs is glued to the top of the motor (above), and the wires are bent accordion style. A rubber band secures the plug in place while the glue dries.

Testing the electrical connections is a simple matter of stuffing one power pack lead into the hole of one of  the bushings and the other lead into the other bushing. Give it some juice and (if all goes well) the car should roll across the work bench (which it did!). So now were ready for the test track. Yes sir! We are ready for the test track!

Dandy

Monday, March 11, 2013

Every Good Hero has a Side Frame

Installing Side Frames onto the Diablo Mechanism

Hollywood Foundry suggests a couple of ways to mount the side frames to the Diablo, but I'm going to go with soldering them on. Solder is good, I trust solder.

Ooh look at that texturing on those tabs! All that extra surface area will really help the side frames stick. I further cleaned and roughed it up with a Bright Boy.

Hot solder will really stick to this kind of surface. Flowing solder onto the surfaces to be joined ahead of time (tinning) helps make soldering easier and more reliable. I removed the cover plate from the Diablo and then tinned the surfaces of the tab and the side frame itself with a soldering iron.

After determining where exactly the side frame sits so that the journal boxes will line up with the axles, all I had to do was hold the two pieces together with tweezers and then heat the joint with a small torch. I could feel when the two pieces melt together.

 These side frames are on there solid. I never have to worry about them ever falling off. I cleaned the solder joints with some alcohol so that the flux residue won't corrode the joint.

Reattach to the Diablo and were all solid man. Yes sir! Solid man!

Dandy