Drilled her from behind and shoved a rod up in her, that straightened her out real nicely.
This warping seems to be inherent with 3D printing. Two different 3D printing companies, exact same warp. So I've got to see what I can do about it.
I laid a pair of pliers on the post and left it overnight to gently persuade it back into alignment. This actually straightened out the tower long enough to drill out the post:
The tower was modeled with a hollow post for a conduit for the wires for the lighting. But I had to widen it out a bit so that I could fit a brass rod up through there. I could actually feel the tip of the drill bit making its way up the fragile post, so I kept pressure on it so I could feel if the bit threatened to dig through the side.
The brass tube fits nice and snug. It will help provide the strength and straightness as well as a conduit for one of the wires and act as the return (ground) for the other polarity.
Ready for some paint now that it is standing straight and tall. Yes sir! Standing straight and tall!
Made adjustments to the dimentions and now the tower is correct for H.O. scale!
Here is how the tower looks straight from the printers. Some cleaning up is required.
This time I had the tower printed at i.materialize. Their "Primer Gray" isn't quite as rough as Shapeways "White Detail". There is still a texture, but ya got to be pretty close to see it. We'll see how noticeable it is after its been painted.
And there is that warping again! Exactly the same as the Shapeways model. I don't know if there is anyway around it. A few readers of this blog suggested printing only the cabin and base and use either a brass or plastic rod for the post. The post scales out to almost an 1/8th inch, so that is a very doable idea.
Okay, I'm off to the workbench to fiddle around with this model some more and we'll see what can be done with it. Yes sir! We'll see what can be done with it!
It's here! All the way from the Netherlands, My first 3D Print!
I don't remember the last time I felt this excited about finding a package left by UPS. Lets tear it open!
Whoops! I goofed on the dimensions. This is actually the right size for O Scale, not HO. No wonder is cost so much! Despite that flub though, this is very exciting. I've built hundreds of objects in the computer over my 20 year career, but this is the first time I've actually held one in my hand. The detail is all there, and it smells exactly like dirt! But unfortunately, as you can see, the post is warped. And I'm not sure why this happens or how to prevent it with future prints. Maybe the smaller (HO scale) size will eliminate that.
Here you can see the texture inherent in the layering process of 3D printing. This model was printed with Shapeways "White Detail" material. Costs twice as much but it has a better finish than "White, Strong, and Flexible".
Okay, I've scaled the 3D drawings to the correct scale, and made some adjustments. There is a 1mm minimum thickness requirement, so I had to thicken up some of the details. This time I sent it off to Volkmars weapon of choice: i.materialize in Belgium. So we'll see what materializes. Yes sir! We'll see what materializes!
Encouraged by the fantastic results Volkmar Meier has been achieving with Rapid Prototyping, Additive Manufacturing, Stereolithographic 3D Printing, I have decided to give it a go myself.
I was approached by Shapeways
years ago inviting me to try out this emerging technology of 3D
printing. Looking into it, I wasn't impressed with how rough the 3D
prints were. So I dismissed it for the time being. But the technology
has marched on and 3D prints are looking really nice these days!
Volkmar's blog, Interurban Railways, chronicles very nicely his construction of a Terre Haute, Indianapolis & Eastern wooden combine, from a 2D drawing, to a 3D render and then finally an actual 3D Print model. There is still a slight texture to the finished model, but once painted, its hardly noticeable. His work has embolden me to finally give it a try.
But before building something as elaborate as an interurban though, I thought I would cut my teeth on a bite-sized project first. I've been wanting to build a model of these inner city junction towers for quite some time now. I even started building one out of brass seven years ago, but the model wasn't progressing as well as I would have liked. So that project stalled. But now I think this tower would be perfect for a 3D print noob like me.
Another deciding factor is that I still have the drawings I made for the brass model. All I have to do is import these drawings into a 3D program and build the 3D model over it. There are many 3D programs out there that are well suited (and cheaper) for modeling structures for a 3D print, but I will be utilizing 3D Studio Max for this project. By profession I am an animator with years of experience animating with 3D Studio Max. So its a logical choice for me. And its already installed on my computer.
Some of the details won't print well and so have been omitted, such as the awnings and the stirrup steps. These will be added afterwards. I did include pilot holes for the stirrup steps up the post, we'll see how well they print out. The post is hollow so that wiring for lighting could be run up from the base to the tower. The roof is removable so that the interior can be painted and detailed and an occupant added (the most important part!).
There has been a flurry of discussion about 3D printing on a Yahoo Traction Modeling group lately. And after carefully weighing what folks had to say about the quality of different 3D printing companies, I have decided that since this is my first model and I want to see how much of the detail shows up on these prints, etc, I'm going to go with a company that is the least expensive but yet still has decent quality. So I put in an order with Shapeways (White Detail). When the model comes back, I'll see whats working and what isn't, make adjustments to the 3D drawing, and then place an order with an expensive, excellent quality company. Yes sir! An expensive, excellent quality company!
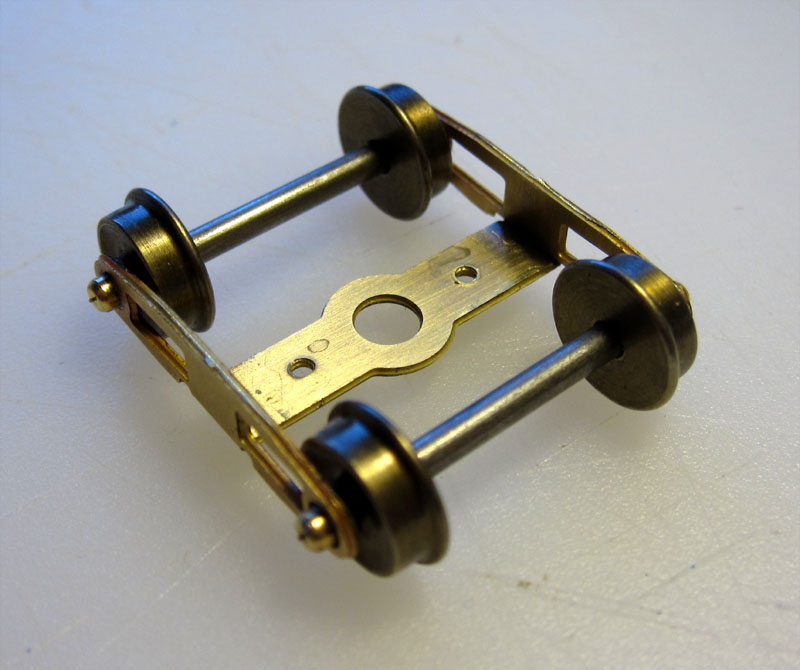
Assembling the Hollywood Foundry Lightning Trailing Truck Kit
is actually easy-peasy!
The drive on my old Pacific Traction H.O scale San Diego 400 series car has had a full life. The gears are worn, the spring drive slides, even one of the tires has separated from the axle. It needs a whole new drive. Preferably a precision drive, capable of ultimate slow speed smooth running on tight city curves.
And Hollywood Foundry has (once again) come to the rescue with their magnificently designed Diablo Power Truck.
But, it comes as a kit, assembly required. Assembling such a precision
instrument can be a little intimidating. But Hollywood Foundry maintains
that its actually easy and quick to assemble.
So, to get an idea of what it will take to assemble the Diablo, why not assemble their Lightning Trailing Truck first? Their methods of assembly are very similar. And that's exactly what I did. Yes sir, that's exactly what I did.
Let me just say that the instructions are very well written with plenty of crystal clear illustrations accompanying the text. AND a color version of the instructions are available on-line for free. The rest of my post pretty much reiterates what already has been published. But if you want to see the assembly of the Lightning Truck in photos, well then, here you go:
But make sure you follow the instructions that come with the Lightning!
Only three tools are required to assemble the Lightning Truck. The first is a simple file to deburr the parts.
These bearings are what make the Lighting Truck such a great roller. The bearings can actually be dropped into place and will be trapped without fear of them falling out. Or you can glue them in. I chose to carefully solder them in place so that they will never be a problem. First I spread some solder (tinning) around the bearing itself, then, I tinned the truck frame around the hole. Then I dropped the bearing into the hole and heated the assembly until the bearing was properly seated in the hole.
Now comes the folding:
The only rule Hollywood Foundry has with bending the parts is that the metal is always folded towards the etched fold line.
Bending the parts are easy-peasy. Using the second tool, a smooth jaw pliers, to hold the part just below the etched fold line, I applied firm, balanced pressure with my finger, slowly bending the part into its correct position.
The opposite side of the truck frame is bent half way to first accept the wheelsets before bending fully into position.
I just realized the painting the wheelsets ahead of time would have been a good idea. Bending and unbending would cause the metal to harden and become brittle and could break. So this little planing ahead would help keep the truck sound.
With the wheelsets in place the frame is folded into position.
I made some slight adjustments to the folds for maximum "spinnage". And true to advertized, the wheels spin for quite a while when spun with a finger.
Now for the bolsters. A quick clean up with a file and were ready for...
...fold, fold, fold, fold.
Washers are included to adjust the height of the truck. But that will be determined when the Diablo is built and the height of the Lightning and Diablo need to be matched.
A Wiha Phillips #00 screwdrive was the only tool I needed to buy for this. But I needed one of these for a while now. So it was about time I bought one. The bolster screws right on, what with the holes already been drilled and tapped and whatnot. Like I said: easy-peasy. Yes sir! Easy-peasy!
For reliable transfer of track power from the truck to the chassis, I soldered the lead to the nickel silver solder tag.
Now were ready to mount the truck.
First, place the Derlin washer and properly seat it into the hole.
Then place the truck on top and fit the screw through.
Flip the chassis over...
... and fit the second Derlin washer seated into the hole.
The nickle silver power tag is placed next and...
... place the nut and tighten moderately.
And there we go! Essentially the truck is assembled and installed. I just need to add the old side frames.
The holes in the old sideframes were the bearings for the old wheelsets. But with the new, high tech Lightning bearings, the holes in the sideframes need to be enlarged to clear them.
It was a simple matter of finding a drill bit with the same diameter as the bearings to enlarge the holes. Test fit. Drill some more. Test fit. Don't drill all the way through!
Then the sideframes were soldered on. And were good to go!
This all went together in about 45 minutes! And that includes stopping to compose these pictures.
I'm so ready to tackle the Diablo now because, I tell ya, I feel like a downright metal smith now! Yes sir! A downright metal smith!
"6 years! The prototype San Diego
Electric Railway was built in less time for crying out loud! Yes sir!
The prototype was built in less time!"
Dan D. Sparks' annual rant.
Dan D. Sparks
President. Yes sir! President!
And thus brings to a close a dismal "fiscal" year (Sept. 2011 to Sept. 2012) of modeling for this blog. But today marks the beginning of a very bright year ahead. So lets see where we stand so we can accurately gauge how far we go in this coming year. And now, without further ado:
The Dan D. Sparks Plywood Development and Transportation Co.
Annual State of the Company, Board of Directors Meeting
22nd September 2012
8:00 AM San Dollar, California.
Board Members:
Present:
President: A very unhappy Dan D. Sparks
Chairman: A very nervous Lettuceleaf M. Malone
Traffic Manager: A smug Robin DeRail Finance Manager: A jubilant Count DeMonet
Director of Development: A crafty Arnie Clever General Manager: David Lyman
Quorum present? More or less.
Others Present:
Man of Mystery: Fred Gurzeler
Company Band leader: Bill Bolton & Orchestra
Absent: No Show Joe
Proceedings:
· Meeting called to order at 8:09 a.m. by Chair, Lettuceleaf M. Malone
· Last year's meeting minutes were read and regarded with nostalgia.
Lettuceleaf M. Malone
Chairman
Opening Message from the Chairman:
Life is a balance between Family, Occupation, and Hobby. Most of the time, these are out of balance. One usually requires presidence over the others. This past year was no exception. "Occupation" was the focus this past year. Without it, the other two suffer. And with it, the other two can benefit greatly.
"Hobby" is about to benefit greatly from this years employment. So hang on... because here we go!
Robin DeRail
Traffic Manager
· Traffic Managers Report Provided by Chair,Robin DeRail:
~ Last year we were enjoying a nice upswing in viewership. This year, despite half the blog entries being posted (19 posts, down from a record 28 posts last year), we managed to hang on, with a some gain, to that viewership.
~ This blog hosted 3,064 visitors this last year (Sept. 2011 to Sept. 2012) visiting 5,484 times. That's up from 1,939 visitors visiting 3,379 times the previous year, for a grand total of 16,668 visitors.
~ This blog is now averaging 15 visitors per day viewing for almost a whole 2 minutes (1:52)! That's a gain of 50% from the revised figure of 10 visitors per day viewing for a minute and a half (1:34) last year.
· Finance Committee report provided by Chair, Count DeMonet:
~ The Count happily reported that revenue from this blog (from ads) has more than doubled and is now averaging over $0.04 per day, up from a $0.02 daily average last year.
~ DeMonet went on to report that the annual earnings for this last fiscal year are estimated at $16.07. That's an increase of over 100% from last years earnings of $7.34! Bringing the grand total to $39.48.
~ The finance chair went on to suggest that product placement may help the bottom line. When pressed further, he offered an example; "The finer photos in this blog were photographed with the affordable Canon EOS Rebel T3 Digital SLR Camera with 18-55mm IS II Lens. Should anyone buy that camera by clicking on our link, we receive a referral fee!".
This was met with great skepticism by the board.
Arnie Clever
Director of Development
· Board Development Committee's report provided by Chair, Arnie Clever:
~ Mr. Clever reported that though things have cooled off modeling wise, planning has continued in earnest. "Oh the projects that are planned!" he went on. "This company has plans coming out of the wazoo! Why, this company has more plans than could possibly be implemented in a single lifetime! Oh-boy do we have plans!" he explained. "Plans, plans, plans! You want it? I've planed it!".
~ The development chair, on the verge of collapse from the lengthy revelation of all his plans, explained that during these robust times the company has managed to stockpile a sizable amount of modeling materials and may actually see some of these plans through to fruition! The board blinked at each other in silent amazement.
And on that note, Mr. Sparks offered: "Well then... lets get to it. Yes sir! Lets get to it!
Mr. Bolton stuck up the band with a rousing
rendition of "Happy Days Are Here Again".
· Meeting adjourned at 11:59 p.m.
· Minutes submitted by Secretary, Mrs. Roundbottom.