Monday, September 27, 2010

Niles Project ~ Slappin' Some Decals onto #105

Applying Decals to Niles Combination Car# 105


The last we left off, #105 has been painted and then a layer of Floquil Hi-Gloss applied to where the decals are going to be applied.


Fortunately there isn't any white or silver lettering involved, so I was able to print the decals with my home printer. My printer is an ink jet, so I purchased some decal paper specifically for ink jet printers.

These Niles cars are a little different from the Birney car in that these cars have "wood" slats. The decal doesn't want to settle down into all the grooves. It did in the groove to the left of the "0" (above photo) but that's about it. Eventually (as I understand it) the decal over those grooves will dry up and flake off. The only solution I could think of is to coat the decal with Micro Sol and used a tiny screwdriver to stretch the decal into the grooves. but I could only work the decal for a short time before it gets damaged. 

 This method proved to be somewhat successful, but only to a degree.The decal is conforming to the groves a little better, but a lot of air is still trapped in there. So I contacted my friend Don Ball for his advise...

Don Ball would know what to do, he is modeling the 1895 Stockton & Copperopolis Railroad which is stocked full of finely pinstriped and scroll lettered locomotives and wooden passenger cars. He recommended that instead of cutting the decal as one large piece, rather, cut the decals closer to the pinstripes and lettering and add them separately so that the air is better able to escape out from underneath the decals.  So its too late for #105, but not for #107 which is next in line for decals.


Not bad overall though. A downright fancy looking 1908 streetcar. After the decals are good and dry, I'll spray the car with a good coat of Testors Dullcote. Not only does this seal the decals, but it readies the car for weathering. So tune in in two weeks and we'll get this car good and dirty. Yes sir! Good and dirty!

Dandy

Wednesday, September 22, 2010

4th Dandiversary ~ 101 Posts!

The Dan D. Sparks Land Development and Transportation Co.
Board of Directors Meeting 22nd September 2010
8:00 AM San Dollar, California.

 Board Members:
 Present:
President: Dan D. Sparks
Chairman: Lettuceleaf M. Malone
Traffic Manager: Robin DeRail
Finance Manager: Pastor Buck
Director of Development: Arnie Clever
General Manager: David Lyman
Quorum present? Probably not.
Others Present:
Various Company Minions

Absent:
Slacker Sam

Proceedings:
· Meeting called to order at 8:01 a.m. by Chair, Lettuceleaf M. Malone
· Last year's meeting minutes were marveled at and approved.

· Traffic Managers Report:
- Last weeks post "Niles Project ~ I Cal, You Cal, We All Cal For Decals" brings this blogs total posts to 100! The board broke out the champagne and proceeded to congratulate themselves.
- An Australian reader of this blog, Bill Bolton, forwarded a rare document to the company containing invaluable information about the San Diego Niles cars not seen before by this committee. The committee broke out in a chorus of "For He's A Jolly Good Fellow!" and drank a toast honoring Mr. Bolton.
- Average daily readership of this blog is 5.57 readers. Up from 4.12 daily readers last year. The board commenced to congratulate themselves again and drank more champagne.
- Most hits received in one day was during the U.S. Senate hearings with Daniel Sparks of Goldman Sachs. The board once again congratulated themselves, this time because there was no relation to Dan D. Sparks, so this company isn't being investigated. I'll drink to that!
- Blog post most read: Birney Project~Fresh Homemade Decals with 305 pageviews. No congratulations since the post is over a year old but the sipping of champagne continued.
- In fact, no posts from this year even made the top ten posts read according to Google Analytics. Board members giggled over the offhand joke "well, you wouldn't have analytics without there being anal".


· Finance Committee report provided by Chair, Pastor Buck:
- Revenue from this blog is now averaging $0.01 a day, up from $0.005 last year. That means a whopping $3.65 a year earnings! At this rate we should make our first million in 273972.6 years! The committee proceeded to hide the expensive champagne.
- That brings this blogs all time estimated total earning from the last 4 years to: $19.11. Committee members sent out for coffee.

· Board Development Committee's report provided by Chair, Arnie Clever:
-Despite this blog being rather insignificant and having a tiny readership, Clever recommended continuing the blog for another year since the numbers are continuously improving. MOTION to continue this blog for another year; seconded and passed with a "...ah, what the hell, why not."
- Clever suggested to the Board that actions can be taken to improve this blog such as adding some how-to videos. MOTION to add how-to videos; seconded and passed.
-And Clever strongly suggested we finish building these damn Niles cars soon and get to building the layout and run some trolleys! MOTION seconded and passed with a resounding "Huzzah!".

· Assessment of the Meeting:
- General Manager David Lyman noted that this meeting was pretty much a huge waste of time, time that could have better been spent actually building models. He reminded members that the focus of this blog is to chronicle the construction of the layout and was never intended to make anyone rich. Unfortunately, the board was too hung over to pay any attention and the meeting was adjourned.

· Meeting adjourned at 10:30 p.m.
· Minutes submitted by Secretary, Mrs. Roundbottom.


Monday, September 13, 2010

Niles Project ~ I Cal. You Cal. We All Cal for Decals!

Creating decals for #105.
Voilà! Pretty much used the same technique that I used for the Birney car to make these decals for the Niles car. See my post: Birney Project~ Fresh Homemade Decals.

My model of #105 is based on the history of #101. So I used this photo as reference for the font style and the locations of the lettering and pin-striping.

The earliest surviving SDERy streetcar is car #54 of 1895 (rebuilt 1901) vintage. It ran until it was retired in 1913. So it was around at the same time as the Niles cars. #54 sports red 3D lettering with drop shadows. Looking at the b&w photo of #101, this seems to be of the same color scheme. So I went with that. SDERy seemed to have used either red, silver, or brown for lettering, so I'm pretty confident this is the correct color scheme.

Here is a nice clear closeup of #101 that I used for the destination sign. ( I deduced that the sign on the other end of the car read "To San Diego"). Its' also the only photo that I have come across that clearly shows the "garnish" in the corners of the pin-striping. Is that supposed to be a rose? My simplified version looks like an ant! Either way, it doesn't matter. It's really minuscule on the model.

#105 has been sprayed with a layer of Floquil Hi Gloss necessary for applying decals to surfaces painted with Floquil paints. Once its dry we can apply the decals. Decals really make a model, I can't wait to see what 'ol #105 is going to look like with decals. Exciting isn't it? Yes sir! Very exciting indeed!

Dandy


Tuesday, August 31, 2010

Niles Project ~ Yellow and Brown Paint for #109

After its last paint job was deemed unacceptable, the Point Loma car was stripped of its paint and is now ready for a new paint job.


While the Pine-Sol did a splendid job removing the paint, it left gooey, sticky boogerballs behind that where a real pain to remove. Scrubbing the model with Dawn dish soap on an old toothbrush helped a lot, but in the process I managed to loose a hand rail. So a new one had to be fashioned with brass wire.


Repaired, Cleaned, Sterilized, and Ready for painting.


Primed (Floquil Primer)


Interior painted with my Mahogany mix. (50/50 mix of Floquil Roof Brown with So. Freight Car Brown)


Masked


Exterior Paint (10 parts Floquil Railbox Yellow with 1 part So. Freight Car Brown)


Masked for Roof paint (Floquil Mud).


Detail painting (window sashes and bumpers(?)) with my Mahogany mix.


The Point Loma car is on the bottom. Compare this photo with the above photo and you can see that the new color is much more reasonable. Now it is the SD&SE car (center) that looks too yellow! Also compare with the photo of the original paint and I think I've pretty much nailed SDERy Yellow. Yes sir! Pretty much nailed it!

Dandy

Monday, August 16, 2010

Niles Project ~ Continuing Quest for Golden Yellow

Knowing the color is one thing. Replicating the color, that's another thing!


Splitting hairs at this point. The color slide of the SDERy work truck reveals a more brownish yellow. So I'm experimenting with mixing Floquils Southern Freight Car Brown with Railbox Yellow and CNW Yellow. The mix on the lower left (above) really caught my eye. Lets try that.

Hmm! Might be too yellow. At top is the Birney painted with Scalecoat colors. Next is #105 combine in Floquils CSX New Image Gold. Third is #107 sporting a 50/50 mix of New Image Gold and Railbox Yellow. But the Point Loma car on the bottom... It might be too yellow. Its a gorgeous shade of yellow though. But its more yellow than the Birney which is too yellow. But I tell ya... Its a very pleasing mustard yellow. But it needs to be a more of a golden yellow. You know... No matter how much I like it... its just the wrong color. Yeah, I don't think its quite right. Well... I really hate to do this, but...

... into the Pine Sol it goes. Its heart breaking. Such a beautiful paint job. But its just the wrong color, no doubt about it. Its gotta go. Damn. A lot of work down the drain. No wonder it takes me forever to accomplish something. Yes sir, It's no wonder.

Dandy

Monday, August 02, 2010

SDERy Yellow Caught on Color Film!

For the first time ever, I have come across the infamous yellow in a color photograph.


The San Diego Electric Railway streetcars wore their golden yellow and mahogany paint scheme from the companies inception (1892) to about 1931. Kodachrome wouldn't come out on the market until 1936. So as a result, nothing exists in the way of color photographs of the old paint scheme.

While looking around on eBay I came across this photo of SDERy 408 in the experimental orange paint scheme SDERy was trying out in the 1940s. I almost dismissed the photograph until I noticed that curved white line in the street. It warns of the overhang of the cars while making a turn. Ah, there is a turnout there. Going where? Oh hey, that's the car barn on the right. And whats that parked out front? The company truck!...

...still painted in the original company colors! There it is folks! Photographic evidence of SDERy "Mission Yellow" and "Mahogany Brown". Oh I'm so going to nail this color. Yes sir! Nail it!

Dandy

Monday, July 19, 2010

Niles Project ~ Yellow and Brown Paint for #107

Trying a 3rd mix of paints to replicate SDERy Yellow.
Floquils "CSX New Image Gold" looks pretty good on #105, but I want to saturated it a little more and push it more towards yellow. The "Roof Brown" used for the trim is just too dark.

After experimenting a bit (above), I settled on a 50-50 mix of "Railbox Yellow" and "CSX New Image Gold" for the yellow, and a 50-50 mix of "Southern Freight Car Brown" and "Roof Brown" for the Mahogany trim color (outlined above).

Ooh! Not bad. Not bad at all. Compare to this poorly lit photo of old actual SDERy yellow. After letting this dry for a day, I'll hand paint the trim with the Mahogany brown mix.

After letting the trim paint dry for a day, its time to paint the roof. Some precision masking is required for the clerestory windows. I laid out a length of masking tape onto a piece of glass a tad longer than the length of the windows. After carefully measuring the width and length as well as where the curves start, I cut the mask to size with a sharp Xacto knife.

The mask is carefully worked into place. Then the rest of the car is masked off. This time I'll paint the roof Floquil "Mud". Its a little warmer than "Earth".

Well... my digital camera seems to be "rounding off". The yellows almost look to be the same here. But the differences are more discernible in person. But not that much more. On the other hand, the difference between "Earth" on #105 (right) and "Mud" on #107 (center) is more discernible in the photo than they are in person! As for the yellows, I'm so close. I'm probably splitting hairs at this point. Yes sir. Splitting hairs!

Dandy

Monday, July 05, 2010

I Have Seen the Golden Yellow!

I have finally seen San Diego Electric Railway "Mission Yellow" in person!

Over the Fathers Day weekend, the Southern California Traction Club (of which I am a member) set up the modular layout at the Orange Empire Railway Museum.
I have always known that an old San Diego car that was rebuilt into a cabin at some point in its history is stored there. I saw it years ago. Its covered in shingles and is painted a blue/gray color. Not much to see really.

But a fellow I met at the museum there mentioned that the car is an old Exposition car. That really piqued my interest so I made my way over to the car barn that its stored in to take a second look at it.

In a dark back corner of the carbarn there it stands. Still covered in blue/gray shingles, covered in dust, patiently waiting for someone to take an interest in it. I looked closer. I could make out the curved top of the windows. The rounded front end. Its definitely a SDERy Class 2 Pay-As-You-Enter car.

I also noticed that some of its original yellow paint was showing through here and there. But its faded and grimy. I wondered what the chances were of finding the yellow in its original saturated condition. Somewhere where it would have been out of the UV rays of the sun. Somewhere where it would have been out of the rain. Somewhere where it wouldn't get dirty or dusty. Somewhere like... the stairwell!!! Yes! Up underneath a stair! I scraped away some of the house paint (and spider webs) and sure enough, nice, relatively saturated, relatively clean, golden yellow. I ran back and grabbed my Birney car and, with much difficulty, snapped this picture:

Well... I'm within the ballpark. Hard to tell. Still have to make some educated guesses about what that paint looked like when it was shiny. Was it brighter? Or does my car need to be darker? The digital camera is also changing the color. Next time I'm at the OERM, I'm going to have to bring a color matching chart. I am determined to nail this color. Yes sir! I'm determined to nail SDERy Yellow!!!

Dandy


Monday, June 21, 2010

Niles Project ~ Interior Paint

I notice that a lot of folks don't take the time to paint the interior of their models. But really, it doesn't take that much extra effort to do.

 The interior of the Niles cars are described as being finished in selected mahogany. For that I used a 50/50 mix of Floquil Southern Freight Car Brown and Roof Brown. After letting that dry for a day, I masked off the windows and the open bottom. Don't forget to mask the clerestory windows too!:

If I was to paint the interior last, the the masking would have be on the outside. Which would mean the side of the window posts would also be the mahogany color. Which in some cases may be desirable. It all depends on what the end result requires.

So in the end, it only cost me an extra day and a half to paint and mask the interior. But if you ask me, I'd say its worth it, yes sir! I'd say its worth it!

Dandy

Thursday, June 10, 2010

Niles Project ~ Primed and Ready

Getting ready for a nice coat of SDERy "Mission Yellow". Whatever color that is!
All right. With the Birney project once again wrapping up, I can now turn my attention back to the Niles cars. Here is where I'm at with that:

The new Sightseeing Car (far right) is awaiting its "De-PEing" while the other three have gotten a nice coat of primer. This time I'm using Floquil paint since I have come across a recipe for SDERy "Mission Yellow" utilizing that brand.

 On combine #105 though, I wanted to try out Floquil F110358 CSX New Image Gold. On paint swatches and in the bottle, it looks really close to being the right color for SDERy Mission Yellow. But on the car it looks very desaturated. And there is no way of saturating paint. You can desaturate paint by adding gray, but you just can't re-saturate a color. For the roof and under body details I'm trying out F110081 Earth. It looks good on the roof, even better when it gets weathered, but for the underbody details I might try Mud instead. The trim is painted in Roof Brown, but that's entirely too dark. I'm going to have to try mixing it with one of the Tuscan colors.
As you can see in this photo, SD&SE #101 has had a hard life. It started out as a passenger car, converted to an interurban, then involved in an accident and so rebuilt into a combine. I want to try to capture this flavor with my model of #105. So I just might leave it the faded color it is and just weather the heck out of it. Yes sir! Just weather the heck out of it!

~Dandy

Tuesday, June 01, 2010

Worlds Largest Model Tram Show ~ Bremen, Gemany

Small tram - VERY LARGE

Werner Jurkowski, a very fine tram modeler from Berlin, Germany brought this show to my attention. The Kleine Bahn Ganz Gross (Small Tram Very Large) attracts tram modelers from Austria, Belgium,  the Czech
Republic, Germany, Great Britain and Switzerland. The show is held annually and this year it was held in the carhouse for the Bremen-Sebaldsbrück tram lines in Bremen Germany (next to the Mercedes-Benz auto plant!). I wanted to share the following video taken at the show with you. The modeling is fantastic!:


The video starts out with shots of the carhouse and prototype tram equipment, but then it gets into the modules. I just love the model of the carhouse, the smooth running tram models running in the streets with tight overhead and clean streets. A clip of Werner's layout starts around the 7:20 mark.

Traction modeling seems like it might be starting to take off here in the USA. I hope we start seeing shows  like this real soon here. Yes sir! I hope we start seeing shows like that here!

Dandy

Wednesday, May 12, 2010

Valence Project ~ Light Fixtures

Hey! You know what this lighting valence needs? How about some lights!

I have been puzzling for some time now with how exactly I was going to install lights into this thing. I mean, lights are one of the major reasons for building this lighting valence in the first place after all.
One major stumbling block is that I'm not a certified electrician. The highest voltages I have ever dealt with is about 15VDC, you know, model railroad motors and whatnot. So its with some intrepidation that I design and build a 110V layout lighting system.

I'm interested in using the round bulbs that were popular with the old wooden streetcars and carousels during the early 20th century. But my walls and ceiling don't have space for wiring inside because, well, there isn't any inside. Just 1/2" plywood at best. I looked into using white, round bulbed Christmas lights. Just attach them to the ceiling and plug them in. Easy enough. But it just lacks that elegance I'm looking for. So I looked at how they were constructed and then headed off to the store to see what I could find.

 After MacGyvering my way through various home improvement stores, this is what I have come up with.

 I found a plastic candelabra cleat and the round bulbs that come in the candelabra size which is about the right size for this project. But the wiring is exposed, which doesn't seem like a good idea to me. So mounting the cleat directly to the valence out. I need some sort of housing for the cleat.

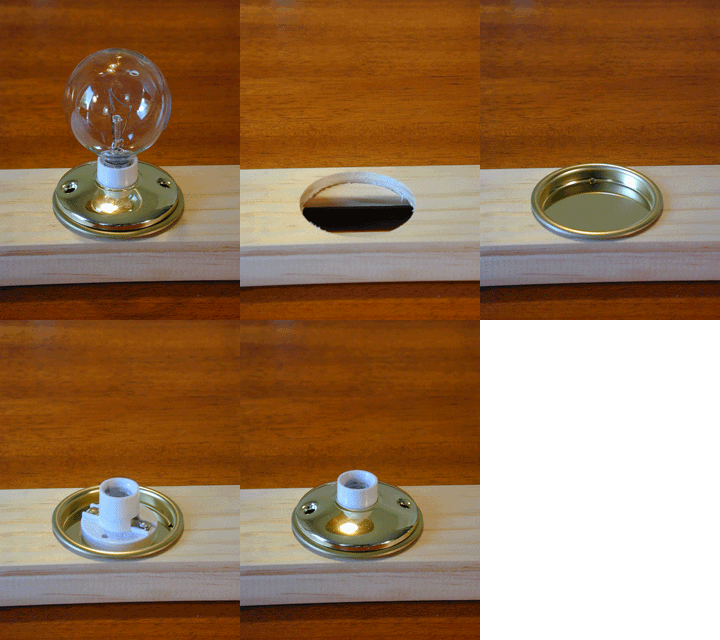
 A brass doorknob back plate! Looks like the stem of the cleat will slip right through the hole. But it didn't. I had to grind off about 1/16" with the Dremel tool. Then to close off the bottom... a sliding wardrobe door  brass pull! And here is how it all went together all nice and neat:

1. Wardrobe door pull. 2. Candelabra cleat. 3. Doorknob Back Plate. 4. Bulb.

The base is constructed of 2.5"x.25" trim wood and .75"x.75" angle trim from the moulding dept.

Then a hole was drilled to accommodate the light fixture.
Here is the completed lighting assemblies. The spacing of the bulbs coincide with the clerestory windows. Now all that's needed is wood treatment, staining and varnishing. And...


Wow! You would think I knew what I was doing or something. Now all that"s left is somehow wiring all this up in a safe and appealing way. But so far its looking just fine. Sure beats Christmas lights. Yes sir! Sure beats Christmas lights!

Dandy