Read the Free Trolleyville Times Monthly for the Latest News on Prototype and Model Traction!

Monday, October 04, 2021

For Justice and Glory!

 Anybody Remember the Keystone Cops?

I thought it would be funny to model them.


The Keystone Cops (often spelled "Keystone Kops") are fictional, humorously incompetent policemen featured in silent film slapstick comedies produced by Mack Sennett for his Keystone Film Company between 1912 and 1917  -  Wikipedia

After the demise of Jordan Highway Miniatures vehicles I started looking around for other period models. This Model T Ford is a 3d print from Robert Sprague 3D Designs on Shapeways. It's not as fine of a model as Jordan but I wanted to see what I could do with it.

Tru-color paint was used for the black.  But the Floquil metallic paint used on the radiator and other details turned out too glittery for my taste. It works fine on tiny details like the hubcaps, but the broad expanse of the radiator and even the marker lamps is too much. A brass colored paint would look a lot better for this.  As is typical of 3D prints the model has some visible strata from the printing process and some details are oversized to meet the 1mm minimum thickness.  
But truth be told- I'm trying to get G scale results with HO scale models with this ultra close-up photography I'm doing. But really the model looks just fine when observing the scene when standing next to the layout.

So it is what it is.  When it comes time to populate my layout with automobiles I'll reassess this model to see if I'll use it or not.  And then I called the Model T project finished for now.


Then, while researching something unrelated, I came across this production still from a Keystone Cops flick.  "Hm! I wonder if I could model that" I wondered to myself . "Well... I do have that Model T model and covering it with cops would hide most of it defects" I replied to myself. "Ah- but what about all those cops" I countered, "nobody manufactures HO scale cops like that". Darn! I was right. I was defeated. Until I came across this:  
 
Preiser Unpainted Firemen. The uniforms are really similar and they even have those helmets like the Keystone Cops! Well what do you know?  Everything fell into place. This is a feasible project after all. Well I gotta do it now!

Trying out different figures to see where and how many I can fit.

The 12 selected figures were primed with Tru-Color grey primer.  Then they were painted with FolkArt craft paint. Not as nice as model paint but effective. The buttons and badges were painted with the same Floquil Brass glitter paint as the automobile. 

The Walrus Moustaches are a must!  Now its time to see how many of these guys I can fit in the auto.

I really didn't expect to fit them all in- but they all fit in! Well technically the 12th one isn't IN the car but is running to catch up.

Here is the photo set-up. My phone that I'm taking the pictures with doesn't fit under the overhead wires. So it is laying on a cardboard tube cut to length to keep the phone just above the wires. Under the camera lens is a First Surface Mirror set a 45 degree angle aimed at the scene. A flashlight is illuminating the "sky".

And voila! The completed scene.

I might revisit this at a later date. Add some billy clubs to their hands. I'll see if I can introduce the appearance of speed. Maybe turn those front tires so its making a hard turn and introduce some lean to the suspension. I'll take a look at those Artitech Model T's when they become available again.

But for now I'm satisfied. I think this photo is hilarious.

Yes sir- hilarious!

"Good job Dandy"
"Awe thanks Dandy"

Dandy

Monday, August 30, 2021

Frogs on the Overhead

 Overhead Crossing Frogs


I just noticed that I haven't finished swapping out the temporary overhead crossing frogs with commercial frogs.


But the temporary frogs have been working out so well that I might just keep them!


Negotiating Frogtown.


Here are the four 90° double track crossing overhead frogs (track obscured for clarity). The two crossings on the left still have the small washers that I was using for temporary crossing frogs. The two crossings on the right have been finalized with crossover castings. But since the washers have been performing flawlessly and they have a much smaller appearance that I've decided to keep them as is. They just need to be finalized by trimming the excess wire and solder it all in place for electrical continuity.

As for the angle crossings I don't think the washers were working well for that. So they have been swapped out for the adjustable crossing frogs. These work great.

Rivers Trolley & Traction Adjustable Crossovers are what I used. But I have no idea where a fella can purchase them these days. Might have to monitor eBay closely for them.

Yes sir! Closely monitor eBay for frogs!

Dandy

Monday, August 02, 2021

How 'bout Them Apples!

 In studying photos of 19th century city streets I've noticed that "road apples" are quite ubiquitous.

But the question is: should droppings be modeled?

I mean- it is natural after all. Horses are going to doo what horses gotta do!

Both Images: Shorpy.  Color: Hotpot

And doo they do a lot! It was quite the problem back in the day. Particularly in New York City that when the elevated railroads were built the steam locomotives were hailed as a solution to the pollution!

But doo I want to model "excreta" though? I suppose I might if it's not too conspicuous- one of many details to notice. And it is kind of funny. But I doo want to be careful- it is a poop joke after all. I don't want to be crass. Just... realistic. Which begs the question- what to model dung with?

The question of what to use to model "after parts" had been lurking in the back of my mind for some time now and one morning while emptying my coffee maker I noticed that the used coffee grounds are about the right size and color for manure. So I set up the test photo shown at the top of this post and well, yeah, not a bad result. So I'll keep it in mind and see if I can tastefully incorporate "effluent" into some of the scenes on the layout when I get to the detailing stage of layout construction.


All I need now is for someone to make some HO scale Pooper-Scooper figures, then I can make a nice little scene like this.

Yes Sir! HO scale Pooper-Scoopers!

Dandy


Monday, July 19, 2021

Street Congestification

 Oh! Traffic Around this Town is getting Nuts!

Left to right: Hauler: Velociped, Berkshire Valley: Buggy,  Artitech: Ford T Runabout,  LMB Old Time Trolley. with Preiser and A.C.Stadden figures.

I'm finally getting some nice photos on the layout.
Yes sir! Finally!

Dandy
Sunday, July 04, 2021

Fireworks

 Electrical Arcing at the Southern California Railway Museum.

The track was relocated but the overhead hadn't been yet. So the brakeman had to try and guide the trolley wheel. But when the wheel left the wire, fireworks ensued.


One thing the video didn't capture was the brilliant green color of the arching: 


Enjoy the fireworks and have a happy 4th of July.
Yes sir! Happy 4th of July!

Dandy

Monday, June 21, 2021

Spanned

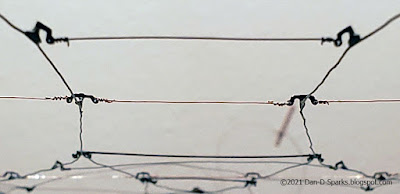
Successfully Strung a Span Wire Between Two Electroliers - Without Blowing out the Lamps!

This is a big relief since the brass Electroliers are ground for the 3 volt DC streetlamps AND act as an anchor for the 15 volt AC overhead.


The fear being that the 3 volt LEDs are exposed to the 15 volts running current. But since each have their own power source it doesn't seem to be a problem.

Now that all of the Electroliers are in I would really like to install the span wires between them. The overhead in the intersection is a bit bouncy without them. After the success of a little test rig I have commenced stringing the span wires.

These old wooden temporary poles and span wires can finally be removed. The poles were on the building property line and with them gone now, I can finally get to building the buildings.

Trying something new here.  The rule has been Nickle Silver wire for the contact wire and Phosphor Bronze for the span and pulloff wires.  But for these new span wires I'm trying 30 AWG High Quality Polyurethane Enameled Copper Wire. This wire is softer and much easier to work with. The phosphor bronze I was using just loves to pierce the skin!

I found the Polyurethane Copper Wire much easier for wire wrapping and its easier to straighten than the phosphor bronze.


Hmmm... seeing my wire wrappings up close in photographs I see that my wrappings are kind of loose. I need to work on tightening my wire wrapping skills.

Yes sir! Tighten my wire wrapping skills.

Dandy

Monday, June 07, 2021

Horsing Around

 Horse Trading and Harnessing

Comparing HO scale harnessed horses and adding duct tape reins. 


After finishing construction of the Berkshire Valley Models Buggy (right) I needed to add a horse. But the horse that Berkshire Valley offers (left) is rather heavily harnessed for such a light buggy. So I looked around at other HO scale harnessed horses.

It wasn't until after I ordered horses from Knuckelduster Miniatures that I noticed that their horses are identical to Berkshire Valley's horses! (They do come in two poses though). So choices are limited. Taking a look at the Jordan Highway Miniatures (out of biz sadly) horses (left) I noticed that they are more lightly harnessed. So I swapped out the horses with the Highway Miniatures Delivery Wagon since heavier harnessed horses would work better with that.

So I painted up the Jordan horse and attached it to the buggy. But after the previous blog post, the lack of reins bothered me. I considered different materials for the reins (thread?, tiny brass or styrene bar?) But as I was repairing a black leather seat with black duct tape it occurred to me this might make for great reins material.

I laid a piece if duct tape on a piece of glass and sliced off a very thin piece.

And stuck it on. The bottom and sides of the duct tape is white, so a little touch-up paint is required. But I really like the leathery look of the duct tape. Note to self: start with the driver and work towards the horse. Its easier to trim the reins at the nose of the horse rather than inside the buggy.

It was a little tricky installing the reins. But it took me longer to write this blog post than it took to install the reins, so... yeah. But I'm pleased with the results. We'll see how this holds up long term.

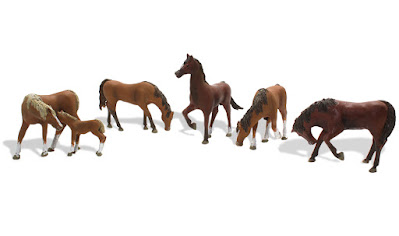
It occurred to me that duct tape might be a viable way to add harnesses to ho scale farm horses like these from Woodland Scenics. Then we can press these guys into service! (Except for the pony of course - I'm not heartless!)


Then there are also some well done draft horses available on Shapeways. I'll probably give these a try at some point.
So there are some good options out these these days for a variety of harnessed horses.

Yes sir! A good variety of horses these days!

Dandy


Monday, May 24, 2021

Recolorizing a Berkshire Valley Models Buggy Photo

Build a Berkshire Valley Buggy.  Take Photo of Buggy.  Decolorize Photo of Buggy.  Have AI Recolorize Photo of Buggy.

Artificial Intelligence is getting kind of smart.  I came across a site for colorizing old black and white photographs and I wondered how well it would colorize "old" photos of my layout:

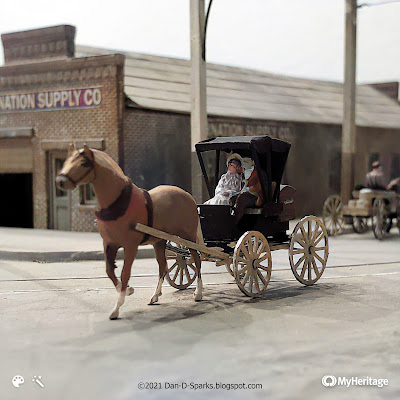
Recolorized. I just finished building this Berkshire Valley Models Buggy in HO scale so I thought it would make a good subject for trying out AI colorizing.

Original Photo. This is the photo I took on the layout. It's interesting to compare it with the AI photo (top). Since I gave the ai a black & white photo (below) it had to guess the colors. It nailed the horse color. It assumed the street was concrete and colored it grey. I kind of like what it did with the brick color. It guessed the mans jacket was red rather than green. And really didn't do much with the yellows.

The black & white photo the ai had to work with. I took the original photo into Photoshop and took out the color and then uploaded the result to the MyHeritage site. And just like the old timey photo tinting studios from back in that day, it had to make educated guesses with the colors.
 
Interesting results. And I can assume this technology will only get better as time goes on.

Yes sir! The technology will only get better!

Dandy

Monday, May 10, 2021

Street Track and Overhead Cleaning Part 2 ~ Wet vs Dry

Cleaning the Overhead with a Conductive Contact Cleaner and Keep Alive Decoders to "Track in the Dirt and Track out the Clean".

In the last post I wrote about the tools and cleaners I've tried and the ones I'm actually using. This post I'll address how I'm using them to clean the hard to reach track and overhead.

Car № 107 got its decoder before the availability of KeepAlive decoders. So if the track isn't perfectly clean its lights will flicker.

Some years ago there was a lot a debate over "Wet vs Dry" track. Some of the cleaners (like DeoxIT) conduct electricity so why not just leave the track wet with the stuff? If the track get dirty the trains will still run. While others argue that dry, shiny track is the way to go. Personally I find that starting out wet and working my way towards dry works out best for me.

Attack plan. First of all, I start with a general cleaning of the easy to reach outside loops leaving the hard to reach intersection for last. I'll run a car on a loop and address any stalls or hesitation issues until the loop is running well. Then I'll move on the to next loop until they are all running well. Then its time to attack that intersection!

As you can imagine, the intersection is the last place I want to try to retrieve a stalled streetcar. That overhead wire is like a cage. So clean track and overhead is quite desirable there. Cleaning the track through the overhead with the Double Headed Cotton Swabs is straight forward enough. But that overhead! So to clean it I developed a "trick". Let the cars themselves clean the overhead:


This is where having cars with "Keep Alive" decoders come in handy. First I'll give the capacitors in the decoders time to charge up (~20mins) while they run around the outside loops. Then I'll place a drop of DeoxIT on the contact wire just before the intersection. Then throw the turnout to route the car into the intersection. The pole will collect the DeoxIT and spread it on the wires as it goes through the intersection. The "Keep Alive" will keep the car moving through the dirty overhead until it reaches the clean track of the next loop. Each time the car traverses the intersection the trolley pole collects dirt from the contact wire and then spreads it to the clean contact wire of the outside loops. All I do is keep cleaning the track and contact wire on the easy to reach outside loops. The cars track in the dirt to the outside loops and track out the clean into the intersection. And of course, I'll clean the cars wheels and poles from time to time.

Once the track and overhead is clean enough to run my cars that don't have the "Keep Alive" decoders well I'll begin the process of drying the track. Leaving the track and wires wet with DeoxIT will just collect a thick layer of gunk and when that dries its difficult to get it off. In the photo above, the upper rail is covered with some gunk that the cars tracked in from the intersection. While the lower rail has been polished dry. That dry, polished track and overhead throughout the layout is the ultimate goal.

San Diego Electric Railway wagon outfitted for overhead wire maintenance.
So to recap:

DeoxIT on double ended cotton swabs for a general cleaning of the track and overhead as well as the poles and wheels on the cars.

Let the cars track the DeoxIT around on the rails and overhead until the layout is running smooth.

Use the double ended cotton swabs to begin the process of drying and polishing of the track, overhead, poles and wheels.

The longer the layout runs for the cleaner it gets.


I've been using that method for years. So of course as soon as I write a major blogpost about it a "new" product comes along that's highly recommended. I'm going to give this NO-OX-ID "A Special" a trial and see how it compares to my usual method. If I find significant improvement with it I'll let you know.

Yes Sir! The cleaner it gets!

Dandy

Monday, April 26, 2021

Street Track and Overhead Cleaning Part 1 ~ What I'm Using.

The BEST way to keep track and overhead clean is to simply run your trains! But oftentimes we need a little extra help to get to that point first.

After spending years trying everything to clean track and overhead, I've seem to have finally settled into a pretty good technique.


As you can imagine, cleaning track under the overhead wires can be quite challenging. But clean track and overhead is imperative for smooth operation. So what to do?

I used to reach under the overhead with a Bright Boy track cleaning pad. But this has proven to be rather destructive, my elbow inevitably bumps a line pole somewhere, slightly bending it enough for the span wire to sag. Unsightly!  And with more and more delicate details being added to the layout, well, my big ol' clumsy paw is just too much. The city now has ordinances against such practice!

The Bright Boy is also too abrasive. It scrapes the paint from the streets revealing the bright white plaster underneath, ruining the realism of the scene. (If I had to do it over again, I would add a grey tint while mixing the paving material (Durham's Water Putty) so if it does chip, it would still have the street color). So at some point I'm going to need to do some touchup painting on the streets- with the overhead in place!

So- except for extreme situations, the Brightboy is out!


So what to do then? Well, one of the benefits of being a member of the Southern California Traction Club are members who have experience of such things.  John McWhirter for one has a great way of cleaning the clubs track and overhead which I have adopted for my own layout:

Double Headed Cotton Swabs. These are perfect for reaching through the overhead to clean the rails. The cotton heads are tightly wound so I'm able to scrub the track without them getting all fuzzed up like Q-Tips do.


Apply drops of the cleaning solution to the ends of the swab for cleaning rails and then apply drops to the sides of the swab to clean the contact wires.
The swabs fit nicely in the girder channel scrubbing the contact surface well.
Slide the side of the swab to clean the contact wire. I'll pinch the wire between my thumb and swab for extra tough spots.


I picked these up at a (now defunct) electronics store, but they are readily available on line. They come in packs of 100 for heap cheap.

For the cleaning solution, DeoxIT works very well for me and seems to be widely available.  Many model train manufacturers also offer track cleaning solutions. A nice property of these contact cleaners are that the solution conducts electricity!

Which brings us to- Wet VS Dry track and overhead. But I'm out of time right now so I'm going to end this here and tackle this subject and the cleaning process with the next post.

Yes sir! Wet VS Dry contact surfaces.

Dandy