Showing posts with label win. Show all posts

Monday, June 09, 2014

Casting Fail

These Lamps Are Way Too Hard To Build To Have Failures Like This!

I can't tell you how disappointing it is to open the mold after 3 days of curing to find it to be a complete fail. It takes a better part of a day to build the armature and to pour the casting resin around it. It's too time consuming and costly to have this happen!

I'm not sure where I went wrong, I didn't do anything different. The only thing I can guess is that the resin ran when sandwiching the two parts of the mold together, creating these bubbles. Surface tension of the resin and no escape routes for the trapped air didn't allow the resin to fill in the voids. This clear resin takes much longer to set than the Smooth-Cast resin does, so its much more liquidy when to two halves of the mold are sandwiched together.

I'm amazed at how delicate some of these structures are. The resin stayed in the corners and edges creating this skeletal look. Unfortunately, I can't think of a way to save this lamp. The resin would have to be pried from the armature, which would damage it. Maybe- I could fill the voids with resin and put it back in the mold? Maybe?

So put it in the past and carry on. Since then I casted this perfect casting. This time I was sure to "paint" the sticky resin onto every surface of the armature before closing the mold so that it would be less likely to run away. And it seems to have worked! So- 3 useable lamps down, 9 to go! Sheesh!
Live and learn? Yes sir! Live and learn!

Dandy

Monday, March 03, 2014

Moment of Truth

Pouring the Resin Around the Lighting and Overhead Support Armature. And Hopefully End Up With A Reasonable Looking Streetlamp!

Here it is! From a virtual model and crazy idea to something I can actually hold in my hand! The freakin' thing actually turned out right.

Here is how it went:

Last post I had just finished building the support armature.

First the rubber mold needs a couple coats of mold release and allowed to dry. Then the armature is placed into the rubber mold into its precise position. That means bending and wiggling as needed to get it just right. (Note: I took this photo before I added the lamp globes).

Now its ready for the resin pour. I used Smooth-Cast resin from Smooth-on from the kit as described in this post. Just like the silicon rubber used for the mold, its mixing equal parts of resin and catalyst.

The top part of the mold (left) was poured first and allowed to set a bit while the resin was poured carefully around the armature in the bottom half of the mold (right). I'm not too concerned about using too much resin as I want to be sure it gets everywhere.

The resin in the top half has set enough (2 or 3 minutes) where I can flip the mold over. The two mold parts are keyed so that they almost lock together for perfect registration. I clicked the top parts of the molds together and then squished them together from top to bottom so that the excess resin is forced out the bottom (where the puddle is). 
The resin only takes about an hour to set fully. The thicker parts set first and the thinner parts take a little longer (the thicker part has more heat from the catalyst than the thinner sections would and so sets first). I knew it was ready to handle when the thin parts of the puddle had solidified.

The mold release allowed the mold to be pulled apart with no problem. And this is my first look at the lamp. And it looks like it worked!
The lamp peeled out of the mold with no problem. Most of the flash snapped right off. The rest required a little filing to get looking just right. Now the question is: Will it light?

It works! It actually works! I think this project is going to work out as intended! I mean some questions remain. How will it hold up to long term use as a linepole? How will the resin casting hold up with a brass armature inside of it over the long term? How long are those bulbs going to light for (I can't change burnt out ones!)? How is paint going to take to it? What am I going to use for power supply? 
But as it stands now, this crazy project is actually working out. I don't why I'm so surprised. But I am just giddy that this worked out. And its just a streetlamp. Not an Electroliner or something fancy like that. Just a streetlamp. But there it is all the same. A one of a kind model streetlamp.

Well then, one down and 11 to go. Yes sir! 1 down and 11 to go!

Dandy

Monday, September 09, 2013

The Tension is Mounting!

Apparently as the overhead is constructed the tension is building, as is evident in the corner poles which seem to be taking the brunt of it all:

I was excited with how quickly the overhead was going up, allowing my cars to progress further down the line. But this development has brought all that to a screeching halt.

So this is what I'm faced with:

A Guy wire is out of the question, the poles are right on the corner.

Swapping out the poles is no easy matter. The wires would have to be cut, the poles removed,  beefier poles constructed, the holes enlarged to accept the larger poles,  new wires spliced in to replace the cut wires, and then all tied together.

There is no easy way of doing this. So I just jumped right in and fabricated new, beefier poles from solid, hard 5/32" brass rod, painted to look like wood.

The eye bolt was carefully removed from the old pole with the backbone and pulloff wires still attached. The old 1/8"diameter pole was removed and the new one installed. A new wire was wrapped around the new pole and attached to the old eye-bolt, maintaining the original tension. And were back in business. Yes sir! We're back in business!

Dandy

Monday, April 18, 2011

Ring A Ding Ding! A Slice of Girder Rail!

After clenching my fists and stamping my feet in a hissy fit over missing out on an authentic San Diego Electric Railway trolley gong, it turns out it went to a better home after all.

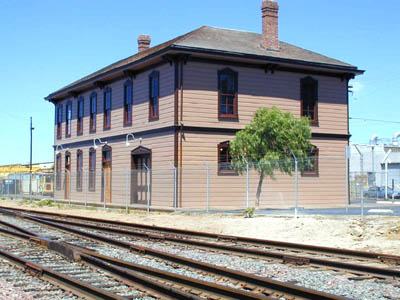
The San Diego Electric Railway Association has as its headquarters the historic 1882 California Southern Railway (ATSF) National City Depot.  They have been there like, forevar, so there is really no excuse for me not ever visiting. So what did I do? I finally paid them a visit.


They have quite of a collection of SDERy artifacts there. I was geeking out over an authentic SDERy conductors bell while mentioning the SDERy gong I saw on eBay when the docent  there said "I think we got that."  He proceeded to pull the gong out from behind an exibit. Sure enough, there it was!
Well I tell you one thing, I am so glad I didn't end up with it. Its huge! And weighs a ton! I would not have been able to display it as intended. I made my peace and gave the bell a ring (nice and loud!). I can not be any happier than to have it displayed at the museum where it truly belongs. So things worked out just fine after all.


Better yet, I didn't leave empty handed. I was able to  purchase another (and more reasonably sized) piece of SDERy artifactory. An authentic, well worn slice of SDERy girder rail (girder rail is rail used for tracks in paved streets). All is well with the world. I am satisfied. Yes sir! Satisfied!

Dandy

Friday, June 19, 2009

Birney Project ~ Window Glass

Model Railroading isn't always fun. Sometimes its downright tedious!

My apologies for the late post but I'm finding that installing the window glass to be just that... tedious.

I'm trying to make good on this post about my method of installing the window glass. But I have run into some obstacles. While trying to install the motor assembly into the Birney body, it kept snagging on the seats, pushing them up. So I spot glued the seats into place with superglue. Turns out that the motor was snagging on some of the figures elbows. So I had to file those down. Now the motor is in there but so are the seats and figures. I can't access the windows to install the glass. If I pry the seats loose, the thickness of the glue remains so that when the seats are reinstalled, they will be sitting too high. Now I'm looking into superglue solvent.

In the meantime, I installed the glass into the front window. I cut a piece clear styrene to span the front windows and glued it into place. But...

As you can see, trying to maneuver the glass into place scratched the heck out of it and the glue got all over. Unacceptable. Lets punch out the glass and try that again.

This time I cut each window pane to size. Using two part epoxy, I applied one part to the window frame and the other part to the edge of the glass. This gave me time to get the pane into the car and into position for installation. Using this suction cup tool, the glass was carefully positioned into place. The two parts of the epoxy contacted each other, the reaction took place and set.

Now thats more like it! There's Birney the Motorman at the controls with a clear view ahead.

Yeah, Model Railroading might get tedious at times, but the results can be very satisfying. Yessir! Quite satisfying!

Monday, March 30, 2009

Birney Project ~ Trolley Poles

Success! Finally. After expensive trial and error searching for suitable trolley poles for the Ken Kidder birney, I finally found a pair that work!

HO scale PCC Form 11 Trolley Pole from Miniatures By Eric available through Custom Traxx.
HTP2s includes Poles, two brass pivots, and two plastic insulators for $32.00.


You know, its a good thing model railroading is a rich mans hobby, keeps the riffraff out ;o)

I treated the shiny brass poles with Blacken-It. This actually turns the brass black but won't chip like paint, AND still make electrical contact. Which is good, because the car is going to be wired for "trolley pole reverse" which means the poles need to make good contact with the hold down hooks on the roof.

Now with the poles installed, we can finally get the electricicles happening. Yessir! Get our electricicles on!