Showing posts with label blueprint. Show all posts

Thursday, March 10, 2016

Track ~ Electrically Isolated Blocks

DC Block Control, Eliminated, and then Revived...

Gaps in the rails.  Originally designed for DC Block Control, DCC eliminated the need for these electrically isolated track blocks.

Power bus. A bare wire is run under the layout following the cloverleaf pattern of the track above to tie all the block wiring together.

Block Detection for Automation. Putting those old blocks to good use, they can be used to give feedback to loconet for use in running the layout automatically or semi-automatically.

Yes Sir! Running the layout automatically!

Dandy

Monday, May 04, 2015

Structures ~ The Backesto Block Building

Dimensional Drawings for Modeling the Backesto Block Building

Here is my working drawing for constructing a model of the Backesto Building for the layout. I'm starting with this building for a couple reasons. One, its one of the most ornate buildings, thus more time consuming to build. So I want to get it out of the way early. And Two, for its historical significance:

The Backesto Building figures prominently in this photo of the opening day of the San Diego Electric Railway. I greatly desire to duplicate this scene in model.


Originally built in 1873 it was San Diego's finest building at the time. It was later expanded a couple of times.

Amazingly, the Backesto Block remains intact today as part of San Diego's Historic Gas Lamp Quarter! Although without all those chimneys (probably an earthquake hazard). The building is about 224 feet long with another 84 foot addition (to the right). I don't have that kind of space so my model will be an abbreviation of that at 70 scale feet.

I photographed the building extensively for the dimensional drawing. I tried to get shots that not only reveal the layout of the building but also the profile of the building.

Did I mention the building is ornate?

The head-on shots show the layout of the building of course, but I also need shots that reveal how far details protrude from the walls.

I lucked out and found this old newspaper clipping revealing how the roof of the Backesto looked in the 1880s. I would have never guessed that pitched roof design hidden behind the parapet.

Early Modeling Attempt

You've probably noticed this building appearing in the background of some layout construction shots. Its my very early attempt to build the Backesto, I'm talking decades ago! Its pretty crude, one of my first attempts to scratch build with styrene. But the fact its held up so well for so long is a testament to the strength of styrene. Its good stuff!

The structure is a corner building, so here is the South side. One of the expansions is suggested on the left. During the Backesto's early years it had a couple of blank walls that had advertisements painted on them.
The era I'm modeling (1890s), Schiller and Murtha occupied the ground floor.

I think the Backesto Block building is a gorgeous building. I'm looking forward to modeling it. This time as a fine model. Yes sir! A fine model!

Dandy

Monday, April 20, 2015

City Planning

What's a City without Buildings?

Its time to start building buildings for this layout. And not just any old buildings. But models of actual buildings from San Diego's historic Gas Lamp Quarter. Because, you know... I like to do things the hard way.


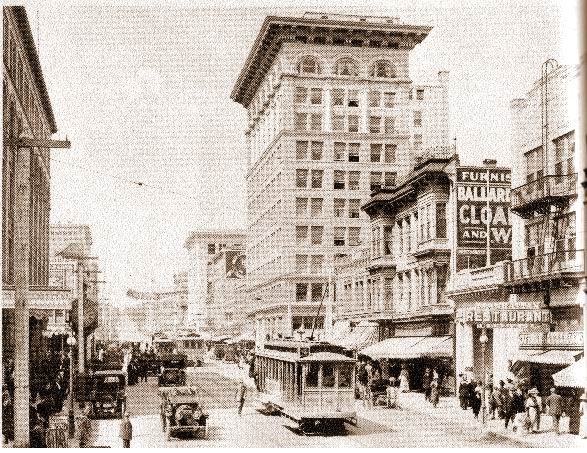
Looking North up San Diego's 5th Street c.1915. Most of these buildings not only exist today, but are beautifully restored as part of San Diego's Historic Gaslamp Quarter.

The Plan
Each street on the layout represents a different decade, from the 1890s to the 1940s. Pretty much the entire era of the San Diego Electric Railway Co (1892 to 1949). The architecture of the buildings will be of the era of the street on which they stand. 

Because this is a model railroad and space is a premium, this layouts blocks are rather short. My blocks are just over 100 scale feet compared to San Diego's 200 x 300 feet. This for the most part relegates me to modeling exclusively corner buildings. Though I might be able squeak in a small mid-block building somewhere, its not a priority. Corner buildings are just fine.

An old edition of a San Diego newspaper touting some of the city's finer buildings. I originally wanted to include all these buildings on the layout, but I have since come to realize that the U.S. Grant is too huge. It's around 200 feet wide and wouldn't compress down to 100 feet very well. But the Union Building would fit well, especially since it housed the offices of the San Diego Electric Railway!


The Ultimate Goal:

This photo of the double-decker San Diego Electric Railway #1 rounding the corner in front of the Backesto Building was a big inspiration for the conception of this layout. Other than getting the layout up and running as designed, replicating this scene in model is my ultimate goal. Modeling ol' #1 will be the cherry on top. Until then, I think I'll start by constructing a model of the Backesto Block building. That should be a good challenge to start with. Yes sir! Should be a good challenge!

Dandy


Monday, April 06, 2015

Bungalow Row

A Suburban Neighborhood Module Designed For The Southern California Traction Club Layout.

Since the old SCTC modular layout was a continuous loop, adding a module to one side of the layout required another module of the same length on the opposite side. So by adding the Tarnation Module to the industrial side of the layout, a companion module would be needed for the suburban side of the layout. So I designed this:

Bungalow Row. A standard 2'x4' double track traction module.

Nothing fancy in the way of trackwork. Just the standard double-track on a private right-of-way on the center divide of a boulevard. 

This postcard of a neighborhood in Pasadena, California with the Pacific Electric tracks down the center of the street has the look and feel I wanted to capture with this module.

A couple of narrow residential streets like this intersect the main boulevard.

These streets would be populated with various styles of craftsman homes.

To break-up the grid pattern a bit and as added interest, a dry wash cuts through the module at an angle. This would allow for a short wood pile trestle for the tracks and a couple concrete bridges for the boulevard.

I would have like to have included this passenger shelter on the module, but I just wasn't able to get it to fit. Too bad, that would have been a nifty detail.

The Models

There are some pretty decent models of bungalow style houses available out there:


Barbs Bungalow by Atlas could be built up into a really beautiful house.

Alpine Division (old Suydam) has a couple of rather nice craftsman kits of Craftsman style houses. With a lot of work, these could be built up to look great.

Woodland Scenic's Granny's House, all built up and ready to go.

 Rix even offers a couple of houses that could be built up into some pretty decent models.

Speaking of Rix, they offer this overpass that would be perfect for boulevard crossing over the dry wash.
The tracks would cross the wash on these trestle bents by Grand Central Gems.

AMB LaserKits even offers the Pacific Electric style passenger shed seen in the prototype photo earlier in this post. I would love to fit this in!

But alas... the SCTC has taken on a fresh new direction rendering this module obsolete. But the module could conceivably be redesigned to fit the new layout. So maybe there's life in this after all! Yes sir! Maybe there is some life in this after all!

Dandy

Monday, November 03, 2014

What In Tarnation!


Plans for an Oil Drilling Module for the Southern California Traction Club

Today's post is presented by the Vice President for Planning of the Dan D. Sparks Plywood Development and Transportation Co. Arnie Clever:

Shareholders, interested parties and what-not,


Mr. Dan D. Sparks and the Board of Directors and such have declassified some documents plans and what-not and have asked me to share them with you to you today this week. As you might know, the DDSPD(and)TCo also has a vested interest in the Southern California Traction Club too. So the company had me draw up some plans for an oil drilling operation outfit for that clubs layout. And boy! Did I come up with a whopper of a plan! I call it "Tarnation" yep. And its packed full of oil drilling goodness. Check it out for yourself and see!:
Arnie Clever

Tarnation Oil Drilling Module

2'x4' HO Scale Traction Module
  • 5 Oil Derricks with containment ponds.
  • An oil supply warehouse with steam boilers
  • A freight and passenger depot
  • Various oil tanks
  • Oil loading racks with tank cars
-all in a compact space. And its very prototypical as well. I actually lifted the layout of these structures from an genuine prototype photograph!:

Huntington Beach, CA. c.1920s

Everything this side of the tracks in the photo are on the module! Starting at the lower right, a road passes a supply warehouse, past some boilers, past a derrick with containment pond, ending at a mainline with overhead trolley wire and what appears to be a cannery (which I substituted with a depot). On the other side of the tracks sits an oil loading facility with tank cars. To the right of the center oil derrick are two tanks and another derrick. And through all that, power lines are strung. Its all there!


The 5 derricks will use the Campbell Scale Models Timber Oil Derrick to start with and then built up to look more like those in the photos.

DPMs Schultzs Garage will represent the supply warehouse.

I'm not sure exactly what these boilers were used for, but I could easily imagine they came in very handy when dealing with sticky, clumpy tar! This one is by American Model Builders.

For the Depot, a modified American Model Builders Northern Pacific Depot fits the space nicely.

This Chama Oil Dock would have been perfect, but it doesn't seem to be available anymore. So other arrangements will have to be made.


The Oil loading platform could be populated with some 1920s era tank cars available from an assortment of manufacturers.

Non-rolling tanks are available from a variety of manufactures as well.

Throw in some Jordan Highway Miniatures vehicles and lots of assorted details, and I think we'll have ourselves a darn nifty oil drilling diorama!

Arnie Clever
Vice President of Planning
Dan D. Sparks Plywood Development & Transportation Co.

Monday, October 21, 2013

Grand Union Overhead

I've seen some Grand Union track-plans published.  But never for the overhead wires!

So the engineering dept of the Dan D. Sparks Plywood Development and Transportation Co. has its work cut out for it designing a reliable working overhead cantanary wires for this intersection.

This detail from a Shorpy photo is the only photo I've ever seen of a (non-modern light rail) Grand Union Intersection. Its a bit asymmetrical with one of the streets cutting off at an angle like that.  But lets see what can be learned from this photo anyway.

This is my interpretation of the wiring configuration gleaned from the Shorpy photo. And I believe this arrangement can be improved upon. I know one factor for reliable overhead construction is that the pulloff wires should be perpendicular to the contact wire. Something that the traction company in the photo hadn't yet discovered in those early years. Having a pulloff wire pulling the contact wire at an angle will increase the tension on one side of the contact wire, and cause slack on the other end. Nice balanced overhead tension is desirable. 

Another interpretation. Here I'm trying to counteract pulloff wires pulling off at an angle by having a second pulloff pull from the other direction. But I have found that the tension of having too many pulloff wires tends to cause the contact wires to loose their tension and sag. A model overhead needs to be a simplified version of the prototype.

Getting a little too complicated here. The nice thing about the rotationally symmetrical design of the Grand Union is that each contact wire has a mirror image counterpart that it can pull off from. All that the line poles have do is simply hold the whole thing up!

Here we go! To get a pulloff wire that  pulls off the contact wire at a right angle when there isn't a place for the other end of the pulloff wire to anchor to requires a backbone wire. Support wires can attach to the backbone wire at an angle, but the backbone wire provides a place for the wires pulling off the contact wire to attach at a right angle.

I think I have done enough figurings. I think now its time to dive in and start laying in some of these wires and see where it gets me. Doing these drawings has given me a good idea of what I need to do and the confidence needed to cut into the mainline wire and add in the turnout pans and diverging route wires. Yes sir! It has given me the confidence to cut in and lay in those diverging routes!

Dandy


Monday, May 27, 2013

The Grand Plan!

Finally! The mysterious, top secret, hush hush, track plan finally revealed!

Judging by all the comments, emails, cards and letters we haven't received, yous guys aren't exactly dying of curiosity about the track plan of this dandy little pike! So without any further ado, here you go anyway:

Ta-Da!
Four city blocks of downtown traction action, featuring a Grand Union (or Grand Junction) intersection, all contained within a 4 1/2 x 4 1/2 foot layout. So whaddaya think? Worth the wait? Hmm? Yes sir! Worth the wait!

Dandy


Monday, October 22, 2012

Jumping on the 3D Printing Bandwagon!

Encouraged by the fantastic results Volkmar Meier has been achieving with Rapid Prototyping, Additive Manufacturing, Stereolithographic 3D Printing, I have decided to give it a go myself.

I was approached by Shapeways years ago inviting me to try out this emerging technology of 3D printing. Looking into it, I wasn't impressed with how rough the 3D prints were. So I dismissed it for the time being. But the technology has marched on and 3D prints are looking really nice these days!

Volkmar's blog, Interurban Railways, chronicles very nicely his construction of a Terre Haute, Indianapolis & Eastern wooden combine, from a 2D drawing, to a 3D render and then finally an actual 3D Print model. There is still a slight texture to the finished model, but once painted, its hardly noticeable. His work has embolden me to finally give it a try.


But before building something as elaborate as an interurban though, I thought I would cut my teeth on a bite-sized project first. I've been wanting to build a model of these inner city junction towers for quite some time now. I even started building one out of brass seven years ago, but the model wasn't progressing as well as I would have liked. So that project stalled. But now I think this tower would be perfect for a 3D print noob like me.

Another deciding factor is that I still have the drawings I made for the brass model. All I have to do is import these drawings into a 3D program and build the 3D model over it. There are many 3D programs out there that are well suited (and cheaper) for modeling structures for a 3D print, but I will be utilizing 3D Studio Max for this project. By profession I am an animator with years of experience animating with 3D Studio Max. So its a logical choice for me. And its already installed on my computer.

Some of the details won't print well and so have been omitted, such as the awnings and the stirrup steps. These will be added afterwards. I did include pilot holes for the stirrup steps up the post, we'll see how well they print out. The post is hollow so that wiring for lighting could be run up from the base to the tower. The roof is removable so that the interior can be painted and detailed and an occupant added (the most important part!). 
There has been a flurry of discussion about 3D printing on a Yahoo Traction Modeling group lately. And after carefully weighing what folks had to say about the quality of different 3D printing companies, I have decided that since this is my first model and I want to see how much of the detail shows up on these prints, etc, I'm going to go with a company that is the least expensive but yet still has decent quality. So I put in an order with Shapeways (White Detail). When the model comes back, I'll see whats working and what isn't, make adjustments to the 3D drawing, and then place an order with an expensive, excellent quality company. Yes sir! An expensive, excellent quality company!

Dandy