Showing posts with label motor. Show all posts

Monday, October 03, 2022

#135 ~ Motorin'

 A Motor and Mechanism for #135

West Coast Traction Supply's Model of the SDERy Class 1's were Designed to Fit the Bowser Drive System .


So I ordered the Bower Drive System from CustomTraxx (125130).

Installed! But I did need to do a little filing of the floor to get the truck to swivel properly.

The only tools I needed to purchase (and should have already had) is a 2-56 Tap and T-Handle so I could thread the plastic to accept the mounting screws.

A.J.'s video for installing a Bowser into a Illinois Terminal box motor is identical for the SDERy car. So this is what I followed for the installation.

A little filing of the bolster was required to help the gearbox to clear the tightest radius curve on the layout (6 7/8").  But it looks like I'm going to have to remove the skirting on the bottom of the car for the side frames to clear.  It's essentially a choice between a perfect looking model or an actual running model.  This layout is designed to move!  So I'll take the hit on the side frames so I can run these cars on the layout.

Yes sir!
I'll take the hit.

Dandy

Monday, June 29, 2020

№ 9 ~ Going for a Drive

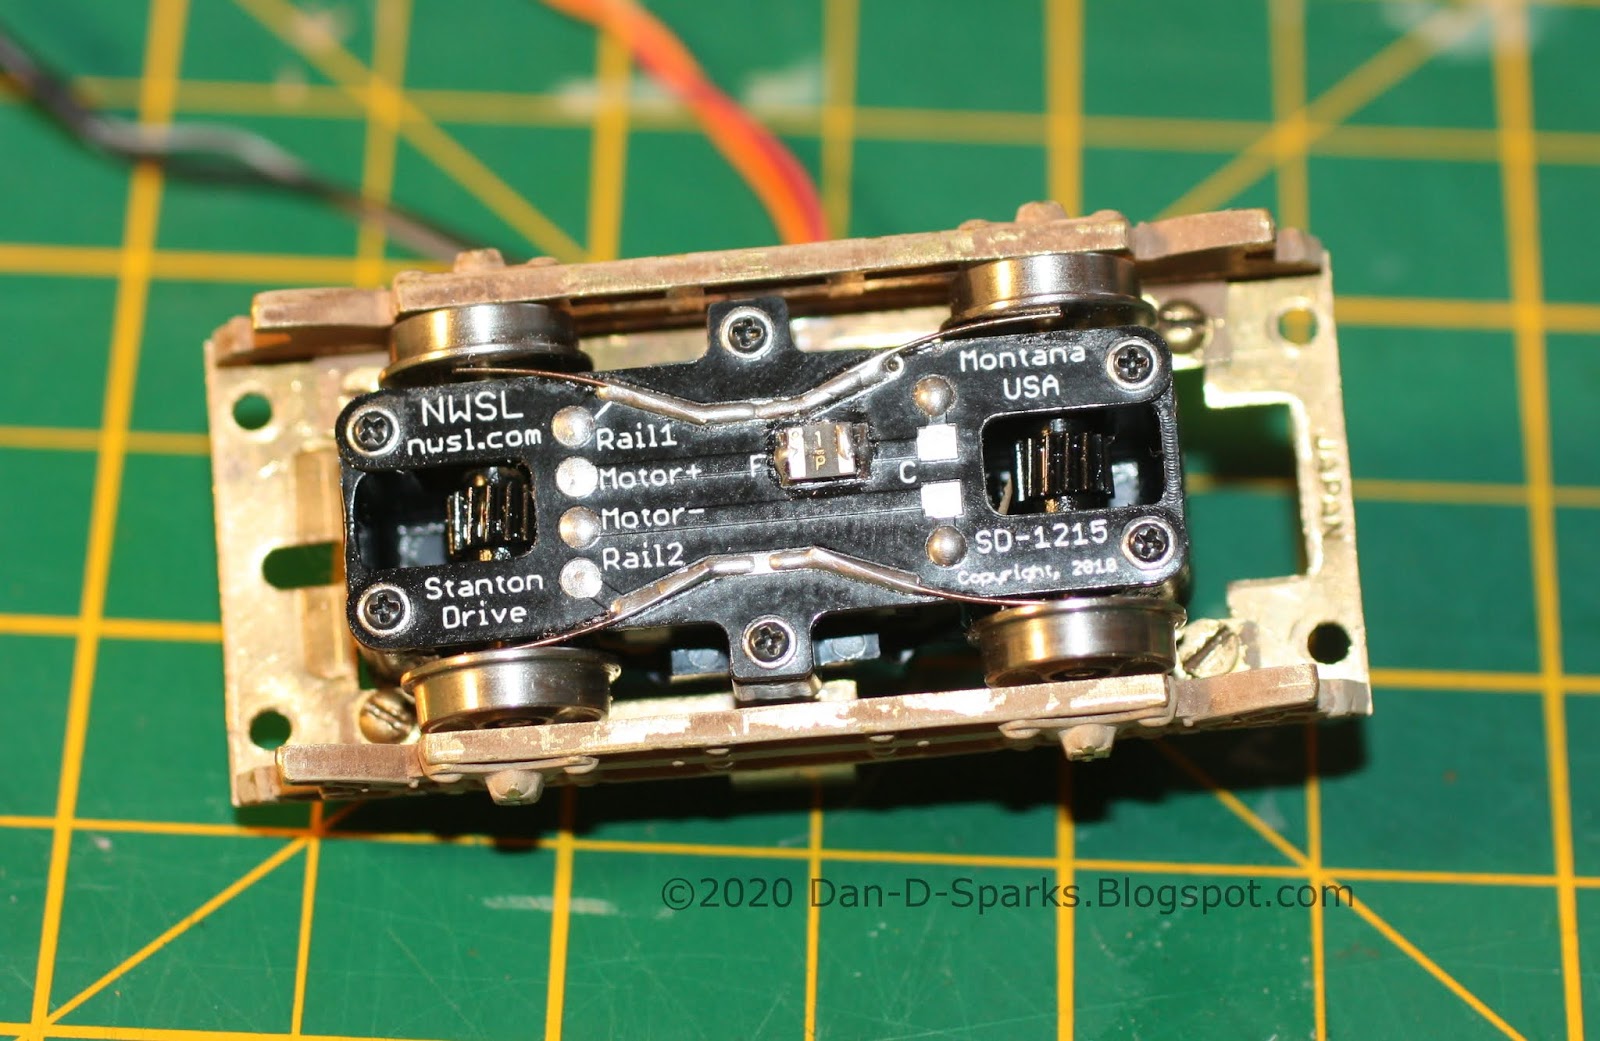
A NWSL Stanton Drive that is.

     In a previous post I had mentioned that motoring this trolley would be the stumbling block for this project. But a Dan D. Sparks Blogspot reader Don Ball had commented that he has had luck with the  NWSL’s new DCC-ready, self-contained underfloor power unit. So after looking in to it I've decided to order one and give it a go.

A quick look, it looks like it should fit (somehow):

Specs:
H.O. Scale NWSL Stanton Drive Model 1215
8'0" Wheelbase
33"/110 Wheels

The 33" wheels are the smallest that NWSL offer. The original wheels on the model are 28". So I had to give a little there.
I also went with the 110 wheel width. Four wheel cars notoriously ride rough, model or prototype. So the wider wheel width should help the car successfully navigate the intersection every time.


Just barely fits! Couldn't be any bigger. The corners of the Stanton almost touch the four screws holding on the side frames. If it was any bigger I would have had to find a different way of attaching the side frames.

The original floor had to be opened a bit to fit the Stanton. I was able to keep the original weight in place. A motor mount was fabricated for the Stanton to screw onto and hold it at the proper height.

An important thing to note is that the Stanton is not symmetrical in length. The housing was designed for two different wheel base sizes (probably 8'0" and 8'6" in this case). I have the smaller size so one of the wheel sets is closer to the pivot than the other. So Note to Self: The motor mounts one way (wires opposite side of pivot from the weight).

It's in there! What was once a formidable task is now in the past. Relief. Now it's time to move forward. Next: Decoder and a Pole.

Yes Sir! Keep moving forward!

Dandy

Monday, February 25, 2013

Diablo Unchained

Mounting a Motor to the Diablo Power Truck couldn't be any easier!

With the Diablo Power Truck built and installed, I added a small drop of Labelle #108 oil to all the moving parts (except the belt- You want friction there!). Now I'm ready to install the motor.

Hollywood Foundry's instructions for this are very clear and concise.  So don't do as I do, do as they say!


 The drive shaft of the power truck is a bit on the long side for this car. I want the motor to be reasonably centered so that the car is well balanced to aid in reliable operation. So a little trimming is in order:


A cutting disk equipped Dremel tool made quick work of trimming the drive shaft to size.

- and now the motor is well centered and ready to be mounted.

 In an attempt to get the cars in my fleet all running at similar speeds, I ordered a motor that was around the same size as those used in the Niles cars. Which is a little on the small size apparently*. So I had to add a few layers of double sided tape the get the motor up to the right height for the drive shafts to line up.
*Some people insist that its best to use the largest motor that could be fit ( I don't want to name any names but, his name starts with a "F" and ends with a "-red Gurzeler"). So that's something to consider.

 I was able to get the two shafts to line up pretty darn well. Which is good! You know, all in the name of reliable operation.

 A nice length of Silicon Tubing is included in the power truck kit. A little longer that what I could fit. So a work order was placed with the maintenance dept to trim it to size.

The silicon tube was worked onto the pulley shaft and then the motor shaft. Then the motor was pressed firmly into place. And that's all there is to it! No screws, no drilling, no nothing! The tape is more than sufficient to secure the motor in place. It couldn't be any easier to mount a motor than this. Yes sir! Couldn't be and easier!

Dandy

Monday, October 10, 2011

Niles Project ~ Strategic Seating

Arranging seats around the motor so its not so conspicuous.

Additional seats are fabricated using the original seats as reference:

From Right to Left (above), the narrow brass bar stock is used for the seats and the wide bar stock for the base. The bar stock is measured, marked and cut. The wide bar stock is notched so that the tabs can be folded up as the seats legs. The wide center tab is ground off with a moto-tool. The narrow stock is bent matching the angle of the original seat backs. Then the seats and base are soldered together. Take care with soldering the seat assemblies to the floor. My seats are a tad too close to the sides and scrape when the body and floor come together.

Installed and painted. Some seats are right over the motor mounts. So seats were fabricated and then soldered to flat bar stock thick enough to get the seats to their proper height. Holes are drilled to accommodate the mounting screws for the motor. So what you see here is a sandwich of floor, mounting plate, insulation, motor tab, and then seats, all screwed together.


See? The motor is already disappearing into the background. If you look closely, the front seats of the center section (behind the figure) are seat backs only. You can see holes on the floor in front of them where the tabs on the bulkheads attach to the floor when the body and floor come together. Right where the seats are.
Alright, the seats are in and ready for paying passengers. Yes sir! Paying passengers!

Dandy
.

Monday, August 08, 2011

Niles Project ~ Gurzelin'

Installing a Hollywood Foundry Gurzeler on Niles #105.
The Gurzeler is the second mechanism that I'm trying out on these Niles cars. #107 got the half floor which has worked out just fine. And now #105 will get the Gurzeler. Each mechanism has it advantages.

This is the city. Los Angeles, California. I belong to a club here. The Southern California Traction Club. I'm a traction modeler.
Sunday, 2011, a club member who goes by the name, interestingly enough, of Fred Gurzeler, approaches me. Fred, a man of a few words, reaches into his pocket and pulls out a small object. Its an etched plate. He hands it to me explaining that its a mounting plate for mounting the Gurzeler mechanism to Suydam PE 414 cars. No mention of where it came from, or what those mysterious markings mean. Just a well manufactured mounting plate. That's how Fred operates. Who am I to argue or ask questions? Its exactly what I need. Thanks Fred. I owe you one.

Exhibit A.
The mysterious Gurzeler mounting plate.

While soldering the mounting plate to the floor, I managed to unsolder one of the seats. And maybe some underbody details. No matter! Easily fixed.

I wasn't able to get the opening for the belt exactly centered because the plate has to fit between the interior bulkheads that the floor screws into. Even if I did, it later proved to be a problem. The opening needs to more towards one end or the other so that the motor is centered inside the car because the flywheel protruded into the interior bulkhead base. (Edit: Turns out that if I had ordered the Gurzeler Motor Package, I wouldn't have had this problem! DDS 10-11)

The Gurzeler is a simple yet brilliant design. The motor is mounted in place with double sided tape which also acts as a sound barrier. The belt (not an O ring, but an actual belt made to withstand the tension) replaces the noisy gear tower and also pulls down on the motor, helping to keep it in place.

Under floor view. I chose silicone tubes to transfer the power to the LowBoy trucks. Seems to me silicon tubes would be the easiest to replace should they fail after a while.

With no giant motors under the floor and those silicone drive shafts, these cars should be able to negotiate some crazy radius curves now!

This all went together easy-peasy (except for the off-centering of the motor. See below). The motor and silicone drive shafts are nice and level. I added a Miniatronics 2 pin Micro Mini Connector socket by soldering the leads to the motor and gluing the socket to the top of the motor. The other plug will connect to the decoder. This makes for a convenient way to separate the floor from the body for maintenance.

(Edit: Turns out that if I had ordered the Gurzeler Motor Package, I wouldn't have had this problem! DS 10-11) I had to cut a notch in the base of the bulkhead so that the flywheel on the motor will clear when attaching the floor to the model. For the folks who don't have their own mysterious Fred Gurzeler and have to fabricate their own mounting plate at home, the openings for the belt drive and screws need to be closer to the end of the mounting plate. We could all use a mysterious Fred Gurzeler in our lives, couldn't we? Yes sir! We could all use a mysterious Fred Gurzeler in our lives.

Its in there! The motor does sit slightly above window level. But models are very seldom viewed from this angle. All motors would be visible from regular viewing angles. So that's where populating the model comes in. Putting folks in the seats will take the attention away from the motor as was done with Birney #301. The only thing guests will notice about the motor after that is the smooth quiet operation of the model around the layout. Now if I could just get to building that layout. Yes sir! If I could just get to building that layout!!!

Dandy

Monday, June 27, 2011

Niles Project ~ Motorin'

Installing a Hollywood Foundry Half Floor Motor Mount and Level Shifting Gearbox on Niles #107.


Right out of the box the mechanism is a pretty good fit. This is going to work just fine.

The immediate problem that presents itself is that the mounting holes don't line up with anything to screw into. The second problem (that I wish I had taken a picture of) is that the gearbox is too low. The drive shaft to the truck is on an angle. And while that would still probably work, it seems to me a level drive shaft would be the most efficient and problem free.

Both issues are easily remedied in one fell swoop by soldering a length of 1/16" x 1/4" brass bar stock to the frame.

Fortunately I have the good folks at the Southern California Traction Club (and their drill press) to help me drill and tap the holes for the screws. The motor also came with a silicone mounting pad to absorb the noise. I cut it to size and placed it between the new brass bar and the half floor mount as seen in the photo above.

Between the new brass mounting pads and the silicone pads, they lifted the motor to just the right position for the drive shaft to the new LowBoy Trucks to be perfectly level. And the motor is still below window level. All thats left now is to transfer the sideframes from the old truck to the new truck and wire the motor to the decoder. Then this car will be ready for a spin around the test track. Yes sir! All ready for a spin around the test track!

Dandy

Monday, June 13, 2011

Niles Project ~ New Mechanisms for the Old Girls.


Looks like Hollywood Foundry has two mechanisms that will potentially fit the old Suydam Niles cars. The Half Floor Gearbox or the Gurzeler, both used in conjunction with the BullAnt LoBoy Trucks.

Both mechanisms have their advantages and disadvantages of course, but really, the disadvantages are very minor. So either mechanism should work just fine for these models. Therefore I have ordered one of each to try them both out.

Also worthy of note, I'm very impressed with the Hollywood Foundry's new Diablo mechanism. The Diablo could be used with these cars, but not without some major modification to the interior bulkheads that separate the enclosed center and the open ends. If your okay with hacking away at these bulkheads then the Diablo might be a good choice. But I'm not so much, so I won't (But I am excited by the possibility of using the Diablo to remotor my Pacific Traction, San Diego 400 series, class 5 cars in the very near future!).

LinkAccording to my calculations, the 10 Series Half Floor Gearbox with a 1024 Motor will fit below window level of the car, maintaining that realistic see-through look (unlike Birney 301 which has a big ol' motor blocking the windows). The only downside is that the gearbox is a little noisy. I only say that because we are spoiled these days. The Gurzeler is very quiet and the Diablo is practically silent. The Half Floor Gearbox is noisy only in comparison to these. But really, its not all that bad!

The Gurzeler (also with a 1024 motor for consistency) will sit slightly above the bottom of the windows, but not by much. But instead of a gearbox, the Gurzeler uses a belt drive (with a real belt, not an O ring!). Therefore, as I mentioned before, this mechanism is very quiet.

#105 will be fitted with the Gurzeler and #107 with the Half Floor. After living with these for a while, I will decide which mechanisms to use for #109 and #110.

All the cars will be fitted with Hollywood Foundry's LoBoy Trucks. From what I understand, Geoff Baxter (of Hollywood Foundry fame) designed these trucks to directly replace the old Suydam trucks that had a bad habit of splitting their plastic gears, rendering them all but useless. Kudos to Mr. Baxter for this. Because of his efforts, these 40 year old Suydam cars can be built into fine models that can finally perform every bit as good as they look. Cheers to Mr. Baxter. Yes sir! Cheers Mr. Baxter!


Dandy


Monday, October 25, 2010

Birney Project ~ Test Run

Birney #301 takes a test spin around the Southern California Traction Clubs test track.

Wow! I'm really late with posting this! I apologize. Took the Birney for a spin around the test track and it performed as expected. A little noisy though, club members ( having the bull session in the background) thought I was making margaritas or something.


Hollywood Foundry is now making the BullAnt with a belt drive, so the mechanism is really quiet now.

I can't wait for the next set-up of the clubs layout so this little guy can ply its trade on the streets of the big city. Yes Sir! Ply its trade!

Dandy

Tuesday, June 30, 2009

#301 Visits The Southern California Traction Club!

The Southern California Traction Club set up their fantastic modules at the Orange Empire Railway Museum over the Fathers Day weekend.

I brought along #301 to show to them and ask general questions about traction modeling. The members were immediately taken with the model and put it on their track. It was the first time I've ever seen the trolley run! Pretty darn exciting.

Above, #301 passes by the SCTC car yards. Displayed in their yards are the pre-production models of the San Fransisco "F Line" PCC Streetcars by Bowser. SCTC was instrumental in the development of these models. George Huckaby’s “Hollywood” car 717 stands ready on the curve. George Huckaby photo.

Three things were immediately apparent about the Birney. One, it runs really slow! I might have overdone the 30:1 gear ratio a bit. Second, the motor/gears are really noisy. But the club members assured me that all that will quiet down as the car is broken in. And third, as I suspected, the lights didn't light. But over all the car performed really well. My thanks goes out to the SCTC for indulging me like that.

I am really impressed with the clubs modeling. The long straightaways obtainable by lining up the modules look like they go on forever.

The clubs modular layout is about at its limit with how much bigger it can get. So now they are concentrating on detailing the scenes.

Impressive. So impressive in fact, I joined the club! That's right, I am club member #13. Yessir! Southern California Traction Club member #13!

Dandy

Friday, June 19, 2009

Birney Project ~ Window Glass

Model Railroading isn't always fun. Sometimes its downright tedious!

My apologies for the late post but I'm finding that installing the window glass to be just that... tedious.

I'm trying to make good on this post about my method of installing the window glass. But I have run into some obstacles. While trying to install the motor assembly into the Birney body, it kept snagging on the seats, pushing them up. So I spot glued the seats into place with superglue. Turns out that the motor was snagging on some of the figures elbows. So I had to file those down. Now the motor is in there but so are the seats and figures. I can't access the windows to install the glass. If I pry the seats loose, the thickness of the glue remains so that when the seats are reinstalled, they will be sitting too high. Now I'm looking into superglue solvent.

In the meantime, I installed the glass into the front window. I cut a piece clear styrene to span the front windows and glued it into place. But...

As you can see, trying to maneuver the glass into place scratched the heck out of it and the glue got all over. Unacceptable. Lets punch out the glass and try that again.

This time I cut each window pane to size. Using two part epoxy, I applied one part to the window frame and the other part to the edge of the glass. This gave me time to get the pane into the car and into position for installation. Using this suction cup tool, the glass was carefully positioned into place. The two parts of the epoxy contacted each other, the reaction took place and set.

Now thats more like it! There's Birney the Motorman at the controls with a clear view ahead.

Yeah, Model Railroading might get tedious at times, but the results can be very satisfying. Yessir! Quite satisfying!