Showing posts with label masking. Show all posts

Monday, December 18, 2023

Jessop's Street Clock ~ Masking

 Preparing the Model for Painting

Masking those round clock faces was a challenge!

But I figured out a reasonable way to achieve it.

This model wasn't designed to be disassembled without possibly damaging it. Otherwise I would have removed the clock faces for the painting of the body. But alas, it's not to be, so I'll have to mask them off. I also masked off the wire leads for the lighting.

The $5 solution was this K&S 7/16 brass tube that matched the size of the clock face frames.  I pressed the tube hard into the painters tape and cutting mat.  Then I carefully X-actoed around the tube.  It took some tries to get it right.

Hmm- not a round as I would like.  I'm in for some touchup painting when the masks are removed.  Getting the masks to laydown over the clock hands proved tricky. But I think I got it. As long as the paint stays off the clock faces I should be alright.

Alright- off to the paint shop. Fingers crossed.

Yes sir!

Fingers crossed.

Dandy

Monday, May 18, 2020

№ 9 ~ Straight Outta Paintshop

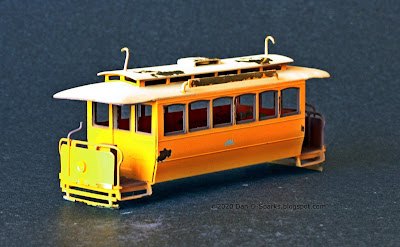
№ 9 Gets A Fresh Coat of Yellow and Brown Paint.

TruColor Reefer Yellow for the body color, Roof Brown for the trim, Foundation for the roof and trucks.

But first, the brass was cleaned and primered with TruColor Light Primer (to help the yellow show up).

After the interior and body were painted, I masked the whole thing except for the window frames and platform for the TruColor Roof Brown

Yikes! A lot of paint pulled off with the unmasking! Either: TruColor is a delicate paint, or I didn't wait long enough for the paint to cure (24 hours), or I should have sprayed a sealer coat on first. Anyway, touch ups required.

But, the whole reason for this exercise, what initiated this project in the first place, was to try out TruColor Reefer Yellow as SDERy Yellow. And you know, its pretty darn close if it doesn't actually nail it!

Yes Sir! Might of nailed it!

Dandy

Monday, January 21, 2013

#426 Project ~ Micro Painting

"Oh how dost one paint th' sill of a window so tiny! Without crooked brushstrokes, yet look so tidy?"  ~ Shakespeare

I just came across a picture set I took but never posted. So I thought I would share it with you now.


 Painting window sills on models is quite difficult and can make or break the fine look of it. So I thought I would try to put as much energy and patience as possible into the preparation rather than the execution.

 My hands are still pretty steady, but not steady enough to attempt painting all these window sills with a tiny brush. That would be tedious. And tedious = not fun. A much better approach would be to do all the work up front, at my leisure, and then blast it all with and airbrush! Now thats fun!

Start by cutting a length of masking tape to the height of the window sills. Then I measured off a scale 3" and marked it with an exacto.

 Squaring off by matching the top of the ruler with the top of the mask, cut at the 3" mark.

Bingo! Straight and squared.

 Use the knife to place the piece...
 and then the point of the knife to nudge the mask into its precise position.

 A small screwdriver is used to tuck in the mask into the corners.

 The smooth, rounded end of a paint brush can be used to burnish the mask so it will hold its position.

 Repeat above steps until all the posts are masked.

 Then mask off the rest of the car that will be in the line of fire of the airbrush. Now only the sills are exposed.

 Now I can blast away with the airbush, shaky hands be damned!

 I love this part. Peeling off the masking, revealing nice straight lines and smooth paint.

And there you go! Took some time investment, but the results are worth it. And its so much easier than trying to paint all those sills with a tiny brush. Yes sir! So much easier than using a brush! 

Dandy

Monday, December 03, 2012

Tower of Light and Color

Now that this junction tower has got its business all straightened out, its time to get its business painted.

The lesson that Thomas Kinkade has relentlessly banged us over the head with time and time again with each successive painting is that light glowing from windows gives a building a very warm and inviting look. However, we are not painters of light. Actually quite the opposite. Us modelers have to paint where we don't want the light to emanate from! Judging by the iridescence of the plastic that this tower is printed from, I'm guessing that this building would glow quite brilliantly when lit from inside. So to help eradicate this problem, I have painted the cupola an undercoating of Floquil Engine Black inside and out.

I'll let that dry for a day.

Back to primer grey. Colors would have a heckofa time showing up over that black. So the tower is recoated with Floquil Primer. I was sure to paint every surface since the printers caution that the print material is sensitive to UV light. Somehow I managed to bust off the ball final on the roof. So now I have to find a way of replacing that.

Let this dry for a day as well.

Floquil Rust is one of my favorites in that its a pretty good color for replicating a mahogany color. These towers were built during the age of when mahogany (or similar) was a common building material for streetcar interiors. So I'm willing to bet these towers had this type of interior.

Again, a day of drying.

 Masking off the cupola, the ironworks are painted Floquil Pullman Green.

To prevent the mask from adhering to the previous layer of paint, or chipping the new layer of paint,  I pull off the mask as soon the paint begins to set and is still somewhat flexible.

Another day, another dry.

The ironworks and interior are masked off for a nice coat of Floquil Depot Buff.

 Well hey there handsome! Oh wait! I forgot something...

 Some Floqul Brass for the gong. We can't forget the bling! No sir! Can't forget the bling!

Dandy


Monday, May 28, 2012

#426 Project ~ The Infamous Golden Yellow Paint Scheme

Painting a San Diego 400 Class 5 car in its as-delivered Mission Yellow and Mahogany Brown Paint Scheme. 
Now that this car has been properly prepared for painting, lets, oh I don't know, paint it?

To make sure the delicate yellow paint shows up in its intended hue, the car is first painted with primer. I prefer good old fashioned Floquil paints applied with a good old fashioned Air Brush. These enamels require a day of drying between coats. So although the entire paint process is shown here all at once, at least a day elapsed between each color application.

Research I have done has shown that for cars built around the same time as these cars (1924), the favored interior color was a white of some sort. Most folks don't paint the interior of their models, but as time will tell, these cars will look so much better with a painted interior. Not to mention the protection the paint will provide against the deterioration of the brass. I chose Floquils Antique White as the interior color for #426.

After the interior paint has dried for a day, the windows, doors, bottom opening and any other orifice to the interior is masked off with ordinary masking tape.

Today's recipe for San Diego Electric Railway Mission Yellow is:
10 - 20 parts CNW Yellow
1 part Rock Island Maroon
It turns out that Floquil Rock Island Maroon is out of production of course. But another Tuscan Red color should work. I only chose Rock Island Maroon because its a gloss. The idea is this: CNW Yellow is the closest yellow available to the chrome yellow used on these cars. So by adding a Tuscan color, its reddish hue will push the yellow more towards orange without actually crossing the line into orangedom (These cars have been described as "Golden Yellow" but have never have been referred to as an orange of any sort). And its brownish qualities will "darken" the yellow a bit.

After the yellow has dried for at least a day, the entire body is masked off except for the doors. Today's recipe for Mahogany is:
1 part Roof Brown
1 part Tuscan Red
One thing I ended up regretting was not masking off the sliver of body showing between the doors and steps. This has proved troublesome to touch up afterwards. So next time!
Also, this color mix is a bit dark. Either it needs to have some white added, or the doors need to be lightened during the weathering process.

I have a theory about the roofs of these cars. I believe they were originally painted with a Tuscan Brown paint that oxidized over time. Later color photos reveal these cars roofs having achieved a rusty reddish brown. This reddish brown is the most common color used with modelers and restorers of San Diego cars. But I'm certain that when these cars were new, the roofs were more of a light chocolate brown. For this color I used:

1 part Roof Brown
1 part Southern Freight Car Brown
1 part CSX New Image Gold.


Details such as headlights, retrievers, trolley pole hold down hooks and towers, and bumper are brush painted Floquil Engine Black. The window frames are brush painted with the Mahogany mix. And there we have it! My latest, greatest shot at San Diego Electric Railways elusive Mission Yellow and Mahogany Brown paint scheme.

Next up is powering this model with Hollywood Foundry's new Diablo mechanism. Awesome stuffs so stay tuned! Yes sir! Awesome stuffs!

Dandy

Tuesday, August 31, 2010

Niles Project ~ Yellow and Brown Paint for #109

After its last paint job was deemed unacceptable, the Point Loma car was stripped of its paint and is now ready for a new paint job.


While the Pine-Sol did a splendid job removing the paint, it left gooey, sticky boogerballs behind that where a real pain to remove. Scrubbing the model with Dawn dish soap on an old toothbrush helped a lot, but in the process I managed to loose a hand rail. So a new one had to be fashioned with brass wire.


Repaired, Cleaned, Sterilized, and Ready for painting.


Primed (Floquil Primer)


Interior painted with my Mahogany mix. (50/50 mix of Floquil Roof Brown with So. Freight Car Brown)


Masked


Exterior Paint (10 parts Floquil Railbox Yellow with 1 part So. Freight Car Brown)


Masked for Roof paint (Floquil Mud).


Detail painting (window sashes and bumpers(?)) with my Mahogany mix.


The Point Loma car is on the bottom. Compare this photo with the above photo and you can see that the new color is much more reasonable. Now it is the SD&SE car (center) that looks too yellow! Also compare with the photo of the original paint and I think I've pretty much nailed SDERy Yellow. Yes sir! Pretty much nailed it!

Dandy

Monday, July 19, 2010

Niles Project ~ Yellow and Brown Paint for #107

Trying a 3rd mix of paints to replicate SDERy Yellow.
Floquils "CSX New Image Gold" looks pretty good on #105, but I want to saturated it a little more and push it more towards yellow. The "Roof Brown" used for the trim is just too dark.

After experimenting a bit (above), I settled on a 50-50 mix of "Railbox Yellow" and "CSX New Image Gold" for the yellow, and a 50-50 mix of "Southern Freight Car Brown" and "Roof Brown" for the Mahogany trim color (outlined above).

Ooh! Not bad. Not bad at all. Compare to this poorly lit photo of old actual SDERy yellow. After letting this dry for a day, I'll hand paint the trim with the Mahogany brown mix.

After letting the trim paint dry for a day, its time to paint the roof. Some precision masking is required for the clerestory windows. I laid out a length of masking tape onto a piece of glass a tad longer than the length of the windows. After carefully measuring the width and length as well as where the curves start, I cut the mask to size with a sharp Xacto knife.

The mask is carefully worked into place. Then the rest of the car is masked off. This time I'll paint the roof Floquil "Mud". Its a little warmer than "Earth".

Well... my digital camera seems to be "rounding off". The yellows almost look to be the same here. But the differences are more discernible in person. But not that much more. On the other hand, the difference between "Earth" on #105 (right) and "Mud" on #107 (center) is more discernible in the photo than they are in person! As for the yellows, I'm so close. I'm probably splitting hairs at this point. Yes sir. Splitting hairs!

Dandy