Monday, October 08, 2012

Bag of Lightning

Assembling the Hollywood Foundry Lightning Trailing Truck Kit
is actually easy-peasy!
The drive on my old Pacific Traction H.O scale San Diego 400 series car has had a full life. The gears are worn, the spring drive slides, even one of the tires has separated from the axle. It needs a whole new drive. Preferably a precision drive, capable of ultimate slow speed smooth running on tight city curves.

And Hollywood Foundry has (once again) come to the rescue with their magnificently designed Diablo Power Truck. But, it comes as a kit, assembly required. Assembling such a precision instrument can be a little intimidating. But Hollywood Foundry maintains that its actually easy and quick to assemble.

So, to get an idea of what it will take to assemble the Diablo, why not assemble their Lightning Trailing Truck first? Their methods of assembly are very similar. And that's exactly what I did. Yes sir, that's exactly what I did.

Let me just say that the instructions are very well written with plenty of crystal clear illustrations accompanying the text. AND a color version of the instructions are available on-line for free. The rest of my post pretty much reiterates what already has been published. But if you want to see the assembly of the Lightning Truck in photos, well then, here you go:

But make sure you follow the instructions that come with the Lightning!

Only three tools are required to assemble the Lightning Truck. The first is a simple file to deburr the parts.


These bearings are what make the Lighting Truck such a great roller. The bearings can actually be dropped into place and will be trapped without fear of them falling out. Or you can glue them in. I chose to carefully solder them in place so that they will never be a problem. First I spread some solder (tinning) around the bearing itself, then, I tinned the truck frame around the hole. Then I dropped the bearing into the hole and heated the assembly until the bearing was properly seated in the hole.

Now comes the folding: 


The only rule Hollywood Foundry has with bending the parts is that the metal is always folded towards the etched fold line.

Bending the parts are easy-peasy. Using the second tool, a smooth jaw pliers, to hold the part just below the etched fold line, I applied firm, balanced pressure with my finger, slowly bending the part into its correct position.

The opposite side of the truck frame is bent half way to first accept the wheelsets before bending fully into position.


 I just realized the painting the wheelsets ahead of time would have been a good idea. Bending and unbending would cause the metal to harden and become brittle and could break. So this little planing ahead would help keep the truck sound.

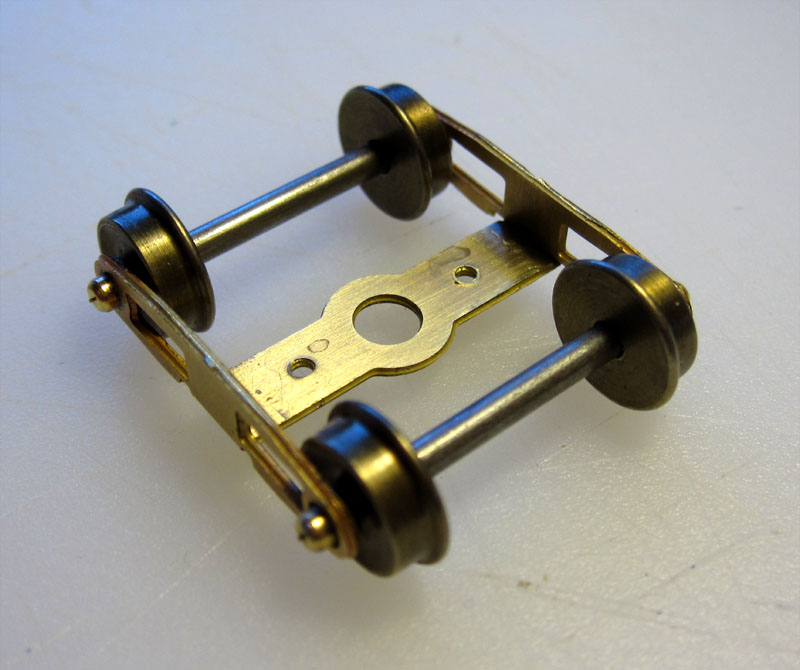
 With the wheelsets in place the frame is folded into position.

 I made some slight adjustments to the folds for maximum "spinnage". And true to advertized, the wheels spin for quite a while when spun with a finger.


 Now for the bolsters. A quick clean up with a file and were ready for...

 ...fold, fold, fold, fold. 
Washers are included to adjust the height of the truck. But that will be determined when the Diablo is built and the height of the Lightning and Diablo need to be matched.

A Wiha Phillips #00 screwdrive was the only tool I needed to buy for this. But I needed one of these for a while now. So it was about time I bought one. The bolster screws right on, what with the holes already been drilled and tapped and whatnot. Like I said: easy-peasy. Yes sir! Easy-peasy!

For reliable transfer of track power from the truck to the chassis, I soldered the lead to the nickel silver solder tag.

 Now were ready to mount the truck.


 First, place the Derlin washer and properly seat it into the hole.

 Then place the truck on top and fit the screw through.

 Flip the chassis over...


 ... and fit the second Derlin washer seated into the hole.
 The nickle silver power tag is placed next and...

 ... place the nut and tighten moderately.

And there we go! Essentially the truck is assembled and installed. I just need to add the old side frames.

 The holes in the old sideframes were the bearings for the old wheelsets. But with the new, high tech Lightning bearings, the holes in the sideframes need to be enlarged to clear them.

 It was a simple matter of finding a drill bit with the same diameter as the bearings to enlarge the holes. Test fit. Drill some more. Test fit. Don't drill all the way through!

 Then the sideframes were soldered on. And were good to go!

This all went together in about 45 minutes! And that includes stopping to compose these pictures.

I'm so ready to tackle the Diablo now because, I tell ya, I feel like a downright metal smith now! Yes sir! A downright metal smith!

 Dandy

Saturday, September 22, 2012

6 Years of Bloggety Blah Blah Blog


 "6 years! The prototype San Diego Electric Railway was built in less time for crying out loud! Yes sir! The prototype was built in less time!"
 Dan D. Sparks' annual rant.

 Dan D. Sparks
President. Yes sir! President!

And thus brings to a close a dismal "fiscal" year (Sept. 2011 to Sept. 2012) of modeling for this blog. But today marks the beginning of a very bright year ahead. So lets see where we stand so we can accurately gauge how far we go in this coming year. And now, without further ado:

The Dan D. Sparks Plywood Development and Transportation Co.
Annual State of the Company, Board of Directors Meeting 
22nd September 2012
8:00 AM San Dollar, California.


 Board Members:
 Present:
President:                         A very unhappy Dan D. Sparks
Chairman:                        A very nervous Lettuceleaf M. Malone
Traffic Manager:              A smug Robin DeRail
Finance Manager:            A jubilant Count DeMonet
Director of Development: A crafty Arnie Clever
General Manager:            David Lyman
Quorum present?              More or less.

Others Present:
Man of Mystery:                Fred Gurzeler
Company Band leader:     Bill Bolton & Orchestra

Absent:                              No Show Joe

 Proceedings:
· Meeting called to order at 8:09 a.m. by Chair, Lettuceleaf M. Malone
· Last year's meeting minutes were read and regarded with nostalgia.

Lettuceleaf M. Malone
Chairman

Opening Message from the Chairman:
Life is a balance between Family, Occupation, and Hobby. Most of the time, these are out of balance. One usually requires presidence over the others. This past year was no exception. "Occupation" was the focus this past year. Without it, the other two suffer. And with it, the other two can benefit greatly.
"Hobby" is about to benefit greatly from this years employment. So hang on... because here we go!

Robin DeRail
Traffic Manager

 · Traffic Managers Report Provided by Chair, Robin DeRail:

 ~ Last year we were enjoying a nice upswing in viewership. This year, despite half the blog entries being posted (19 posts, down from a record 28 posts last year), we managed to hang on, with a some gain, to that viewership.

~ This blog hosted 3,064 visitors this last year (Sept. 2011 to Sept. 2012) visiting 5,484 times. That's up from 1,939 visitors visiting 3,379 times the previous year, for a grand total of 16,668 visitors.

~  This blog is now averaging 15 visitors per day viewing for almost a whole 2 minutes (1:52)! That's a gain of 50% from the revised figure of 10 visitors per day viewing for a minute and a half (1:34) last year.

~ The top 3 posts visited this last year were:
     1. My Old San Diego Trolley Layout
     2. Birney #301
     3. Painting Brass Models

Count DeMonet
Minister of Finance

· Finance Committee report provided by Chair, Count DeMonet:

~ The Count happily reported that revenue from this blog (from ads) has more than doubled and is now averaging over $0.04 per day, up from a $0.02 daily average last year. 

~ DeMonet went on to report that the annual earnings for this last fiscal year are estimated at $16.07. That's an increase of over 100% from last years earnings of $7.34! Bringing the grand total to $39.48.

~ The finance chair went on to suggest that product placement may help the bottom line. When pressed further, he offered an example; "The finer photos in this blog were photographed with the affordable Canon EOS Rebel T3 Digital SLR Camera with 18-55mm IS II Lens. Should anyone buy that camera by clicking on our link, we receive a referral fee!".
  
This was met with great skepticism by the board.
  Arnie Clever
Director of Development
 
· Board Development Committee's report provided by Chair, Arnie Clever:

~ Mr. Clever reported that though things have cooled off modeling wise, planning has continued in earnest. "Oh the projects that are planned!" he went on. "This company has plans coming out of the wazoo! Why, this company has more plans than could possibly be implemented in a single lifetime! Oh-boy do we have plans!" he explained. "Plans, plans, plans! You want it? I've planed it!".

~ The development chair, on the verge of collapse from the lengthy revelation of all his plans, explained that during these robust times the company has managed to stockpile a sizable amount of modeling materials and may actually see some of these plans through to fruition!  The board blinked at each other in silent amazement.

And on that note, Mr. Sparks offered: "Well then... lets get to it. Yes sir! Lets get to it!

Mr. Bolton stuck up the band with a rousing rendition of "Happy Days Are Here Again".


· Meeting adjourned at 11:59 p.m.
· Minutes submitted by Secretary, Mrs. Roundbottom.

Now let's get to it! Yes sir! Let's get to it!

Dandy

Friday, August 31, 2012

The Southern California Traction Clubs 100th Show!

Such a momentous occasion deserves a poster. So a poster shall be:

Drawn with Adobe Illustrator. Print 8 1/2 x 14. Distribute. Attend. Yes sir! Attend!

Dandy

Monday, July 30, 2012

Brand Spanking Pneumatic

Another ad featuring the then state-of-the-art San Diego Class 5, 400 Series car. Taken from the August 1924 issue of the Electric Railway Journal.


The Electric Railway Journals are free to read at The Internet Archive. Fascinating reading I tell ya. Yes sir! Fascinating reading!

Dandy

Saturday, June 30, 2012

Please Stand By!

For the first time in this blogs 5 year run, weeks have gone by without a post! Whats up with that!      Well... "Good News Everyone"!...

I'm sure you have noticed in life that generally, when there is enough money, there isn't enough time. And when there is enough time, there isn't any money! Last year my situation was the latter. Next year my situation will be the latter. But this year...

A career in Animation is very "feast and famine". The work is good when you can get it. And when you've got it, you got to work your ass off to keep it, or not be invited back next season. Right now I'm gainfully employed on Futurama.(Watch Wednesday nights at 10, 9 Central, on Comedy Central to support my cause. Good ratings will mean another season. Another season means I might work again. Working again means financing this expensive hobby! (Crossing fingers and toes!) Thanks!). But they own my ass until the end of the production season, sometime this September for me. Yes sir! They own my "shiny metal ass"!

So in the meantime, I'm stockpiling kits and modeling materials like crazy. And then starting this October, I intend on making some significant progress on the trolleys, the layout, build a couple modules for the club, and other fun projects yet to be unveiled! And maybe even, dare I say, weekly blog posts? Oh my! So stay tuned and see what the future holds. Yes sir! See what the Futurama holds!

Dandy

Monday, May 28, 2012

#426 Project ~ The Infamous Golden Yellow Paint Scheme

Painting a San Diego 400 Class 5 car in its as-delivered Mission Yellow and Mahogany Brown Paint Scheme. 
Now that this car has been properly prepared for painting, lets, oh I don't know, paint it?

To make sure the delicate yellow paint shows up in its intended hue, the car is first painted with primer. I prefer good old fashioned Floquil paints applied with a good old fashioned Air Brush. These enamels require a day of drying between coats. So although the entire paint process is shown here all at once, at least a day elapsed between each color application.

Research I have done has shown that for cars built around the same time as these cars (1924), the favored interior color was a white of some sort. Most folks don't paint the interior of their models, but as time will tell, these cars will look so much better with a painted interior. Not to mention the protection the paint will provide against the deterioration of the brass. I chose Floquils Antique White as the interior color for #426.

After the interior paint has dried for a day, the windows, doors, bottom opening and any other orifice to the interior is masked off with ordinary masking tape.

Today's recipe for San Diego Electric Railway Mission Yellow is:
10 - 20 parts CNW Yellow
1 part Rock Island Maroon
It turns out that Floquil Rock Island Maroon is out of production of course. But another Tuscan Red color should work. I only chose Rock Island Maroon because its a gloss. The idea is this: CNW Yellow is the closest yellow available to the chrome yellow used on these cars. So by adding a Tuscan color, its reddish hue will push the yellow more towards orange without actually crossing the line into orangedom (These cars have been described as "Golden Yellow" but have never have been referred to as an orange of any sort). And its brownish qualities will "darken" the yellow a bit.

After the yellow has dried for at least a day, the entire body is masked off except for the doors. Today's recipe for Mahogany is:
1 part Roof Brown
1 part Tuscan Red
One thing I ended up regretting was not masking off the sliver of body showing between the doors and steps. This has proved troublesome to touch up afterwards. So next time!
Also, this color mix is a bit dark. Either it needs to have some white added, or the doors need to be lightened during the weathering process.

I have a theory about the roofs of these cars. I believe they were originally painted with a Tuscan Brown paint that oxidized over time. Later color photos reveal these cars roofs having achieved a rusty reddish brown. This reddish brown is the most common color used with modelers and restorers of San Diego cars. But I'm certain that when these cars were new, the roofs were more of a light chocolate brown. For this color I used:

1 part Roof Brown
1 part Southern Freight Car Brown
1 part CSX New Image Gold.


Details such as headlights, retrievers, trolley pole hold down hooks and towers, and bumper are brush painted Floquil Engine Black. The window frames are brush painted with the Mahogany mix. And there we have it! My latest, greatest shot at San Diego Electric Railways elusive Mission Yellow and Mahogany Brown paint scheme.

Next up is powering this model with Hollywood Foundry's new Diablo mechanism. Awesome stuffs so stay tuned! Yes sir! Awesome stuffs!

Dandy

Monday, March 12, 2012

#426 Project ~ Cleaning and Preparing Brass for Painting

Dusty and tarnished, #426 is in need of a good cleaning and surface preparation if its going to hold paint for the years of busy service I have planed for it.

 Firstly~ I completely disassembled the model and removed anything that is not brass from the shell.

 Secondable~ The shell is soaked in a 50/50 mix of Pine-Sol and water for a few minutes. If I was removing paint I would have let it soak overnight.

Scrub-a-dub gently with an old tooth brush, front, back, and in-between. Thoroughly rinse with clean water afterwards. Water and brass are pretty rambunctious together and cause a lot of trouble. So I sent that water packing as soon as possible.I used the wife's blow-drier to dry the model immediately. 

Now that the model is clean and tarnish free, we need to get all oil/grease off of it. A fifteen minute soak in White Vinegar will not only do that but also chemically etch the brass, giving it a tooth that will help the paint adhere better. Rinse and dry again. The model can't be handled with bare hands anymore since oils from the skin will prevent the paint sticking. I have actually seen a paint chip in the shape of a finger print on a model once! So wear cotton gloves to handle the model from here on out.

What a difference! Nice bright brass again. But notice it isn't a mirror finish. If it was new brass, a bead blasting would be recommended to etch the surface. So we are now ready for the paint shop. Yes sir! Off to the paint shop!

Dandy

Monday, February 27, 2012

#426 Project ~ Floored

 Hollywood. It'll chew you up and spit you out like a piece of 5 and Dime store gum. But if your lucky, every once in a while, you might catch a break.


I'm glad to be working again but man the studios work you hard. Late one night I was dragging like the brain crazed Undead after a particularly long day of production. But I had to hustle if I was to catch the last Metrolink out of the Glendale station and make my journey home. I was making good time too, until...

 A figure steps out of the shadows. I keep walking. Whatever he's selling, I'm not buying. But he walks right up to me. And even though the night seems strangely darker than usual, I can see him pull something out of his jacket and point it at me, the light of the arriving train flashing off the metal! Acting fast, I wrestle it from him. But wait. It doesn't feel right. I examine it the best I can in the little available light. Is this?.... It can't be... It is! Its a brass replacement floor for Pacific Traction's H.O. scale San Diego 400 series class 5 cars etched to accept Hollywood Foundry's new Diablo mechanism and even drilled with holes threaded for the underbody details! But how... why...  Bewildered, I look up...  but he's gone. Disappeared into the the flurry of activity of the detraining and boarding passengers.

In the cheery, brightly lit interior of the train, I examine the floor. Its exactly what I need:

Exhibit A. Top

Exhibit A. Bottom

With the under body details transferred from the original floor.

Finely crafted, accurate dimensions, and that tell-tale logo. There is only one man I know who could be behind this...
Fred Gurzeler! Front man for that Australian mob. Somehow he knew. Somehow he always knows. In this town of a thousand crushed dreams its good to know that Fred is out there, somewhere, watching out for us. Yes sir! Fred's watching out for us! 

Thanks Fred! Wherever you are!

Dandy

Wednesday, February 22, 2012

When They Were New

Here is an old ad from the September 27th 1924 edition of the Electric Railway Journal featuring the then state-of-the-art San Diego 400 series Class 5 cars. 

 Thanks once again to the mysterious Fred Gurzeler for pointing these out to me!

I've gots lots to post as soon as I can find some time. Yes sir! Just as soon as I can find some time! So stay tuned!

Dandy

Monday, February 06, 2012

Onward Roll the 400's!

New project! With one of the Niles cars wrapping up, I need to model one more car before I get to the layout. Big, roomy, and modern, the San Diego 400 series Class 5's were a favorite with San Diegans. 

50 of these 1924 vintage cars were ordered from the American Car Co. Numbered 400 - 449, they ran until the end of the San Diego Electric railway in 1949. Originally delivered with the one pantograph, a trolley pole had to be added when the pantographs had a way of collapsing, stranding the car. By 1925 the pantographs were replaced entirely with trolley poles because the pantographs also had a way of pulling down the overhead!

Other than the builders photo, this photo of  426 is the only clear portrait of a 400 car in its original golden yellow and mahogany paint scheme I can find. So this is the car I'm going to model. Fortunately for me...

Pacific Traction imported models of the San Diego 400's in 1969. Ive been collecting them for decades and now have about a half dozen of them. The above car I believe is the first car I purchased back in the early 80's. So finally, after all these years, its time to give it the treatment! Its going the feature the yellow and brown paint scheme, the Diablo mechanism from Hollywood Foundry, Fred Gurzeler floor, full details and decals, DCC decoder, and lighting - the works! Yes sir! The works!

Dandy