Monday, April 18, 2011

Ring A Ding Ding! A Slice of Girder Rail!

After clenching my fists and stamping my feet in a hissy fit over missing out on an authentic San Diego Electric Railway trolley gong, it turns out it went to a better home after all.

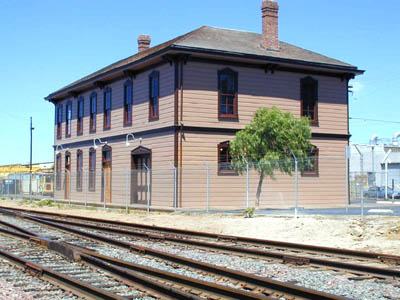
The San Diego Electric Railway Association has as its headquarters the historic 1882 California Southern Railway (ATSF) National City Depot.  They have been there like, forevar, so there is really no excuse for me not ever visiting. So what did I do? I finally paid them a visit.


They have quite of a collection of SDERy artifacts there. I was geeking out over an authentic SDERy conductors bell while mentioning the SDERy gong I saw on eBay when the docent  there said "I think we got that."  He proceeded to pull the gong out from behind an exibit. Sure enough, there it was!
Well I tell you one thing, I am so glad I didn't end up with it. Its huge! And weighs a ton! I would not have been able to display it as intended. I made my peace and gave the bell a ring (nice and loud!). I can not be any happier than to have it displayed at the museum where it truly belongs. So things worked out just fine after all.


Better yet, I didn't leave empty handed. I was able to  purchase another (and more reasonably sized) piece of SDERy artifactory. An authentic, well worn slice of SDERy girder rail (girder rail is rail used for tracks in paved streets). All is well with the world. I am satisfied. Yes sir! Satisfied!

Dandy

Monday, April 11, 2011

Niles Project ~ Illuminatification

Installing interior lighting, LED's this time, and in their prototypically correct locations of all places.

The September 1908 edition of the Electric Traction Weeklys article on the new Niles Cars for San Diego (graciously forwarded to me by Bill Bolton) included an interior shot of these cars. Looking at this photo, I was able to ascertain the locations of the lights in the car (despite the fact that all of the lights weren't shown). Which got me to thinkin' (which could be dangerous) what would it take to light the car prototypically? Would the car look any different/better if it was lit prototypically? Would it be worth the time and effort to light the car prototypically? And why doesn't my spell check like the word "prototypically"? Well, there is only one way to find out. And that is to light the car prototypically (spellcheck be damned!).

This photo was shot in the enclosed section of the California style Niles Cars, probably standing in the doorway of one of the two bulkheads looking towards the second bulkhead. Visible are three lights (or 6 if were counting bulbs). The car is symmetrical so its safe to assume the forth light is just out of frame above.

 
The lights are evenly spaced so, if I continue the spacing into the open end sections of the car, we have a total of 8 interior lights. Seems reasonable enough. As long as the decoder can handle lighting that many lights. Since the lights would be lit more on the dim side, it should.


I've seen traction models with their lights mounted on a strip of circuit board. That seems like a really good idea to me, so that's the route I'm going to take. But because the Niles cars have those bulkheads inside, I'm going to have to split the circuit board into two sections. The bulkheads don't reach all the way into the deck (or clerestory) section, so the circuit boards are able to slip over the top of the bulkheads. But the bulkheads definitely limit the length of the circuit boards.

 
LED's are the way to go. They require less voltage, they don't burn as hot, and last a lot longer, than incandescent bulbs do. But as you can imagine, jamming 8 Christmas LED's into these cars would be ridiculous. So instead, I'm opting for the tiny SMD (Surface Mount Diodes)LEDs (warm white). John McWhirter recommended purchasing the SMD LED's from TrainAidsA. They specialize in electronics for model railroading. I have found them to be very helpful.

 
The circuit board is cut to size. Then holes are drilled for the LED lights and also where the base of the trolley poles pass through the roof. The holes for the lights are filed square to match the size of the LED's. Then the copper clad is notched with a saw to separate the positive and negative sides of each LED. The opposite side the circuit board is notched length wise to act as a bus for the headlights (see photo below).

 
Here are the circuit boards with the LEDs installed. This is actually my second attempt, I had the polarity of the LEDs reversed last time! The round holes are for the trolley pole base to pass through, so these boards have a front end and a back end. The pole holes denote the front end of the circuit board. The white wires are soldered towards the front end, the black wires towards the back end. The back ends of the circuits boards will butt against each other in the center of the car:

 
This test fit revealed the circuit boards fit quite snug between the ceiling and the bulkheads. I don't think any adhesive will be needed to keep them in place.

Next, I have to determine how bright the lights should be. This will determine the size of resistors required. Then we'll have this car illuminating quite nicely. Yes sir! Illuminating quite nicely!

Dandy

Friday, April 01, 2011

My Old San Diego Trolley Layout

You might think I'm trying to fool you but, believe it or not, before your ol' pal Dan D Sparks was modeling the old San Diego Electric, I used to have a layout featuring the "new" San Diego Trolley!

I came across some old photos of the old layout, so I thought I would share them with you. So here is the nickle tour:

The layout was built in a 12x12 foot bedroom in my apartment. Originally the layout started as a 2'x4' module that grew to take over my entire bedroom!

1. This is the scene that greeted you when you walked through the door. I absolutely fell in love with MTS Imports models of the Siemens/DuWag SD-100 LRVs when I saw one in my local hobby shop. So I saved up my nickles and dimes and purchased it. Which was no small feat at $300 a copy (that was a lot of money in the late 80s)! Eventually I was only able to collect 3 of the models.
2. Transit Center and Clock Tower built from Plastruct parts. The background was painted directly on the wall. Something I regretted when it was time to move out.

3. Visitors really loved peeking inside the American Plaza Station, it made for a nice scene.
After the layout was dismantled, I traded in the LRV models for some San Diego 4oo series class 5 trolleys from Pacific Traction. And that's how I got started modeling the old SDERy. MTS imports is apparently importing some more of the LRV Trolley models. I wonder how much they will cost this time around!

I have some more pictures of the layout somewhere. Maybe I'll post some more pix at the beginning of next April also. Yes sir! The beginning of next April also!

Dandy

Monday, March 21, 2011

Niles Project ~ Windowed

Impressed with the qualities of the transparency paper, it was used for the remaining window glass.

I actually like the transparency paper better than clear styrene. It cuts better, the clarity is really nice, and it seems to stay cleaner.


Taking a picture of glass is actually kind of difficult. I posed this car and lights all different ways trying to get a glare on the glass. But I guess I got it good enough. I did manage to get the glass in the interior bulkheads to be visible as well if you look closely.

Finally, with the glass done, we can now get on with the wiring. Yes sir! Now get on with it!

Dandy

Friday, March 11, 2011

Are You Kidding Me!

Oh Dastardly Fates! How did I miss out on an authentic San Diego Electric Railway Trolley Gong on eBay! Why! WHY!!!


I have been building a Dustcover/Lighting Valence/Display Case for my layout that is also housing and displaying SDERy artifacts. Already I have tickets, tokens, passes, and photos to display in it. A virtual shrine to the old SDERy. Not only that, the design of it (what I now refer to as the "Canopy") is that of an old wooden streetcar. So a bell... an authentic trolley gong... oh that would have been the cherry on top!


For years, I have scoured the internet looking for authentic trolley gongs. The only thing I can find are reproductions of San Fransisco's Cable Car Gripman's Bell selling for $600!

So imagine my surprise when not only a trolley gong comes up for auction on ebay, its an authentic SDERy trolley gong!!! Figure the odds! I mean seriously!

But horrors of horrors, the seller included a very low "buy it now" for $129! So of course a savy investor recognized the incredible deal when he saw it and snatched it up.

I'm sure he will relist the bell on eBay knowing full well his profit will be WELL over %100. But because of my dismal financial situation this last year, I can't afford to enter a bidding war. Lousy timing. Yes sir, very lousy timing.


Oh F-ing Fickle Fates! Why do you taunt me so? Why couldn't I have seen this auction just mere hours sooner. Despite my very tight financial situation I could have swung $130 bucks. Never has or will an opportunity like that come my way again!

This photo is actually upside down. The bell would be mounted under the floor. The motorman would step on a pedal to ring the bell. The shaft from the pedal would go through the tube seen in the above photo and push that plate, which would cause the ringer to rotate and strike the bell.

Here is another angle. The tube on the right. Ringer on the left. Counter weight on the bottom center would lift the ringer again when the motorman lifted his foot off the pedal.

Oh rotten day! I just can't live with myself right now. Having something so wonderful appear before me and then snatched away. Its too much to bear!

I guess I should remember whats important. The gong would have been a helluva nice touch, but its a well crafted layout displaying finely tuned, highly detailed, smooth running models, running their routes and making their stops flawlessly that's important, right? If I can achieve that, nobody would really notice the artifacts would they? It should be the show that the visitor remembers. It should be the show that the visitor takes away with them. Yes sir! Its the Show that is important.

This situation still stinks though!

Dandy


Monday, February 21, 2011

Niles Project ~ Cathedral Glass Windows

Simulating the Yellow Stained Glass Windows

Bill Bolton was very kind enough to think of me when he came across the September 1908 issue of Electric Traction Weekly that featured an article on the new Niles cars for San Diego, and sent me a copy. What a timely treasure trove of information that article is with lavish descriptions of the cars inside and out! I knew that the "deck sashes" (clerestory windows) and "upper side sashes" (the arched portion of the center windows) were of stained glass, but I has not a clue to its color. This article reveals them as "Yellow Cathedral Glass". Wonderful! Thanks a million Bill!
After some discussion around the Southern California Traction Club clubhouse, we concluded that colored index tabs would make suitable material. And handy too, we had some extra in the clubs files.

After digging out a yellow tab, I cut it to size and glued it into place with my new glue of choice for this sort of thing: Micro Kristal Klear.

I was going to do the same for the clerestory windows (or "Deck Sashes" as the article describes them as) but it occured to me that Micro Kristal Klear might be perfect for this since the windows are tiny and the material goes in the window rather than behind the window frames like the yellow plastic would.

I "blobbed" on the Micro Kristal Klear over the windows from the inside with a small screwdriver.

The goop filled in the window nicely.

To "stain" the glass yellow, I purchased a bottle of Mr Hobby Clear Yellow Acrylic paint. It comes in a tiny bottle in a variety of colors to tint the taillights and turn signals etc, on auto models.

After the Micro Kristal Klear windows dried, I filled in the window with the clear yellow paint. If the index tabs fade over time, I'll tint them with the clear yellow paint as well.

Oh I wish you could see this in person, the windows glow yellow really nicely. The photograph just doesn't do it justice.
Thanks to good friends around the world, these are turning out to be some very handsome cars. Yes Sir! Very handsome cars!

Dandy

Monday, February 14, 2011

Niles Project ~ Corner Windows ~ Transparency Film

After some more trial and error, I do believe I have finally found a suitable "glass" material that will curve around the corner window frame.

But first, a common suggestion was to use vacu-formed packaging such as found in battery packaging and soda bottles. So I gave that a try...

...and it actually worked well. But a common characteristic of vacu-formed packaging is that it has a texture to it as can be seen in the photo above (above the smudge of glue in the lower 1/3 of the window). The clarity of the plastic isn't the best either. So on to the next suggestions.

Ken Blackburn, a member of the HO Traction Modeling Yahoo Group, suggested Acetate. And Ken Somers, a member of the Interurban Yahoo Group suggested Mylar. I was really struck with how simple and elegant these ideas were. It fits perfectly with the KISS principle. So I set out to find some transparency film. Not so simple. Because of the proliferation of computers, overhead projectors are all but obsolete. Drafting supply shops seem to have disappeared as well. On line I can find transparency film for well over $20 a box!

I ended up stopping by Kinko/FedEx and asked if they can print transparencies. She said a dollar something for color and 75 cents for B&W. "What would you like to print"? I told her I was actually only interested in the transparency sheet itself. She sold a sheet to me for 75 cents. I don't know what the material is other than it came from a box of 3M Transparency Film. But it is slightly more flexible than styrene. So I cut a piece to size and...

Hey! Not bad! Not bad at all. It curved real nicely. And the clarity is quite... well... clear! This time I used CAA (Super Glue) to glue on the window. I've been trying to stay away from CAA since it shatters in freezing temperatures. But I needed the fast drying qualities while I pressed the window to the frame. I'm very happy with the result. I'm going to use this transparency film material for the rest of the windows.

I wish to thank all of you who gave your 2 cents, your help is greatly appreciated. Yes sir! Greatly appreciated!

Dandy

Monday, February 07, 2011

Niles Project ~ Corner Windows ~ Micro Kristal Klear

Well you folks really came through for me, thank you! A lot of ideas were presented, a few of which I'm going to give a try.

To recap, I'm trying to find a suitable solution for creating the "glass" for the rounded corner windows:


Australian traction modeler Bill Bolton comes through once again with the suggestion of trying Micro Kristal Klear. I've been using this stuff for gluing on clear styrene windows because it won't craze the plastic and it dries clear. But it also claims it can be used to make small windows itself. So since my bottle of Micro Kristal Klear is right here, why not give it a try?


Micro Kristal Klear is very similar to white glue, with some characteristics of rubber cement. I took a blob onto a toothpick and stretched it across the window opening. That was easier to do than I anticipated. Then I took a small screwdriver and scraped up the over slop. As you can see in the photo above, the "glass" is within the window frame. Not behind it as clear styrene would. Also, the "glass" the took on the almost 90 degree curve! But unfortunately that wouldn't last. Apparently it shrunk a bit as it dried and kind of straightened out:

And here is the result. Its not exactly "crystal clear" (which is probably why its named "Kristal Klear"), it is a bit cloudy, but not that much more than clear styrene. Also, since it is a liquid, the thickness is not consistent. So there is a bit of a "ripple glass" effect to the window. So Micro Kristal Klear is still a strong contender for use in the final model. But before I make a final decision, I'm going to try some of your other suggestions. Yes sir! Lets try some of those other suggestions!

Thanks Bill!

Dandy

Saturday, January 29, 2011

Niles Project ~ How The Hecka?

I'm unable to get the clear styrene to conform to the curve of the corner windows in a satisfactory manner.

These Niles cars have these stylish curved corner windows. Curving almost a full 90 degrees. Quite a handsome feature if you ask me. If I can only get the glass (clear styrene) to curve that way too!

So I scoured the internets looking at all the nifty theories on bending styrene. I tried a bunch of them, finally building the above jig. How it works is, the styrene fits between the two pieces and then the whole shebang is put into the oven (I forget the temp). It kinda worked:

... but while that method might work fine for regular styrene, it caused the clear styrene to frost over. That might be fine for some folks, but you know me, everything has gotta to be overly realistic. I want to try for crystal clear.


So I'm asking for YOUR help, my dear readers. Below this post you'll find the "comment" button. If you have any ideas on how to fabricate and install curved window material, I sure would like to know. Please, click on that comment button and make you voice hoid! Yes sir! Make your voice heard!

Dandy


Monday, January 10, 2011

Niles Project ~ Christmas Headlights

Shaping Christmas lights LEDs to work as headlights.

Well a year ago I encouraged you all to seize on the end of Christmas sales to grab cheap LED's. Well, I should have known, but it turns out that...

... Christmas LED's come in different sizes (and colors). The bulbs I grabbed (left) are way too big to use as headlights. Fortunately, I have a good friend in John McWhirter who gave me some of his Christmas bulbs (right) that fit the Niles cars perfectly.

To get a good fit for the bulb in the headlight opening, a little shaping of the LED's leads is necessary. Then the tip of the bulb is shaped into a lens shape.

Looking through doorway to see the inside of the front, you can see how well the bulb fits into the hole. And how the leads are bent around the housing and then up the widow posts. Which brings up a little problem; does the window glass go over or under the leads? Obviously, the glass would look best pressed against the window frame. So the glass goes under the leads. Which means, the next step is installing the window glass. Yes sir! Installing the window glass is next.

Dandy

Wednesday, December 22, 2010

Inaugural Run of Birney #301.

SDERy Birney #301 makes it first public run!

The Southern California Traction Club set up its modules at the Great Train Expo this last weekend at the Fairplex in Pomona. I took the opportunity to fine tune #301 and was able to get it to run perfectly on the modules. It ran trouble free for hours. And of course I took plenty of video to share with you!:


The BullAnt motor is kind of noisy in this video but really its not that bad. To be fair, Hollywood Foundry who manufactures the BullAnt offered to replace it with their new and improved belt driven extra quiet BullAnt drive, an offer I hope that isn't too late for me to take them up on!

Because Birneys are a rather diminutive car, the Miniature By Eric trolley poles proved to be not quite long enough to reach the overhead. So one was swapped out with a rebuilt Bowser pole. In the video you can see how the new pole really presses against the overhead for good electrical contact. I'll post in the near future how to rebuild trolley poles.

So after all this time, it was quite satisfying to finally see this little guy make laps around the layout. Yes sir! Quite satisfying indeed!

Dandy

Monday, December 06, 2010

Niles Project ~ Applying Decals to #107

Now that the decals are made, I'm going to try a different technique of applying the decals so as to help them settle more easily into the wood slats.


Remember, decals have to be applied onto glossy surfaces. Since I painted #107 with Floquil paints, which dry dead flat, a coat of gloss has to be sprayed on to where the decals are going to go. AND the decals need to be sealed as well. So while I have the gloss in the airbrush, I'll coat the decals with it as well.


Okay, Floquil Hi Gloss has been applied to the decals and #107. While they dry let me recap the decaling of #105...

With #105 the decals didn't want to settle into the deep wood slats. Eventually, the parts of the decal with air under it will dry out and flake off. So I'll probably loose that part of the "5", and the 3D drop shadow of the "0", and the rose buds on the corner flourish of the pin stripping, etc.  So after discussing the matter with Don Ball, it was concluded that it was difficult for the air to escape from under the vast expanse of the decal paper. So he suggested cutting the decals closer to the printing:


With a new, sharp eXacto blade, I cut out the negative areas of the decals that didn't contain any printing. But while applying the decals, I had a horrible problems with the decals curling! I wasn't able to get any photos since I was frantically trying to get the decals to lay down flat and straight before they set. Some decals got so distorted that I had to scrape them off and print new ones. Now its quite possible that this happened because the decal paper I used is over a year old. Fresh paper might behave better, but I don't know for sure. But I'll be sure to start with fresh decal paper next time since decal paper doesn't cost and arm or a leg.


Decaled and sealed with Dull Cote. Over all it looks good! But under closer inspection, the pinstripes are a bit wiggly, air bubbles can be seen here and there, and the edges of the decals are visible. Hopefully, some of these imperfections will be hidden by a bit of weathering. But over all, its looking good. Yes sir! Looking good!

Dandy