Monday, June 29, 2020

№ 9 ~ Going for a Drive

A NWSL Stanton Drive that is.

     In a previous post I had mentioned that motoring this trolley would be the stumbling block for this project. But a Dan D. Sparks Blogspot reader Don Ball had commented that he has had luck with the  NWSL’s new DCC-ready, self-contained underfloor power unit. So after looking in to it I've decided to order one and give it a go.

A quick look, it looks like it should fit (somehow):

Specs:
H.O. Scale NWSL Stanton Drive Model 1215
8'0" Wheelbase
33"/110 Wheels

The 33" wheels are the smallest that NWSL offer. The original wheels on the model are 28". So I had to give a little there.
I also went with the 110 wheel width. Four wheel cars notoriously ride rough, model or prototype. So the wider wheel width should help the car successfully navigate the intersection every time.
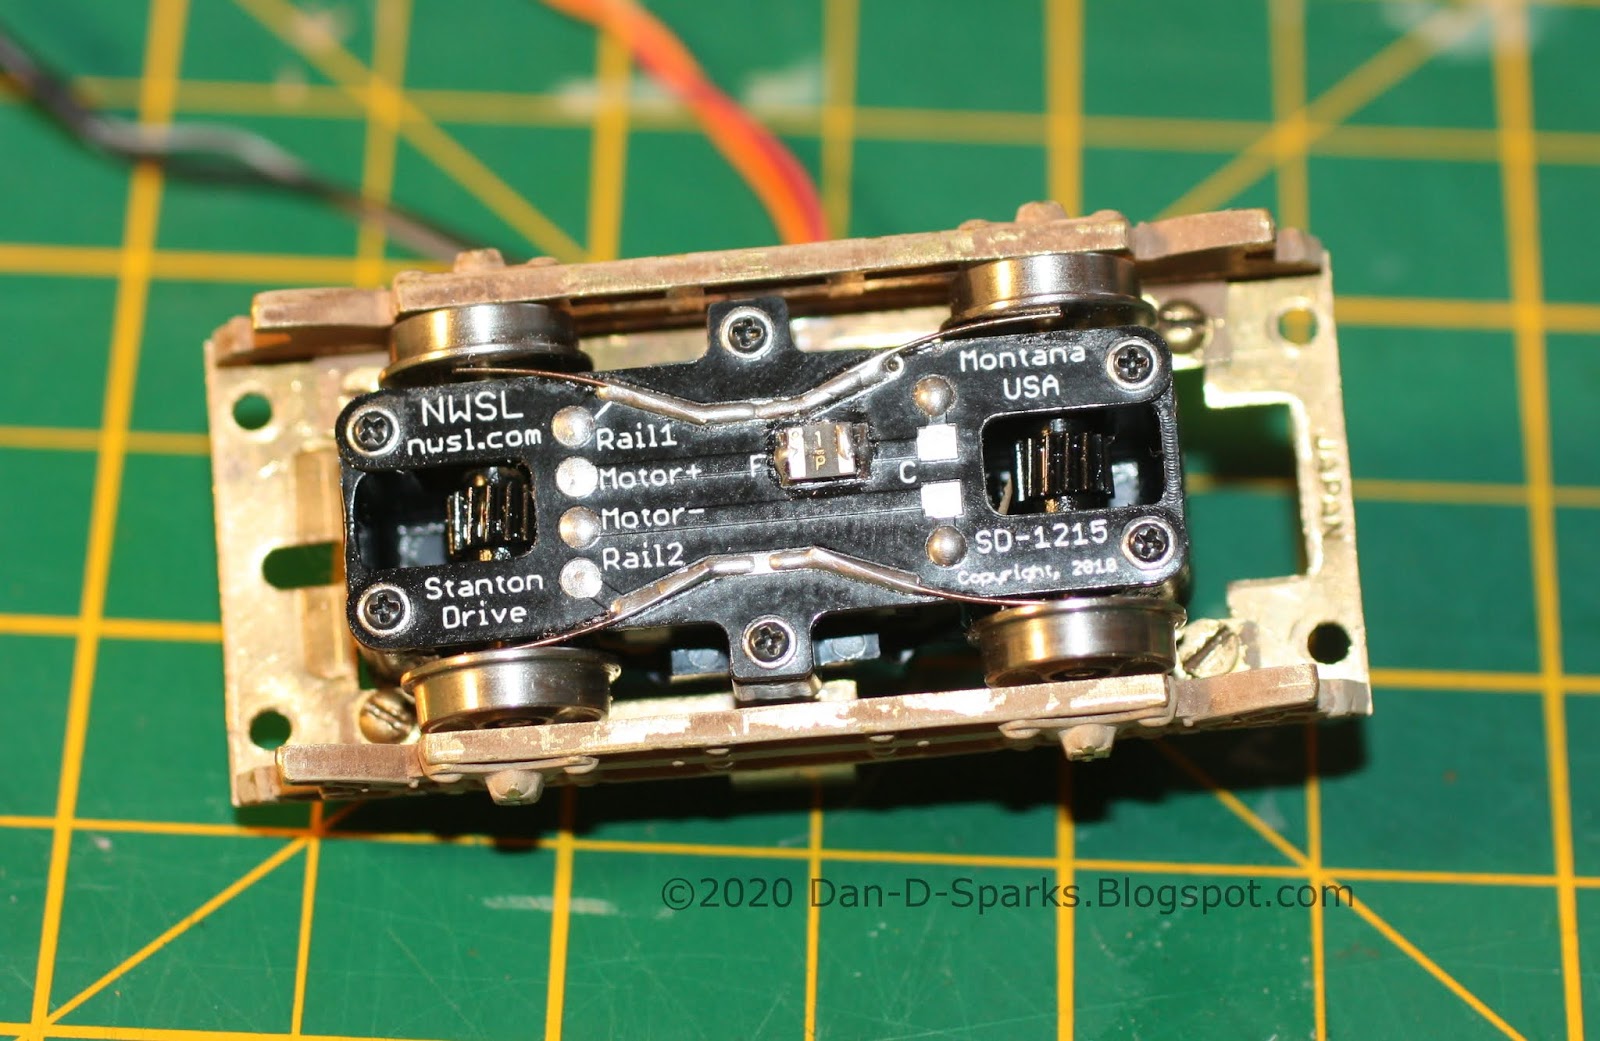

Just barely fits! Couldn't be any bigger. The corners of the Stanton almost touch the four screws holding on the side frames. If it was any bigger I would have had to find a different way of attaching the side frames.

The original floor had to be opened a bit to fit the Stanton. I was able to keep the original weight in place. A motor mount was fabricated for the Stanton to screw onto and hold it at the proper height.

An important thing to note is that the Stanton is not symmetrical in length. The housing was designed for two different wheel base sizes (probably 8'0" and 8'6" in this case). I have the smaller size so one of the wheel sets is closer to the pivot than the other. So Note to Self: The motor mounts one way (wires opposite side of pivot from the weight).

It's in there! What was once a formidable task is now in the past. Relief. Now it's time to move forward. Next: Decoder and a Pole.

Yes Sir! Keep moving forward!

Dandy

Monday, June 22, 2020

№ 9 ~ Decaled

Pinstripes and Neat Lettering Sure Add A Lot of Elegance to a Car.


For all those building their own SDERy #9, I make available to you the decal artwork. Click for the hi-rez version:


Well I'm pleased with how well its going with this car. So I have decided to press on with bringing it to fully operational completion. The next step is to see if I can fit a decent motor in it. Don Ball suggested a NWSL Stanton Drive for it, so I'm going to look in to that.

Yes Sir! Elegant!

Dandy

Monday, May 18, 2020

№ 9 ~ Straight Outta Paintshop

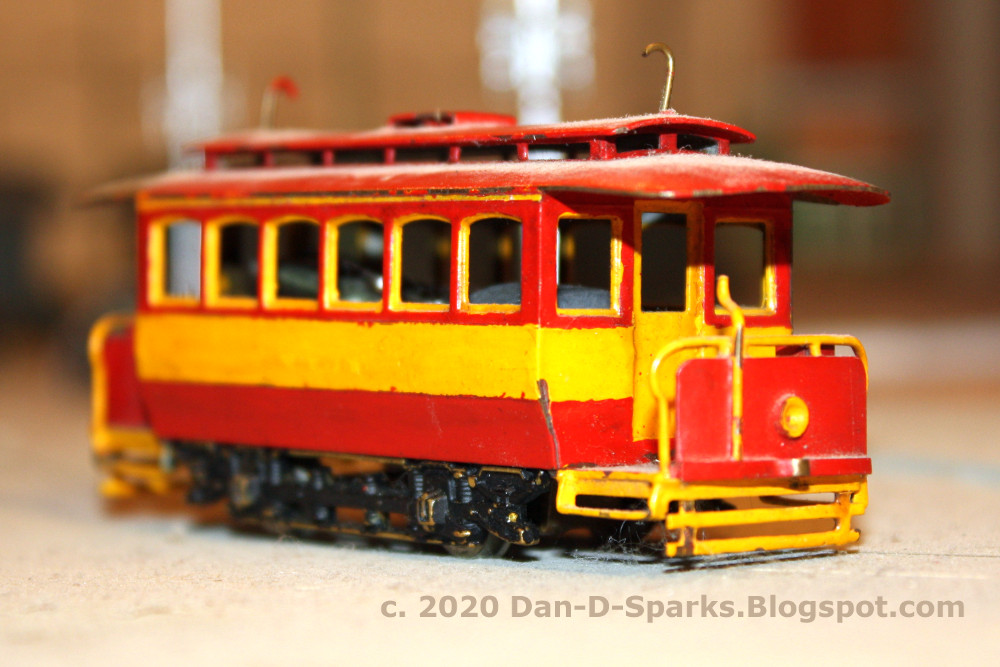
№ 9 Gets A Fresh Coat of Yellow and Brown Paint.

TruColor Reefer Yellow for the body color, Roof Brown for the trim, Foundation for the roof and trucks.

But first, the brass was cleaned and primered with TruColor Light Primer (to help the yellow show up).

After the interior and body were painted, I masked the whole thing except for the window frames and platform for the TruColor Roof Brown

Yikes! A lot of paint pulled off with the unmasking! Either: TruColor is a delicate paint, or I didn't wait long enough for the paint to cure (24 hours), or I should have sprayed a sealer coat on first. Anyway, touch ups required.

But, the whole reason for this exercise, what initiated this project in the first place, was to try out TruColor Reefer Yellow as SDERy Yellow. And you know, its pretty darn close if it doesn't actually nail it!

Yes Sir! Might of nailed it!

Dandy

Monday, May 04, 2020

LMB Old Time Trolley

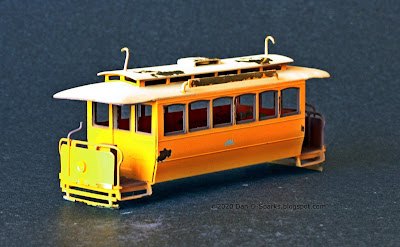
Sizing up an Old Model to Rebuild into SDERy #9

Last post I determined which cars I'm going to use for my fleet. But as I was retrieving them from my collection I came across this old Old Time Trolley "basketcase" model I purchased from George Jones. My first thought was to try out some Tru-Color Reefer Yellow on it to see if its a good color to represent SDERy Mission Yellow. But the more I look at this car...

 
I believe this is be an old LMB "Open End Trolley" model from c1961.

The model is very similar in appearance to SDERy #9 and #10.

Built by Brill in 1892, #9 and #10 ran for 17 years before they were retired in 1909.


A side-by-side comparison reveals that the windows on the model are too short as well as is the roof. Other than that though its pretty darn close.  I think that the model captures the feeling of the prototype quite well.

So into the Pine-Sol bath it went to strip it of paint.

I also fabricated route signs for the sides of the roof.

I guess I'm moving forward with this project! But I'm not sure how far I'm going to be able to get with it, motoring this model seems to be a stumbling point. But so far I'm committed to painting and decaling it. After that, we'll see where this goes

Yes Sir! We'll see where this goes!

Dandy


Monday, April 27, 2020

Determining the Content of the Fleet

This is part 2 of the "Determining the Basic Fleet Series". In part 1 I estimated that 16 cars would be required to fill the layout. Now the question is:


Just Which 16 Cars Should I Model Anyway?


Browsing though the history books of the San Diego Electric Railway and seeing the variety of cars, it is so easy to just want them all!

But that's not practical.

So what is practical? Build models that are commercially available now. Scratch build later.

So using that parameter, here is my breakdown of the 16 cars:


QTY
Make
Model
3
Pacific Traction
400 Series Class 5
3
Andrew Chier
Unannounced project
3
Bachmann
Birney
3
Suydam
Niles
3
TBD
PCC
1
NJ Custom/Orion
3rd Ave Railway 400 Series

Suydam Niles, Pacific Traction 400, WP PCC, Orion 3rd Ave Car, Ken Kidder Birney

You know, seeing this list, suddenly building a fleet doesn't seem like too huge of a project. 
This actually feels downright doable.

Yes Sir! Downright doable!

Dandy


Wednesday, April 22, 2020

Estimating the Size of the Fleet

Just How Many Cars Are Required To Populate This Layout Anyway?


Considering the time and expense that goes into completing just one single car, I would like to focus on building a basic fleet.

Suydam Niles, Pacific Traction 400, WP PCC, 3rd Ave Car, Ken Kidder Birney

The Maths:


The layout is designed for automated operation. Given that there are 4 city blocks each divided into 8 detection blocks, this makes for a total 32 detection blocks (the main intersection is the 33rd block and is undetected- once a car is cleared to enter the intersection it does not stop.).


I estimate that for maximum traffic and yet smooth operation* only half the 32 blocks should be occupied by a car. That way generally each car has an empty block ahead of it. 

So a car on every other detected block makes for 16 cars.


The Answer:


16 cars:  motored, poled, painted, decaled, decodered, and detailed, to make for a maximum traffic operating session (though it might be fun to add that 17th car to see what happens with congestion ;) ).

Yes Sir! It might be fun!

Dandy


* Theoretically, the layout could "run" a maximum of 31 cars, but only one car would be moving at any given time. Basically it would be moving that one empty block around the layout.

Monday, September 26, 2016

New Auxiliary Control Panel

A Quick and Dirty Control Panel for the New DCC Turnout Controls.

The old DC NJ International Turnout Machines are being replaced by Tam Valley Depot Singlet DCC Decoder and Servo Drivers. So as a result a new control panel is required for the Fascia Decoders.

Control Panels are way easier to make these days with a computer and printer compared to the old mask and paint method.

This new panel is drawn with the free vector graphics program Inkscape. This time I included labeling for the electrical isolated blocks as well as a letter designation for each of the four city blocks.

The drawing was then printed out and glued to 1/8" Masonite Board. And then drilled to accommodate the Servo Decoders. Done! Easy peasy. Well... except now comes the wiring!


This new auxiliary panel provides a manual way to control the turnouts since primary control of the layout will be controlled by the computer. But I know computers, and my experience with computers has taught me that a manual alternative would be a wise thing. Yes sir! A wise alternative!

Dandy

Thursday, March 10, 2016

Track ~ Electrically Isolated Blocks

DC Block Control, Eliminated, and then Revived...

Gaps in the rails.  Originally designed for DC Block Control, DCC eliminated the need for these electrically isolated track blocks.

Power bus. A bare wire is run under the layout following the cloverleaf pattern of the track above to tie all the block wiring together.

Block Detection for Automation. Putting those old blocks to good use, they can be used to give feedback to loconet for use in running the layout automatically or semi-automatically.

Yes Sir! Running the layout automatically!

Dandy

Monday, February 01, 2016

TCS Keep Alive DCC Decoders

Installing A DCC Decoder In A Poor Running Model Yields Surprising Results!

One of the advantages touted by DCC proponents is that it improves the performance of motors. So I decided to add a TCS Keep Alive Decoder to my poorest running model to see how it fares:

A Huntington Standard by Oriental Models.
It features a crappy open-frame motor and all brass gears ( usually alternating brass gears with plastic gears produce much better performance).

And wouldn't you know it, I was able to get decent performance out of it. In this short video I was able to run the car around the block with some realism:


Yes sir! Decent performance!

Dandy


Tuesday, January 05, 2016

Digi for the Trax

Santa Baby Was Good To Me!

Digitrax DCS 51

It's official, the layout has gone digital. Though DC was fun, playing keep-away by only using the turnouts...:


...but it's time to start implementing realistic operation. So DCC it is!

To make a quick connect/disconnect between the command station and layout I purchased these XLR Connectors. They seem able to handle any maximum amperage the command station should dish out.

Under the layout shot. The female XLR Connector was mounted to a small project box and then wired to the layout. The male in-line XLR Connector was wired to a 16awg 3 conductor cord (positive, negative, neutral) which is wired to the Command Station.

.We are now DCC ready. Yes sir! DCC ready!

Dandy

Tuesday, December 08, 2015

Oh No! The Rubber Broke!

Apparently, Rubber molds have a shelf life.


Half way through the casting of the street lamps needed for Grand Ave, the rubber mold decides to completely fail.

Now it could be I didn't use enough release agent. But the mold also cracked (Maybe the sun got to it? UV rays are so destructive!). So I'm sure its at the end of its shelf life.

So the next time I make a mold, I have got to make all the casting right away.
Yes sir- Right away!

Dandy

Monday, November 02, 2015

Well Whatdaya Know ~ All Rubber Are Not Alike

Quality Rubber - That's The  Secret Ingredient For A Successful Mold.

      What with the Backesto Bits already to go, its time to make a mold of them all. But when I went to go fetch the left over rubber compound from the Streetlamp Project, I found it has a short shelf life and had hardened.

Anxious to move forward with this project, I stopped by the craft store to pick up some of their casting rubber~ Amazing Mold Rubber. And after some time and effort, well... I found it ain't so amazing. I'm sure its fine for most crafts, but not for precision casting. In a nutshell, it shrinks!

Recycling the box from the streetlamp project, it turned out to be just the right size for this project.

There it is! In all its pink glory. Or so I thought.


The shelf life of the resin is much better. It cast just fine and faithfully with no shrinkage. But when I compared the castings with the originals, there was about 10% shrinkage with the "Amazing" rubber.

So, I'll pay the small extra for the much better quality of the Oomoo rubber compound. Lesson learned.
Yes sir! Lesson learned!

Dandy

Monday, October 12, 2015

Structures~ Backesto Bits

I've seen folks make 3D prints of small buildings, but not of larger buildings. I'm a little skeptical how they would turn out. But casting parts isn't out of the question.

Windows, doors, columns, cornices, and chimneys.

There are some seriously repeating patterns on this building. So my plan is to build one and cast many.


I first built a window with 3D Studio Max so that I could get a 3D print of it and cast that. But for some reason Max has issues with Shapeways and et al.

So the heck with it! I'm going to build them up with styrene. These things are tiny in HO scale, I had to apply the cement with a syringe!

I think I've got everything. The next step will be to make a rubber mold of these and then I can cast as many bits as I need.

Yes sir! Cast as many bits as I need!

Dandy

Tuesday, September 22, 2015

I Ain'ts Done Yet!

The 9th Annual State of the Company, Board of Directors Meeting of 
 The Dan D. Sparks Plywood Development and Transportation Co. 
A Dubiously Structured Corporation (the “Company”) 
Held on 22nd September 2015, 10:ish AM Arbitrary Daylight Time 
at the Car House Tavern, San Dollar, California.


 Board Members Present: 


President:                           Dan D. Sparks
Chairman:                          Lettuceleaf M. Malone
Traffic Manager:                Robin DeRail
Finance Manager:              Count DeMonet
Director of Development:   Arnie Clever
General Manager:              David Lyman
Quorum present?                Who can tell?

Others Present:
Man of Mystery:                  Fred Gurzeler
Technology Genius:            Volkmar Meier
Company Orchestra leader:     Bill Bolton Orchestra & Surf Band

Absent:                     Effort

 Proceedings:
· Chair, Lettuceleaf M. Malone called the Meeting to order at some point.
- Secretary Mrs, Roundbottom recorded the minutes between sipping her Gin Fizz .

 · Secretary Roundbottom presented to the Board the minutes of the Sept. 2014 meeting of the Board for approval, whereupon motion duly made, seconded and toasted with another round of drinks.


Opening Message from Chairman:

 Lettuceleaf  Malone

Pompous windbags - The whole lot of them! I (Secretary Roundbottom) am supposed to be recording the speeches of these gentlemen, but between these marvelous Gin Fizz's and all this bellowing, I just can't be bothered. Truth be told they are all a lazy lot. Between Mr. Sparks racing his yacht (or whatever these moguls do), Mr Malone playing the ponies, and General Manager Lyman always loitering at the Nickelodeon and doodling cartoons all day, its amazing this enterprise is afloat at all! 
Well, I suppose I should pay attention and record these proceedings. At the very least it should be entertaining to listen how these gentlemen will endeavor to put a positive spin on such a dismal year! So if anyone is interested here you go:


· Traffic Managers Report  Provided by Chair:

Robin DeRail

Aye! The programs I instituted to remove nefarious characters and scalawags from eating up valuable bandwidth from this blog has been highly successful! See for yerselves:

Unique weekly blog hits (visitors, not page hits) from 9/22/2014 to 9/21/2015:
  • Overcrowded cars have been cleared out nicely! This blog hosted 3,294  visitors this last year (Sept. 2014 to Sept. 2015). That's down from a crushing 4,930 last year, and 3,355 the year before that. They visited 5,521 times, down from 8,960 times last year and 6,621 times the year before that. That makes for an all time grand total of 42,154 visitors. I'm quiet proud of that I am! 
  •  This blog is now averaging 21 visitors per day. These viewers of quality have a much longer attention span!  Their attention has increased to over 2 minutes (2:09 minutes)! That's down from 29 average daily viewers watching for an average of only 1:58 last year! 
  • Due to the way Google displays data now, it is no longer possible to ascertain what the top 3 posts for last year were. But it is possible for an all time basis, which are:
  1. A Grand Union Intersection In Action!     2,351 views
  2. The Adventures of Bending Wood        1340 views
  3. #426 Project ~ Cleaning and Preparing Brass for Painting     936 views
So to sum up: Less loiterers, and more viewers of quality! Aye!


· Finance Committee report provided by Chair:    

 Count DeMonet

A happy side effect of reduced ridership has been less heavy coins in the fairbox for the cars to have to carry around (It takes two large men to carry one of those!). The company should be seeing some significant savings from the reduction of weight!
  • The Count reported that revenue earned took a dive to an average of $0.03 per day, down from an average of $0.05 per day last year and $0.06 per day the previous year.
  •  DeMonet continued with that the annual earnings for this last fiscal year came in at $10.18. Down from $19.43 last year and $22.78 the previous year. This now brings the grand total to $91.87. Google won't pay out until that total reaches $100, expected sometime this next "fiscal year" (Sept. to Sept.). The Board has agreed that the money will be put towards a DCC system for the layout. 

· Board Development Committee's report provided by Chair,      

Arnie Clever
  • Mr. Clever expressed his dissatisfaction that nobody listens to him and his planning has come to naught. 
  • Despite this situation however, Arnie has carried forth and has been looking into robotics and automation with promising results. Some of which shall be instituted in the very near future!

Mr. Sparks' closing speech summed up his concern that the company has been seriously neglected and it's time to roll up our sleeve and make some significant progress on the layout.

And with that, Orchestra leader Bolton struck up the Orchestra/Surf Band with a rendition of Tales of a  Raggy Tramline:


· Meeting adjourned around Noonish.
· Minutes submitted by a very tipsy Secretary, Mrs. Roundbottom.


Monday, May 04, 2015

Structures ~ The Backesto Block Building

Dimensional Drawings for Modeling the Backesto Block Building

Here is my working drawing for constructing a model of the Backesto Building for the layout. I'm starting with this building for a couple reasons. One, its one of the most ornate buildings, thus more time consuming to build. So I want to get it out of the way early. And Two, for its historical significance:

The Backesto Building figures prominently in this photo of the opening day of the San Diego Electric Railway. I greatly desire to duplicate this scene in model.


Originally built in 1873 it was San Diego's finest building at the time. It was later expanded a couple of times.

Amazingly, the Backesto Block remains intact today as part of San Diego's Historic Gas Lamp Quarter! Although without all those chimneys (probably an earthquake hazard). The building is about 224 feet long with another 84 foot addition (to the right). I don't have that kind of space so my model will be an abbreviation of that at 70 scale feet.

I photographed the building extensively for the dimensional drawing. I tried to get shots that not only reveal the layout of the building but also the profile of the building.

Did I mention the building is ornate?

The head-on shots show the layout of the building of course, but I also need shots that reveal how far details protrude from the walls.

I lucked out and found this old newspaper clipping revealing how the roof of the Backesto looked in the 1880s. I would have never guessed that pitched roof design hidden behind the parapet.

Early Modeling Attempt

You've probably noticed this building appearing in the background of some layout construction shots. Its my very early attempt to build the Backesto, I'm talking decades ago! Its pretty crude, one of my first attempts to scratch build with styrene. But the fact its held up so well for so long is a testament to the strength of styrene. Its good stuff!

The structure is a corner building, so here is the South side. One of the expansions is suggested on the left. During the Backesto's early years it had a couple of blank walls that had advertisements painted on them.
The era I'm modeling (1890s), Schiller and Murtha occupied the ground floor.

I think the Backesto Block building is a gorgeous building. I'm looking forward to modeling it. This time as a fine model. Yes sir! A fine model!

Dandy